Table of Contents
Streamlit makes it super easy to build apps superfast. But what if you want to add a simple login system that works with your company’s existing SSO, like Microsoft or Google? You can still build awesome internal tools fast while making sure only the right people have access.
With Streamlit OAuth, your app can hook up with providers like Microsoft or Google, letting users log in with their work credentials.
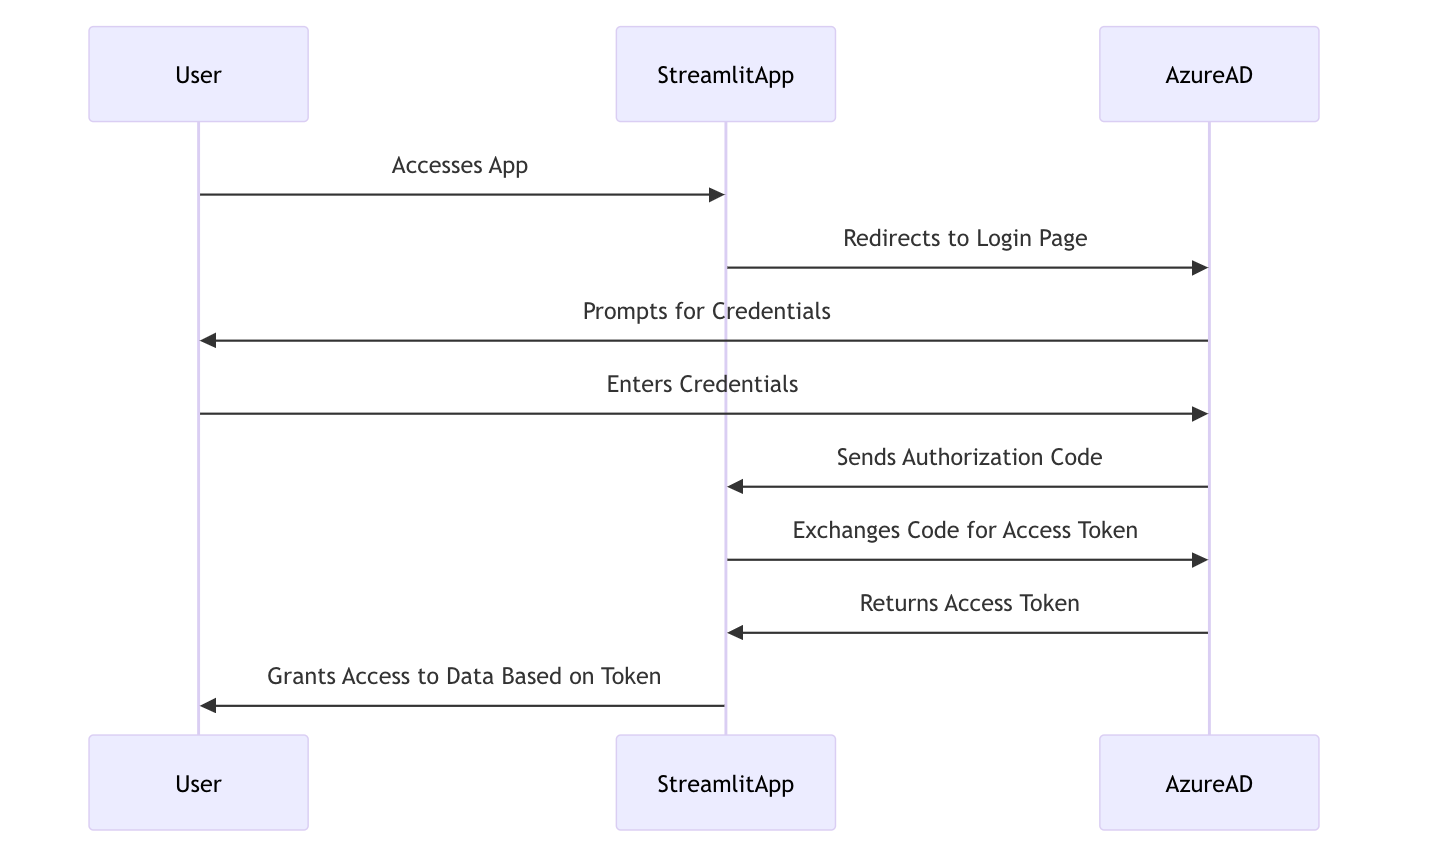
For businesses, this means - build internal apps lightning fast and then secure them easily with existing auth systems. Now that we know how Streamlit OAuth with Microsoft or Google SSO can help in an enterprise setup, let’s break down the login flow, from when someone first opens the app to when they can start using it securely.
- User Accesses the App: When a user navigates to the Streamlit app, they are prompted to sign in with their Microsoft account (e.g., Outlook, Hotmail).
- OAuth Redirect: Upon clicking the login button, the app redirects the user to the Azure AD login page.
- User Authentication: Azure AD handles authentication, verifying the user's credentials.
- Authorization Code: Once authenticated, Azure AD generates an authorization code and sends it back to the Streamlit app.
- Token Exchange: The app exchanges the authorization code for an access token, which represents the user’s permission to access specific data.
- User Data Access: Using this token, the app can securely fetch and display authorized data without requiring further logins.
Now, let’s move on to the practical steps to set up this integration in your Streamlit app.
Step-by-Step Guide to Setting Up Streamlit OAuth with Azure AD
1. Install Streamlit OAuth
Before using Streamlit OAuth, you need to install the package. Run the following command to install it via
pip install streamlit-oauth
This command will install the package along with its required dependencies.
2. Set Up Azure AD for OAuth2 Authentication
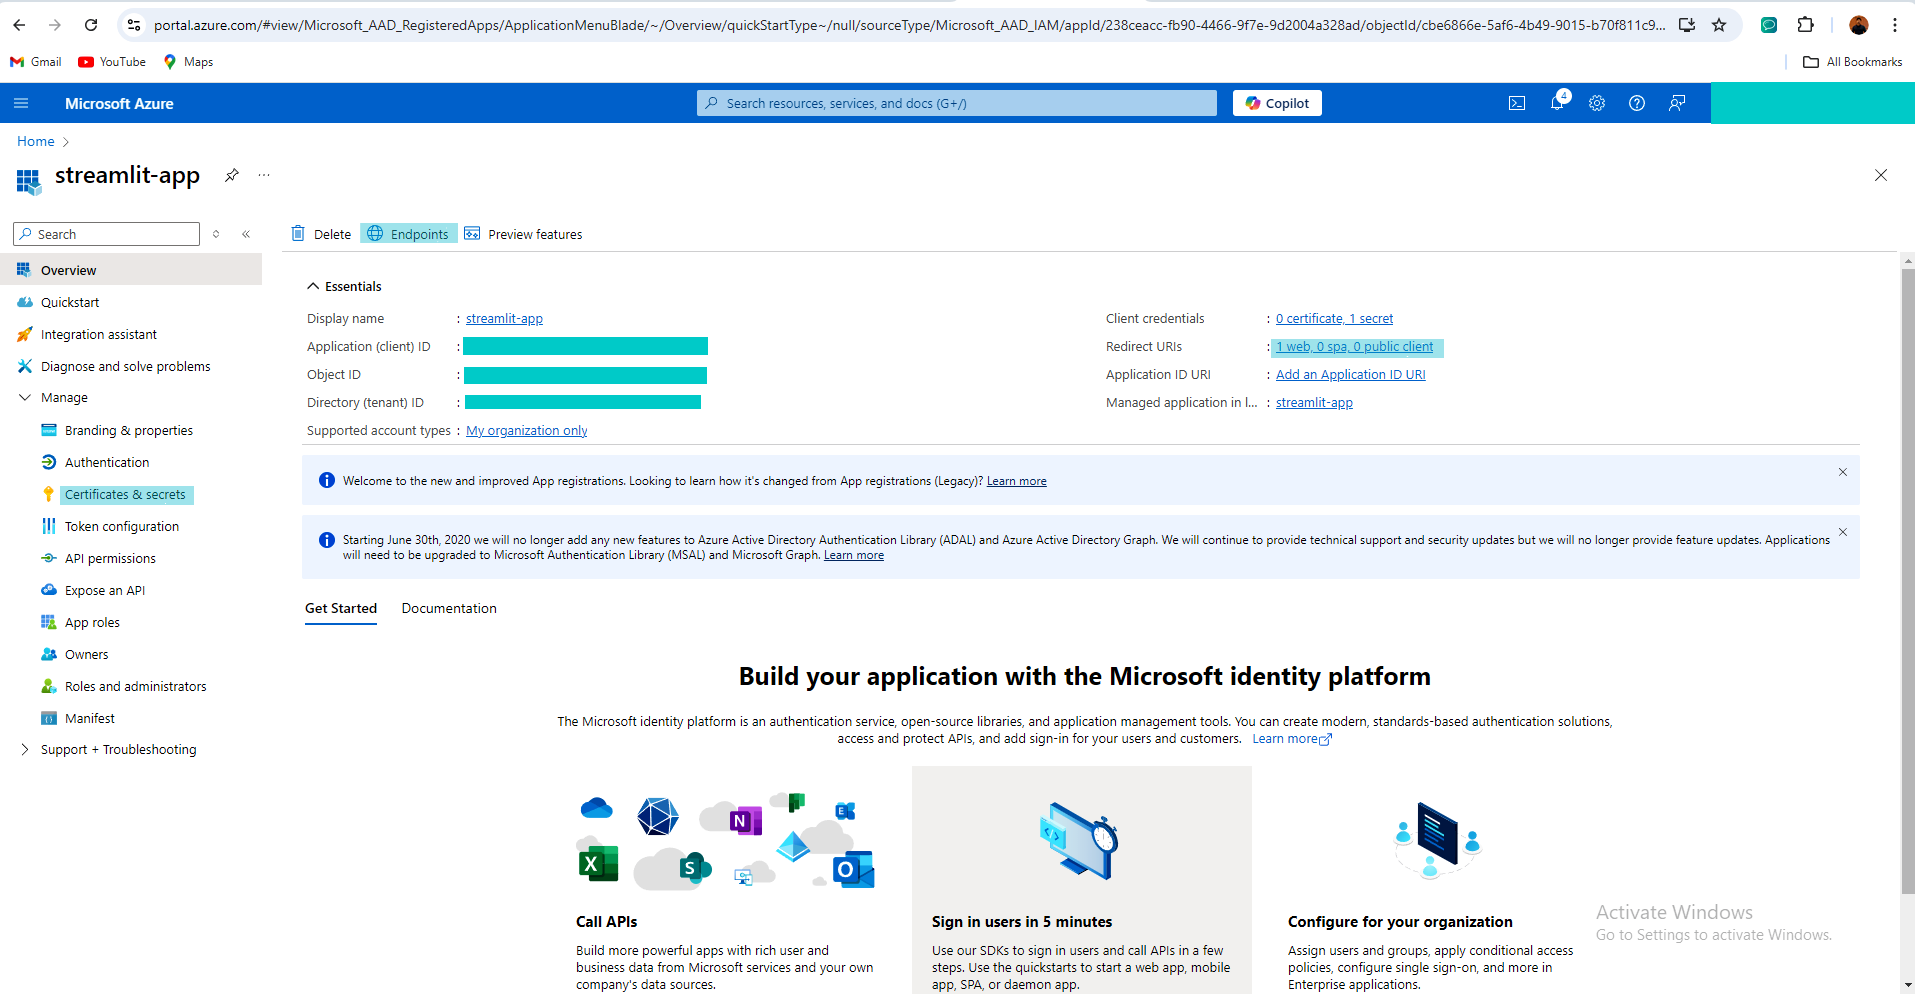
To set up Azure AD and register your application for OAuth2 authentication, follow the guide in this Microsoft Documentation.
This step involves:
- Registering your application in Azure AD.
- Obtaining the Client ID and Tenant ID.
- Generating a Client Secret.
The documentation provides all the necessary steps to configure your Azure AD instance.
3. Create the .env File for Azure AD Settings
After installing the package, we need to configure the OAuth2 settings. This is done using a .env file, which securely stores the configuration details. Create a .env file in your project directory.
touch .env
Open the .env file and add your Azure AD credentials as shown below:
# Azure AD OAuth Settings
AUTHORIZE_URL=https://login.microsoftonline.com/<your-tenant-id>/oauth2/v2.0/authorize
TOKEN_URL=https://login.microsoftonline.com/<your-tenant-id>/oauth2/v2.0/token
REFRESH_TOKEN_URL=https://login.microsoftonline.com/<your-tenant-id>/oauth2/v2.0/token
REVOKE_TOKEN_URL=https://login.microsoftonline.com/<your-tenant-id>/oauth2/v2.0/logout
CLIENT_ID=<your-client-id>
CLIENT_SECRET=<your-client-secret>
REDIRECT_URI=http://localhost:8501/component/streamlit_oauth.authorize_button
SCOPE=openid profile email offline_access- AUTHORIZE_URL: The authorization endpoint URL for Azure AD.
- TOKEN_URL: The endpoint for obtaining the access token after authentication.
- REFRESH_TOKEN_URL: The URL for refreshing the access token.
- REVOKE_TOKEN_URL: The URL for revoking tokens.
- CLIENT_ID: Your app's client ID from Azure AD.
- CLIENT_SECRET: The secret generated in Azure AD for your app.
- REDIRECT_URI: The URL to redirect the user to after successful login (in this case, it’s the local Streamlit app running on
localhost). - SCOPE: The permissions your app needs, such as access to email, profile, and offline access (for refresh tokens).
4. Create the Streamlit App (app.py)
Now, let's create a simple Streamlit app (app.py) that will use OAuth2 to authenticate users via Azure AD.
import streamlit as st
from streamlit_oauth import OAuth2Component
import os

# Load environment variables from .env file
from dotenv import load_dotenv
load_dotenv()

# Set environment variables
AUTHORIZE_URL = os.environ.get('AUTHORIZE_URL')
TOKEN_URL = os.environ.get('TOKEN_URL')
REFRESH_TOKEN_URL = os.environ.get('REFRESH_TOKEN_URL')
REVOKE_TOKEN_URL = os.environ.get('REVOKE_TOKEN_URL')
CLIENT_ID = os.environ.get('CLIENT_ID')
CLIENT_SECRET = os.environ.get('CLIENT_SECRET')
REDIRECT_URI = os.environ.get('REDIRECT_URI')
SCOPE = os.environ.get('SCOPE')

# Create OAuth2Component instance
oauth2 = OAuth2Component(CLIENT_ID, CLIENT_SECRET, AUTHORIZE_URL, TOKEN_URL, REFRESH_TOKEN_URL, REVOKE_TOKEN_URL)

# Check if token exists in session state
if 'token' not in st.session_state:
    # If not, show authorize button
    result = oauth2.authorize_button("Authorize", REDIRECT_URI, SCOPE)
    if result and 'token' in result:
        # If authorization successful, save token in session state
        st.session_state.token = result.get('token')
        st.rerun()
else:
    # If token exists in session state, show the token
    token = st.session_state['token']
    st.json(token)
    if st.button("Refresh Token"):
        # If refresh token button is clicked, refresh the token
        token = oauth2.refresh_token(token)
        st.session_state.token = token
        st.rerun()
Explanation of the Code:
- Load Environment Variables: The
dotenvlibrary loads variables from the.envfile, ensuring your OAuth2 credentials are securely stored. - OAuth2Component: This component handles the OAuth2 authorization flow.
- Session State: We store the token in Streamlit’s session state after successful authorization to maintain authentication for the user.
- Authorize Button: If no token is present, an authorization button is shown. After clicking, the user is redirected to Azure AD to log in, and upon success, the token is saved in the session.
- Token Display: If a token is present, it will be displayed in JSON format. The app also allows refreshing the token.
5. Run the Streamlit App
Finally, run the Streamlit app using the following command:
streamlit run app.pyYour app will be accessible at http://localhost:8501. After clicking the "Authorize" button, users will be redirected to the Azure AD login page. Upon successful login, the tokens will be displayed, and you can use them for accessing protected resources.
Github: GitHub - kubenine/streamlit-oauth-demo
Benefits of Using Streamlit OAuth
- Seamless Integration: With just a few lines of code, you can integrate secure OAuth2 authentication into your Streamlit apps. This makes it easy to incorporate services like Azure AD for user authentication.
- Security: By leveraging OAuth2, you ensure that sensitive user information, like passwords, is never directly handled by your app. Instead, Azure AD manages the authentication process, and your app only receives tokens.
- Access to External Data: Once authenticated, users can securely access protected data from other applications. This can enhance the interactivity of your Streamlit app by allowing it to fetch real-time data from third-party services.
- Refresh Tokens: Streamlit OAuth provides built-in support for refresh tokens, allowing your app to renew access tokens automatically without requiring the user to log in repeatedly.
Conclusion
Integrating Azure AD with Streamlit using OAuth adds security and gives users a straightforward login experience with their Microsoft accounts.
By setting up this secure login system, you’re creating a user-friendly app that’s both accessible and safe—whether for personal projects or larger organizational use.
If managing authentication, scaling, or infrastructure feels like a lot to take on, KubeNine can step in to help. We specialize in building and supporting cloud-ready applications with expertise in DevOps, Kubernetes, AWS, and more.
Let our team handle the technical side so you can focus on building great products. Know more at kubenine.com
New to streamlit? Checkout our other articles exclusively based on streamlit:
https://www.kubeblogs.com/streamlit-authentication/
https://www.kubeblogs.com/streamlit-cloudwatch-logs/


