Table of Contents
Introduction
Running multiple production environments in a single Kubernetes cluster creates a critical challenge: ensuring resource-level isolation for high-priority customers and critical workloads. When three broad production environments share one EKS or GKE cluster, a resource-intensive deployment in one environment can impact performance and availability for others. This scenario is common in enterprise environments where cost efficiency demands cluster consolidation, but business requirements demand strict isolation.
Traditional approaches like separate clusters per environment solve isolation but multiply infrastructure costs and operational complexity. Namespace-based isolation provides logical separation but doesn't prevent resource contention at the node level. When a critical customer's workload needs guaranteed CPU and memory, namespace boundaries alone aren't sufficient.
The solution lies in strategic node pool configuration with Kubernetes taints, tolerations, and node selectors. By creating dedicated node pools for each environment and using taints to prevent cross-environment pod scheduling, organizations achieve true resource isolation while maintaining a single cluster's cost and operational benefits. This approach ensures that environment-specific workloads run only on designated nodes, preventing resource contention and providing predictable performance for critical customers.
Implementing this strategy requires careful configuration of node pools, deployment tolerations, and special handling for DaemonSets and system pods. The result is a production-ready architecture that delivers both isolation and efficiency—exactly what enterprises need when managing multiple high-stakes environments in a consolidated infrastructure.
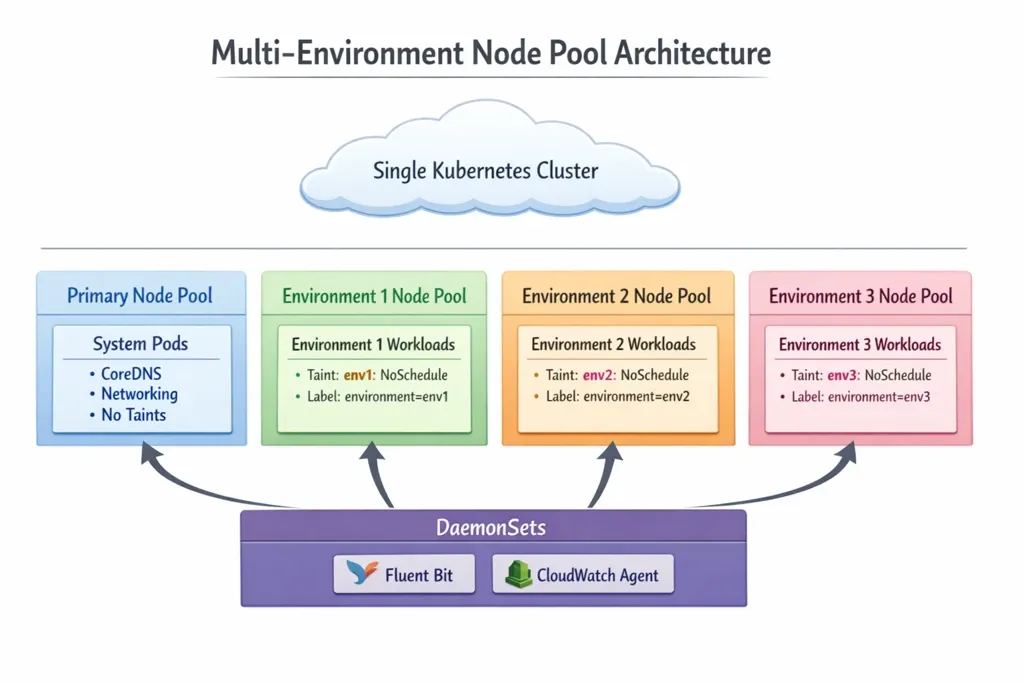
Understanding the Architecture
The multi-environment node pool strategy creates isolated compute resources within a single cluster through dedicated node pools, each configured with environment-specific taints and labels. This architecture provides resource-level isolation while maintaining operational simplicity.
Why This Approach Over Separate Clusters?
Separate clusters provide complete isolation but come with significant overhead:
- Cost Multiplier: Each cluster requires its own control plane, networking, and management infrastructure
- Operational Complexity: Multiple clusters mean multiple configurations, updates, and monitoring dashboards
- Resource Inefficiency: Fixed overhead per cluster reduces overall resource utilization
The node pool strategy delivers isolation at the compute layer while sharing:
- Single control plane for unified management
- Shared networking and service mesh infrastructure
- Consolidated monitoring and observability tooling
- Simplified CI/CD pipelines with single cluster context
This approach is ideal for organizations that need isolation for compliance, customer SLAs, or workload characteristics while optimizing for cost and operational efficiency.
Step-by-Step Implementation
Step 1: Node Pool Configuration
Configure separate node pools in your EKS or GKE cluster using Terraform. Each environment gets its own node pool with a unique taint and label.
Terraform EKS Module Configuration:
# Primary node pool for system pods
module "eks" {
  source = "terraform-aws-modules/eks/aws"

  cluster_name    = "production-cluster"
  cluster_version = "1.28"

  # Primary node pool - no taints, for system pods
  node_groups = {
    primary = {
      desired_size = 2
      min_size     = 2
      max_size     = 4

      instance_types = ["t3.medium"]

      labels = {
        node-pool = "primary"
        purpose   = "system"
      }

      # No taints - system pods can schedule here
    }

    # Environment 1 node pool
    env1 = {
      desired_size = 3
      min_size     = 2
      max_size     = 10

      instance_types = ["m5.large"]

      labels = {
        environment = "env1"
        node-pool   = "env1"
      }

      taints = [
        {
          key    = "environment"
          value  = "env1"
          effect = "NO_SCHEDULE"
        }
      ]
    }

    # Environment 2 node pool
    env2 = {
      desired_size = 3
      min_size     = 2
      max_size     = 10

      instance_types = ["m5.large"]

      labels = {
        environment = "env2"
        node-pool   = "env2"
      }

      taints = [
        {
          key    = "environment"
          value  = "env2"
          effect = "NO_SCHEDULE"
        }
      ]
    }

    # Environment 3 node pool
    env3 = {
      desired_size = 3
      min_size     = 2
      max_size     = 10

      instance_types = ["m5.large"]

      labels = {
        environment = "env3"
        node-pool   = "env3"
      }

      taints = [
        {
          key    = "environment"
          value  = "env3"
          effect = "NO_SCHEDULE"
        }
      ]
    }
  }
}
Key Configuration Points:
- Primary Node Pool: No taints allow system pods (CoreDNS, networking) to schedule freely
- Environment Node Pools: Each has a unique taint with
NO_SCHEDULEeffect preventing unqualified pods - Node Labels: Used by node selectors to direct deployments to correct pools
- Taint Format:
environment=<env-name>:NoScheduleensures only pods with matching tolerations can schedule
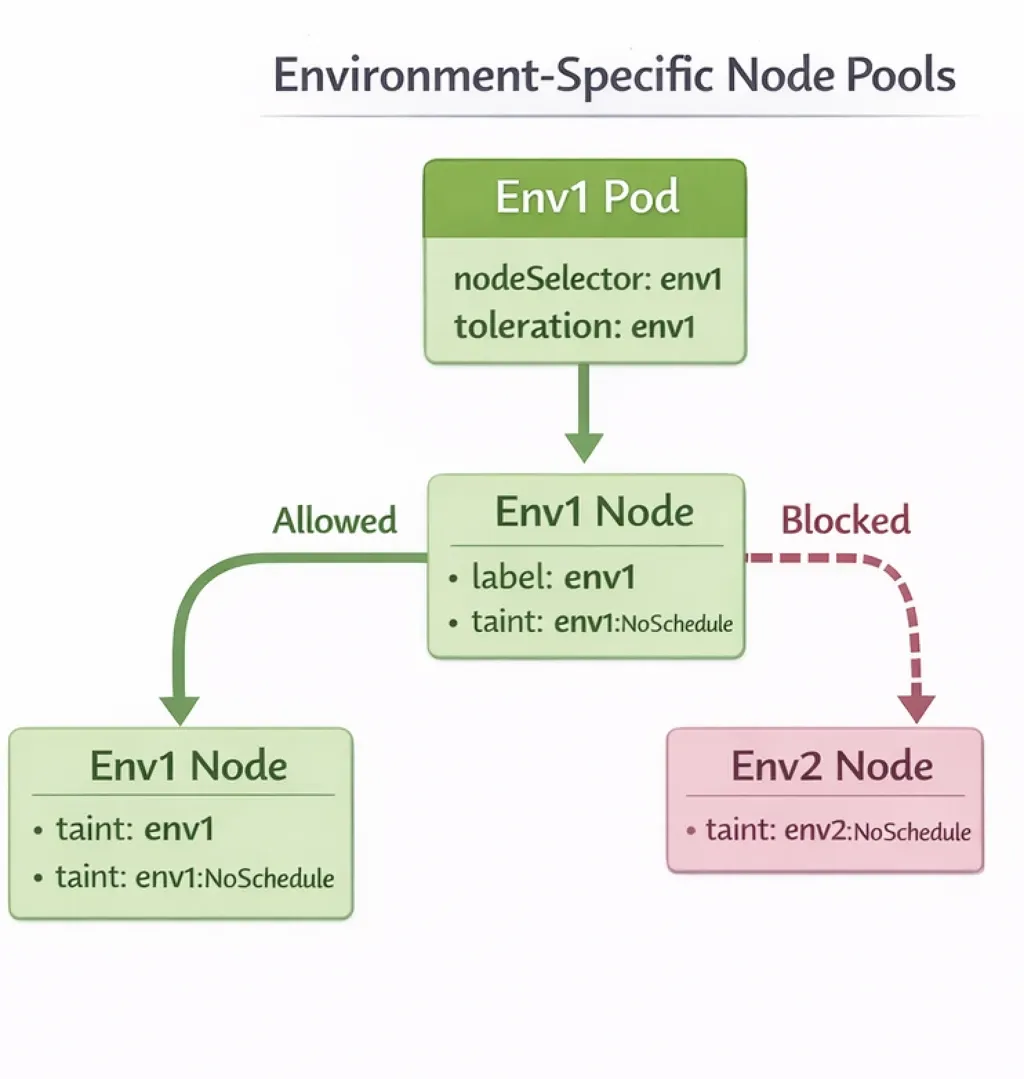
Step 2: Deployment Configuration
Configure your application deployments with node selectors and tolerations to ensure they schedule on the correct node pool.
Environment 1 Deployment Example:
apiVersion: apps/v1
kind: Deployment
metadata:
  name: customer-app-env1
  namespace: env1-production
spec:
  replicas: 3
  selector:
    matchLabels:
      app: customer-app
      environment: env1
  template:
    metadata:
      labels:
        app: customer-app
        environment: env1
    spec:
      # Node selector ensures pods try to schedule on env1 nodes
      nodeSelector:
        environment: env1

      # Toleration allows scheduling on tainted env1 nodes
      tolerations:
      - key: environment
        operator: Equal
        value: env1
        effect: NoSchedule

      containers:
      - name: app
        image: myapp:latest
        resources:
          requests:
            cpu: 500m
            memory: 1Gi
          limits:
            cpu: 2000m
            memory: 4Gi
Environment 2 Deployment Example:
apiVersion: apps/v1
kind: Deployment
metadata:
  name: customer-app-env2
  namespace: env2-production
spec:
  replicas: 3
  selector:
    matchLabels:
      app: customer-app
      environment: env2
  template:
    metadata:
      labels:
        app: customer-app
        environment: env2
    spec:
      nodeSelector:
        environment: env2

      tolerations:
      - key: environment
        operator: Equal
        value: env2
        effect: NoSchedule

      containers:
      - name: app
        image: myapp:latest
        resources:
          requests:
            cpu: 500m
            memory: 1Gi
          limits:
            cpu: 2000m
            memory: 4Gi
How This Works:
- Node Selector: Directs the scheduler to prefer nodes with
environment=env1label - Toleration: Allows the pod to schedule on nodes tainted with
environment=env1:NoSchedule - Combined Effect: Pods can only schedule on nodes that have both the matching label AND the pod has the matching toleration
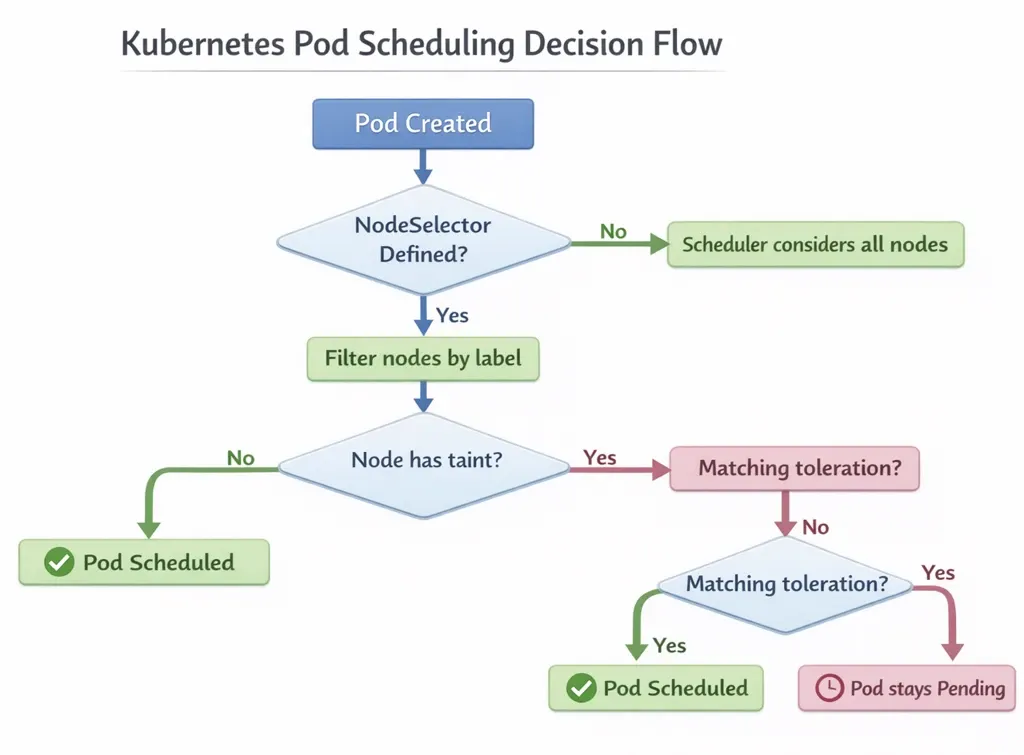
Pod Scheduling Flow:
Step 3: DaemonSet Configuration
DaemonSets must run on every node in the cluster, including all environment-specific node pools. This requires special toleration configuration.
The Challenge:
DaemonSets like Fluent Bit (logging) and CloudWatch Agent (monitoring) need to run on all nodes to collect logs and metrics. However, environment-specific node pools are tainted, which would normally prevent DaemonSet pods from scheduling.
The Solution:
Configure DaemonSets with a wildcard toleration that matches any NoSchedule taint, allowing them to run on all node pools.
Fluent Bit DaemonSet Example:
apiVersion: apps/v1
kind: DaemonSet
metadata:
  name: fluent-bit
  namespace: kube-system
spec:
  selector:
    matchLabels:
      name: fluent-bit
  template:
    metadata:
      labels:
        name: fluent-bit
    spec:
      # Wildcard toleration - matches any NoSchedule taint
      tolerations:
      - operator: Exists
        effect: NoSchedule
      - operator: Exists
        effect: NoExecute
      # Allow scheduling on master nodes if needed
      - operator: Exists
        effect: NoSchedule
        key: node-role.kubernetes.io/master
      - operator: Exists
        effect: NoSchedule
        key: node-role.kubernetes.io/control-plane

      containers:
      - name: fluent-bit
        image: fluent/fluent-bit:2.1.0
        resources:
          requests:
            cpu: 100m
            memory: 128Mi
          limits:
            cpu: 200m
            memory: 256Mi
        volumeMounts:
        - name: varlog
          mountPath: /var/log
        - name: varlibdockercontainers
          mountPath: /var/lib/docker/containers
          readOnly: true
      volumes:
      - name: varlog
        hostPath:
          path: /var/log
      - name: varlibdockercontainers
        hostPath:
          path: /var/lib/docker/containers
CloudWatch Agent DaemonSet Example:
apiVersion: apps/v1
kind: DaemonSet
metadata:
  name: cloudwatch-agent
  namespace: kube-system
spec:
  selector:
    matchLabels:
      name: cloudwatch-agent
  template:
    metadata:
      labels:
        name: cloudwatch-agent
    spec:
      tolerations:
      # Wildcard toleration for all tainted nodes
      - operator: Exists
        effect: NoSchedule
      - operator: Exists
        effect: NoExecute
      - operator: Exists
        effect: NoSchedule
        key: node-role.kubernetes.io/master
      - operator: Exists
        effect: NoSchedule
        key: node-role.kubernetes.io/control-plane

      containers:
      - name: cloudwatch-agent
        image: amazon/cloudwatch-agent:latest
        resources:
          requests:
            cpu: 200m
            memory: 200Mi
          limits:
            cpu: 500m
            memory: 500Mi
Key Toleration Pattern:
tolerations:
- operator: Exists
  effect: NoSchedule
This toleration matches any taint with NoSchedule effect, regardless of the taint key or value. This allows DaemonSet pods to schedule on all node pools, including tainted environment-specific pools.
DaemonSet Distribution:

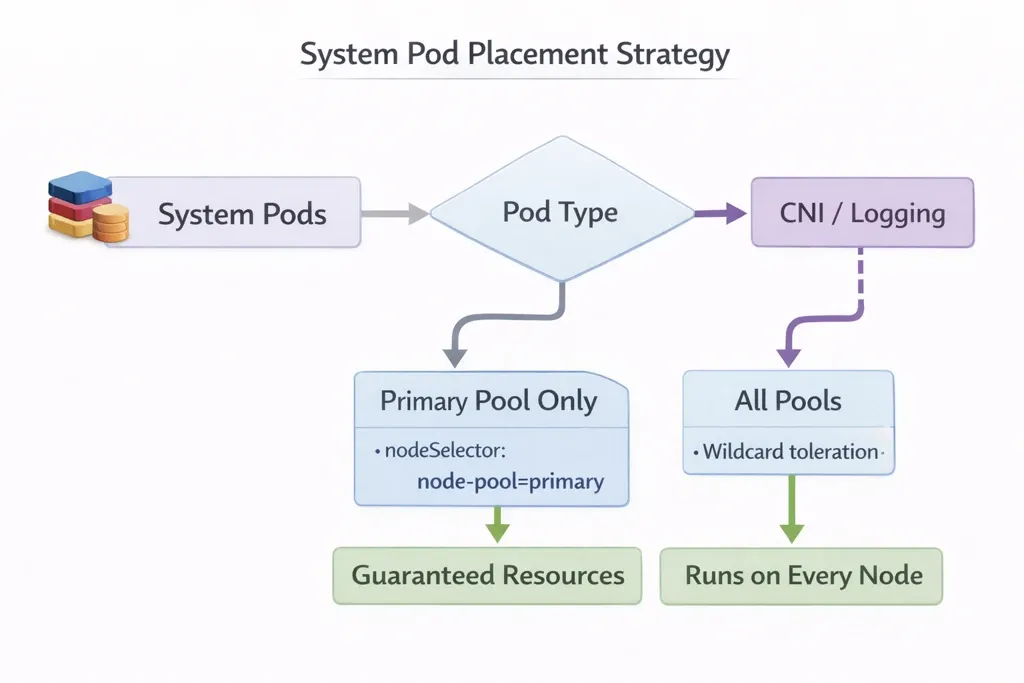
Step 4: System Pods Configuration
System pods like CoreDNS, networking components, and cluster autoscaler must run reliably. The primary node pool provides dedicated resources for these critical components.
Primary Node Pool Rationale:
- System Reliability: CoreDNS and networking pods are essential for cluster operation
- Resource Guarantees: System pods need guaranteed resources separate from application workloads
- Isolation: Prevents application resource contention from affecting cluster infrastructure
- Predictable Performance: System components perform consistently regardless of application load
System Pod Scheduling Strategy:
Architecture Diagram
The complete pod scheduling architecture shows how different pod types interact with node pools:

Key Isolation Mechanisms:
- Taints Prevent Cross-Environment Scheduling: Environment 1 pods cannot schedule on Environment 2 nodes because they lack the
env2toleration - Node Selectors Direct Pods: Deployments use node selectors to prefer their environment's node pool
- Tolerations Enable Scheduling: Only pods with matching tolerations can schedule on tainted nodes
- DaemonSets Use Wildcard Tolerations: System-level DaemonSets schedule on all pools using
operator: Exists - System Pods Use Primary Pool: Critical system components run on dedicated primary pool with no taints
Best Practices and Considerations
Resource Planning
Node Pool Sizing:
- Calculate resource requirements per environment based on peak load
- Include buffer capacity (20-30%) for pod evictions and rolling updates
- Consider autoscaling to handle variable workloads
- Monitor actual usage and adjust pool sizes based on metrics
Resource Allocation Example:
# Environment 1 node pool sizing
env1_pool:
  instance_type: m5.large
  node_count: 5
  total_cpu: 20 cores (4 cores × 5 nodes)
  total_memory: 80 Gi (16 Gi × 5 nodes)

  # Reserve 20% for system overhead
  available_cpu: 16 cores
  available_memory: 64 Gi

  # Per-pod allocation
  pod_cpu_request: 500m
  pod_memory_request: 1 Gi

  # Maximum pods per node: ~30-40
Cost Implications
Single Cluster vs. Multiple Clusters:
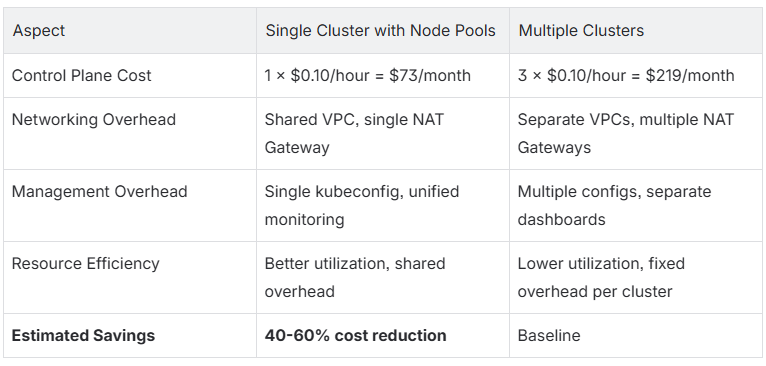
Cost Optimization Tips:
- Use spot instances for non-critical environment node pools
- Implement cluster autoscaler to scale down during low-traffic periods
- Right-size node pools based on actual usage patterns
- Consider reserved instances for primary node pool (always-on requirement)
Conclusion
Achieving resource-level isolation in Kubernetes through node pools, taints, and tolerations provides enterprises with the best of both worlds: strict isolation for critical workloads and cost-efficient cluster consolidation. This approach eliminates resource contention between environments while maintaining operational simplicity and reducing infrastructure costs by 40-60% compared to separate clusters.
The key to successful implementation lies in three critical configurations: environment-specific node pools with unique taints, deployment tolerations matching those taints, and wildcard tolerations for DaemonSets that must run cluster-wide. The primary node pool ensures system components have dedicated resources, preventing infrastructure issues from affecting application workloads.
When to Use This Approach:
- Multiple production environments requiring isolation
- Critical customer workloads needing guaranteed resources
- Cost optimization goals with cluster consolidation
- Compliance requirements for resource separation
- Organizations with 2+ environments sharing infrastructure
Key Takeaways:
- Taints Prevent Unwanted Scheduling: Node pool taints with
NoScheduleeffect block pods without matching tolerations - Tolerations Enable Scheduling: Deployments must include tolerations matching their environment's node pool taint
- Node Selectors Direct Placement: Combined with tolerations, node selectors ensure pods prefer their designated node pool
- DaemonSets Need Wildcard Tolerations: System-level DaemonSets use
operator: Existsto schedule on all tainted nodes - Primary Pool for System Pods: Dedicated node pool without taints ensures reliable system component operation
Organizations implementing this strategy report improved resource predictability, reduced cross-environment incidents, and significant cost savings. The architecture scales effectively as environments grow, with each new environment requiring only an additional node pool configuration.
KubeNine Consulting specializes in Kubernetes architecture design and enterprise cluster optimization. Our team has implemented resource isolation strategies for organizations managing multiple production environments, achieving 40-60% cost reduction while maintaining strict isolation guarantees. Visit kubenine.com to learn how we can help optimize your Kubernetes infrastructure.
Recent Posts