Table of Contents
AI doesn’t make writing terraform code that easy. You’ll agree with me if you’ve tried tried writing a complex terraform code involving multiple modules and resources. Models like Sonet 4 do generate great code but at the end they leave some bugs in it that take your whole debugging time.
The main reason for this issue is that AI models mostly do not have access to the latest documentation. They were trained on old and outdated data. Things change pretty fast in terraform world.
To solve this problem we tried to build our own AI tool. It used a vector database and a RAG setup to read Terraform documentation and generate code, but we failed miserably here. The tool did perform well but wasn’t agentic and couldn’t reason back and forth to come to the final solution.
That’s when we tried the Terraform MCP Server with Cursor. The improvement was huge. It actually understood how Terraform resources and modules worked together and generated quality code.
Terraform MCP Server
The Terraform MCP Server acts as a bridge between AI and Terraform docs, it gives Cursor the tools it needs to get the latest documentation for resources and modules and write working code. This drastically brings down the chances for bugs.
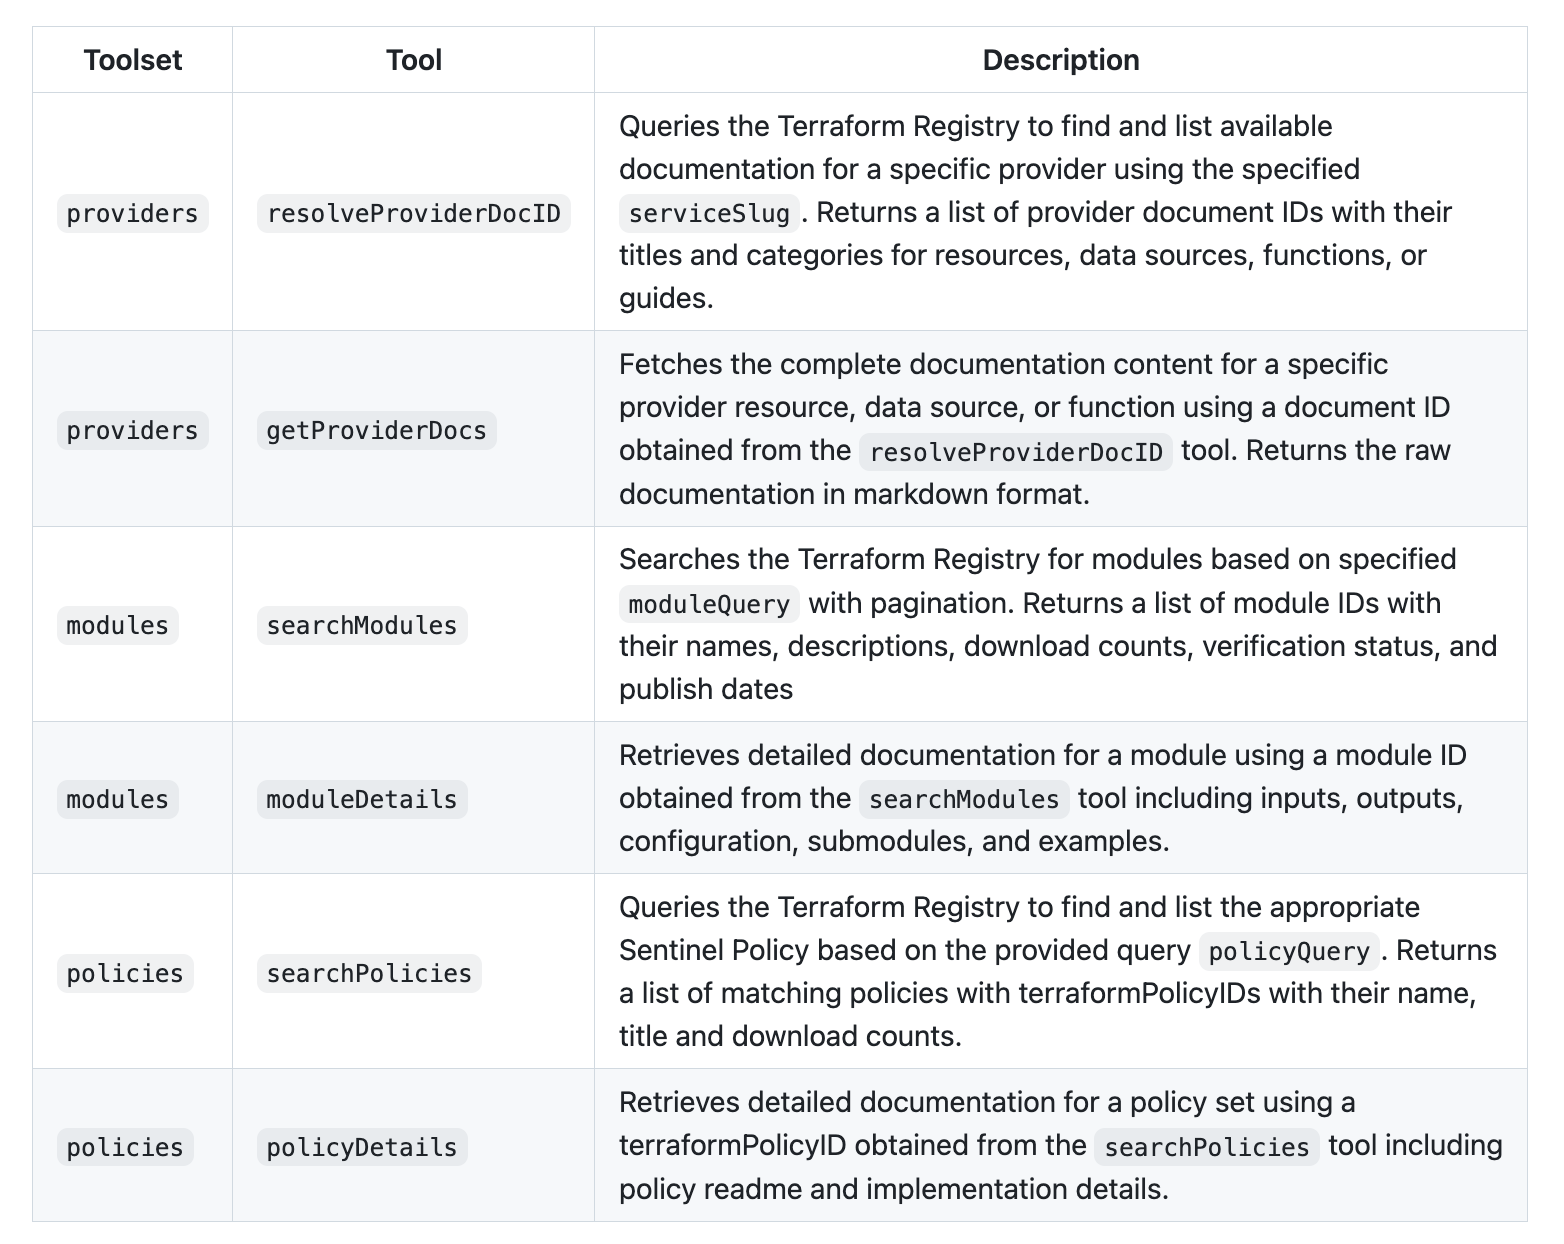
How is it Different?
The MCP server provides Cursor powerful tools with which it gets even more context. The following sets of tools are available:
Demo: Build a complex Infra
Consider building a production-ready web application infrastructure on AWS. You need:
- Networking: VPC with public and private subnets, NAT gateways, and internet gateways
- Load Balancing: An Application Load Balancer with health checks and target groups
- Security: Security groups, SSL certificates, and properly scoped IAM roles
- Content Delivery: CloudFront CDN with custom domains
- DNS: Cloudflare integration for managing DNS
- Compute: EC2 instances in private subnets, accessible through a secure jump box
Manually writing this Terraform configuration would typically take a long time, requiring constant reference to AWS documentation and module specifications.
Let's walk through building the infrastructure described above using Terraform MCP Server with Cursor AI.
The Architecture
Internet → Cloudflare DNS → CloudFront CDN → ALB → EC2 Instances (Private Subnet)
                                                ↓
                                          Jump Box (Public Subnet)
Step 1: Strategic Prompting
Instead of writing code manually, we break down the task:
Start code generation. Do it step by step. Move to next step only after the current step is complete. Only stop after you are done finishing all the tasks
Step: Create VPC and Network Infrastructure - use vpc module
   - Create VPC with appropriate CIDR block
   - Create public and private subnets across 2 AZs
   - Set up Internet Gateway
   - Configure NAT Gateways in public subnets
   - Configure route tables for public/private subnets
Step: Create Security Groups
   - ALB security group (allow HTTP/HTTPS inbound)
   - EC2 security group
        - allow traffic from ALB
        - allow ssh from the vpc
   - Allow all outbound traffic
Step: Create Auto Scaling Group - use autoscaling module
   - Create launch template for EC2 instances
   - Use ubuntu ami for the instances
   - Configure ASG across private subnets
   - Use keypair named "vikas-aws"
   - Add a user data script to install nginx and create a simple html page with instance_id, availability_zone and region
Step: Create a jumpbox
   - Create a jumpbox in the public subnet
   - Use keypair named "vikas-aws"
   - Use ubuntu ami for the instance
   - Ensure jumpbox has a public IP attached to it
   - Create security group for jumpbox to allow ssh from Internet
Step: Create Application Load Balancer - use alb module
   - Create ALB in public subnets
   - Configure listener - HTTP only - with fixed response as default action
   - Create target group and ensure it points to autoscaling group created earlier
   - Do not enable access logs for the ALB
Step: CloudFront Distribution
   - Create CloudFront distribution
   - Configure SSL certificate via ACM
   - Configure origin settings to ALB
   - Ensure the caching ttl is set to 0 so that we can show the changing instance_id on the webpage on every refresh
Step: DNS Configuration
   - Dont create any route53 records - dns is managed by cloudflare
Step 2: Using MCP Server
When Cursor receives this prompt, the MCP server immediately:
- Searches for relevant modules: VPC, ALB, EC2, CloudFront modules
- Retrieves module documentation: Input variables, output values, usage examples
- Understands resource relationships: ALB depends on VPC, EC2 instances need security groups
Step 3: Manually Run terraform apply and fix errors if any
Even though cursor agent with MCP server generates very accurate code, there still could be bugs. You can either let the agent run terraform plan and then fix the errors on its own or you do it manually. I prefer doing it manually as that I have noticed takes much lesser time.
The Results: From Hours to Minutes
What traditionally took hours of manual coding was completed in minutes:
- Immediate deployment:
terraform applyworked on the first try - Production-ready: Security groups, SSL certificates, and best practices applied
- Modular design: Proper variables and outputs for reusability
- Complete documentation: Generated
terraform.tfvars.examplefor easy setup
Conclusion
The Terraform MCP Server brings in a major leap in infrastructure development. By providing AI with deep understanding of Terraform modules and AWS resources, it transforms complex infrastructure tasks from hours of manual coding into minutes of guided AI generation.
For DevOps engineers and cloud architects, this means:
- Faster delivery of infrastructure projects
- Reduced errors through automated best practices
- Better consistency across different environments
- More time for strategic work rather than boilerplate coding
The combination of Terraform MCP Server and Cursor AI doesn't just speed up development, it improves the quality and reliability of infrastructure code, making complex AWS architectures accessible to teams of all skill levels.
Recent Posts