Table of Contents
By default, Amazon CloudWatch Alarms send a notification only when the alarm changes state — for example, from OK to ALARM. If the alarm remains in the ALARM state, no additional messages are sent. This can be a problem in production environments or for support teams who rely on timely updates about ongoing issues.
If the initial alert is missed, there’s no follow-up. The system stays silent even as the problem continues. This gap can lead to delays in response, longer downtime, and missed service-level targets — all because the alarm stopped talking after the first alert.
To solve this, AWS released a CDK-based solution that allows alarms to send repeated notifications while they remain in the ALARM state. In this blog, you'll learn how to set up that system in your own environment — step by step.
We’ll walk through how to:
- Deploy the solution using the AWS CDK
- Tag only the alarms you want to track
- Set a custom interval for repeated notifications — whether that’s every 1 minute, 5 minutes, 10 minutes, or any interval that fits your monitoring strategy
This post also includes a full explanation of how the system works behind the scenes, a diagram that maps out the entire flow, and tips for customizing or troubleshooting the setup.
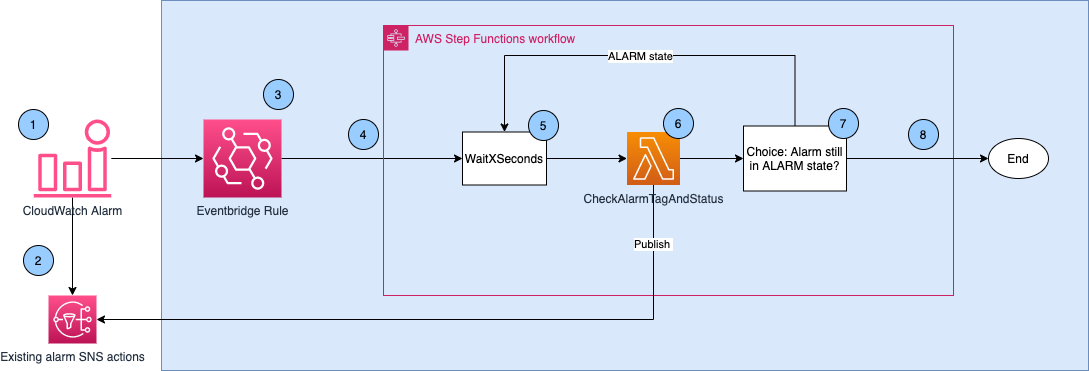
Solution Architecture
This solution is deployed as an AWS CDK application. It creates the following components in your AWS account:
- CloudWatch Alarms – These monitor metrics and are tagged if you want them to send repeated alerts.
- SNS Topic – Used to deliver alarm notifications (email, Slack, etc.).
- EventBridge Rule – Captures alarm state change events when the alarm enters
ALARM. - Step Function – Orchestrates the loop that periodically checks alarm state.
- Lambda Function – Checks the alarm's current status and sends another alert if the alarm is still in
ALARM. - IAM Roles – Grant permissions for Lambda, Step Functions, and EventBridge.
- (Optional) A CloudWatch Resource Group is created for all tagged alarms for easier monitoring.
All of these components work together to monitor the alarms and send repeated notifications as long as the problem persists.
How It Works
Here's how the full system behaves once deployed:
- A CloudWatch alarm is triggered and enters the
ALARMstate. - The alarm sends a one-time SNS notification to its associated topic.
- EventBridge picks up the state change event and invokes a Step Function.
- The Step Function waits for a configured period (e.g., 300 seconds).
- It invokes a Lambda function, which:
- Checks if the alarm has the tag
RepeatedAlarm:true. - Calls
DescribeAlarmsto verify if the alarm is still in theALARMstate. - If true, sends another notification via SNS.
- Checks if the alarm has the tag
- A Choice step decides:
- If still in
ALARM, the process loops back to the Wait step. - If not, the Step Function ends and notifications stop.
- If still in
The repeated notifications stop if:
- The alarm changes state (e.g., from
ALARMtoOK) - The alarm is deleted
The RepeatedAlarm:true tag is removed
Step-by-Step Setup: Repeated Notifications for CloudWatch Alarms
This section provides a complete walkthrough of how to deploy the solution using the AWS Cloud Development Kit (CDK). You’ll clone the project, build it, deploy it, apply tags to alarms, and verify that repeated notifications are working.
Prerequisites
Before you begin, make sure you have the following:
- An AWS account with permissions to manage CloudWatch, Lambda, Step Functions, EventBridge, and IAM
- AWS CLI configured with appropriate credentials
- Node.js version 10.13 or later
- AWS CDK installed (
npm install -g aws-cdk) - Docker running (required during the build process)
Step 1: Clone the Repository
Clone the official AWS sample project for repeated notifications:
git clone https://github.com/aws-samples/amazon-cloudwatch-alarms-repeated-notification-cdk.git
cd amazon-cloudwatch-alarms-repeated-notification-cdk
Step 2: Install Dependencies
Install the necessary Node.js modules for the CDK project.
npm installStep 3: Build the Project
Compile the TypeScript source code into JavaScript.
npm run buildStep 4: Bootstrap the CDK Environment
Prepare your AWS environment for CDK deployments. This step creates required resources like an S3 bucket for storing deployment artifacts.
cdk bootstrapStep 5: Deploy the CDK Application
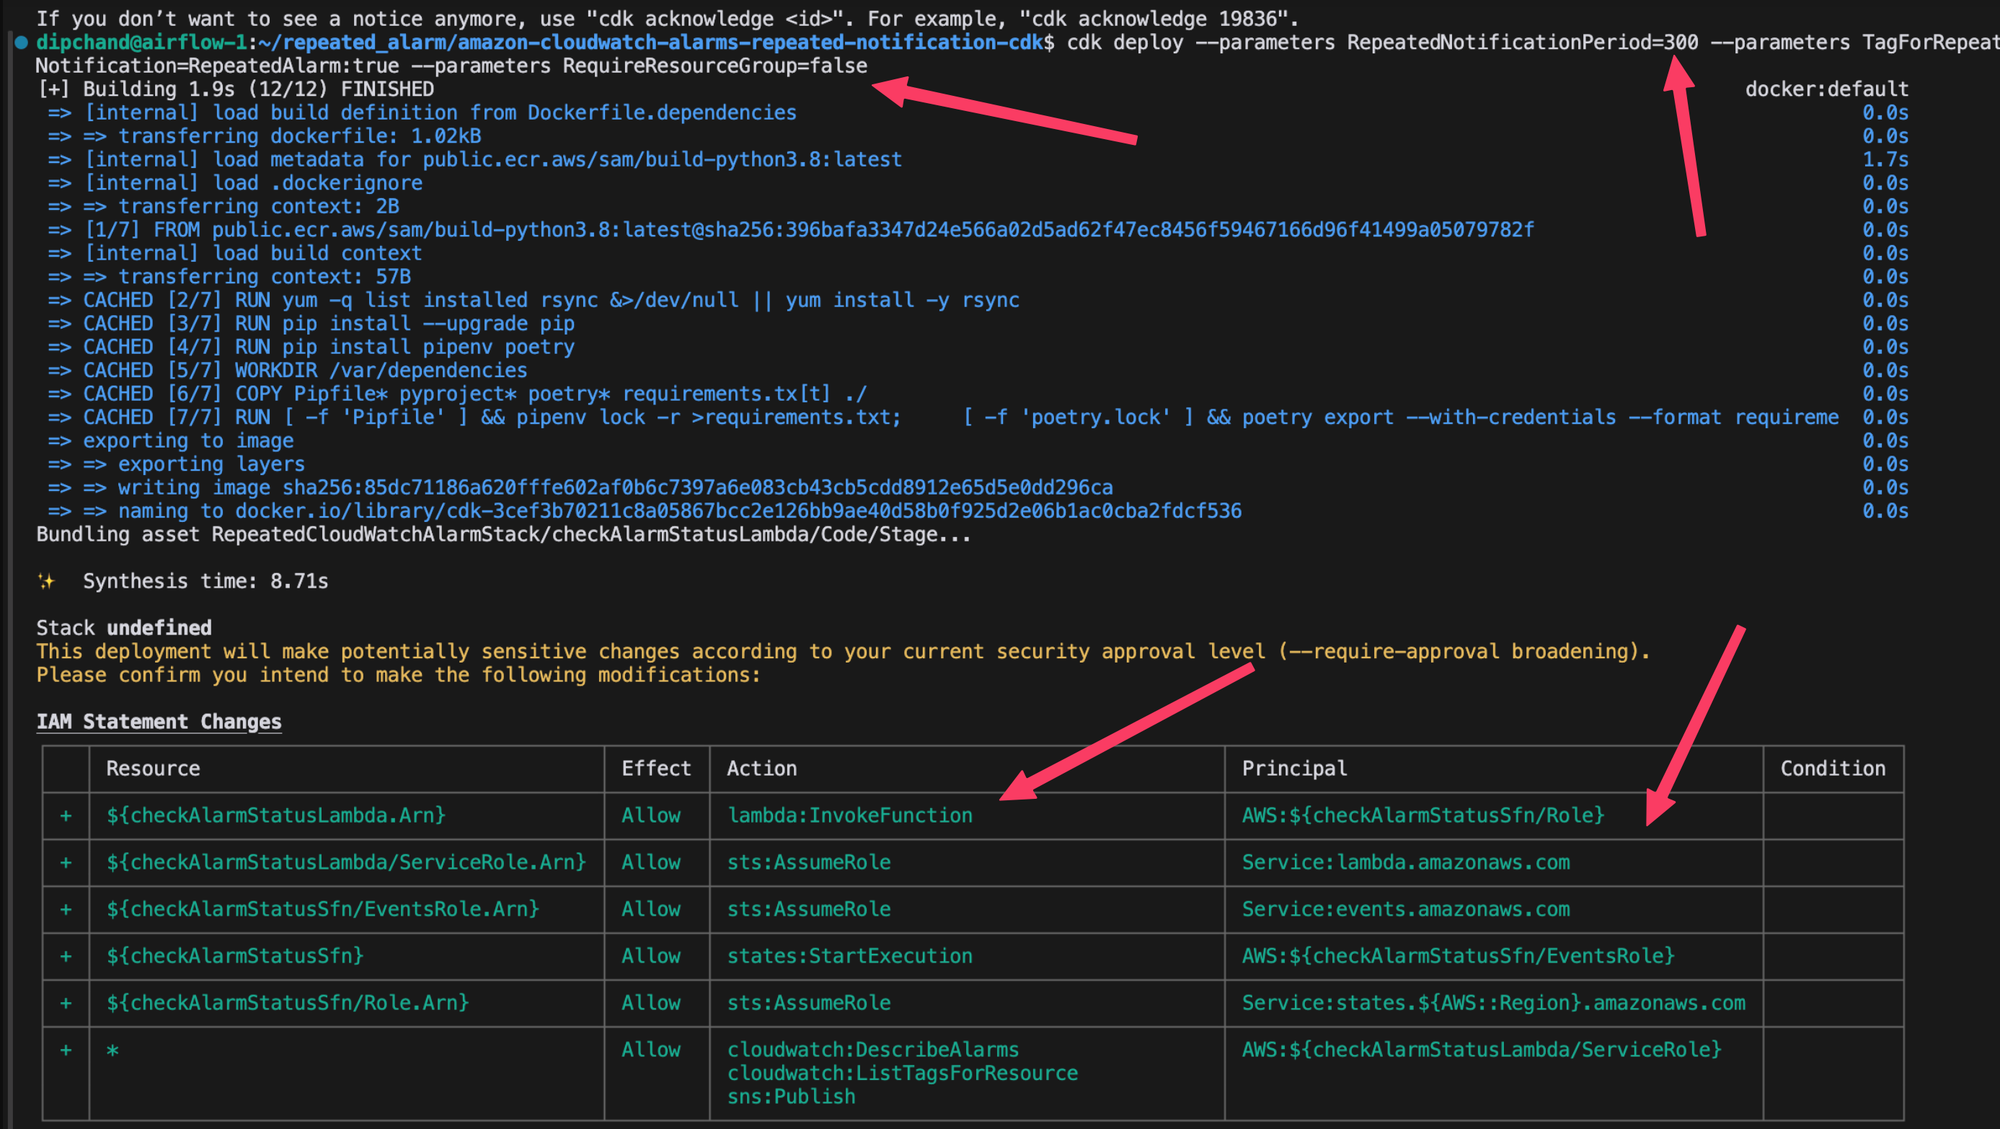
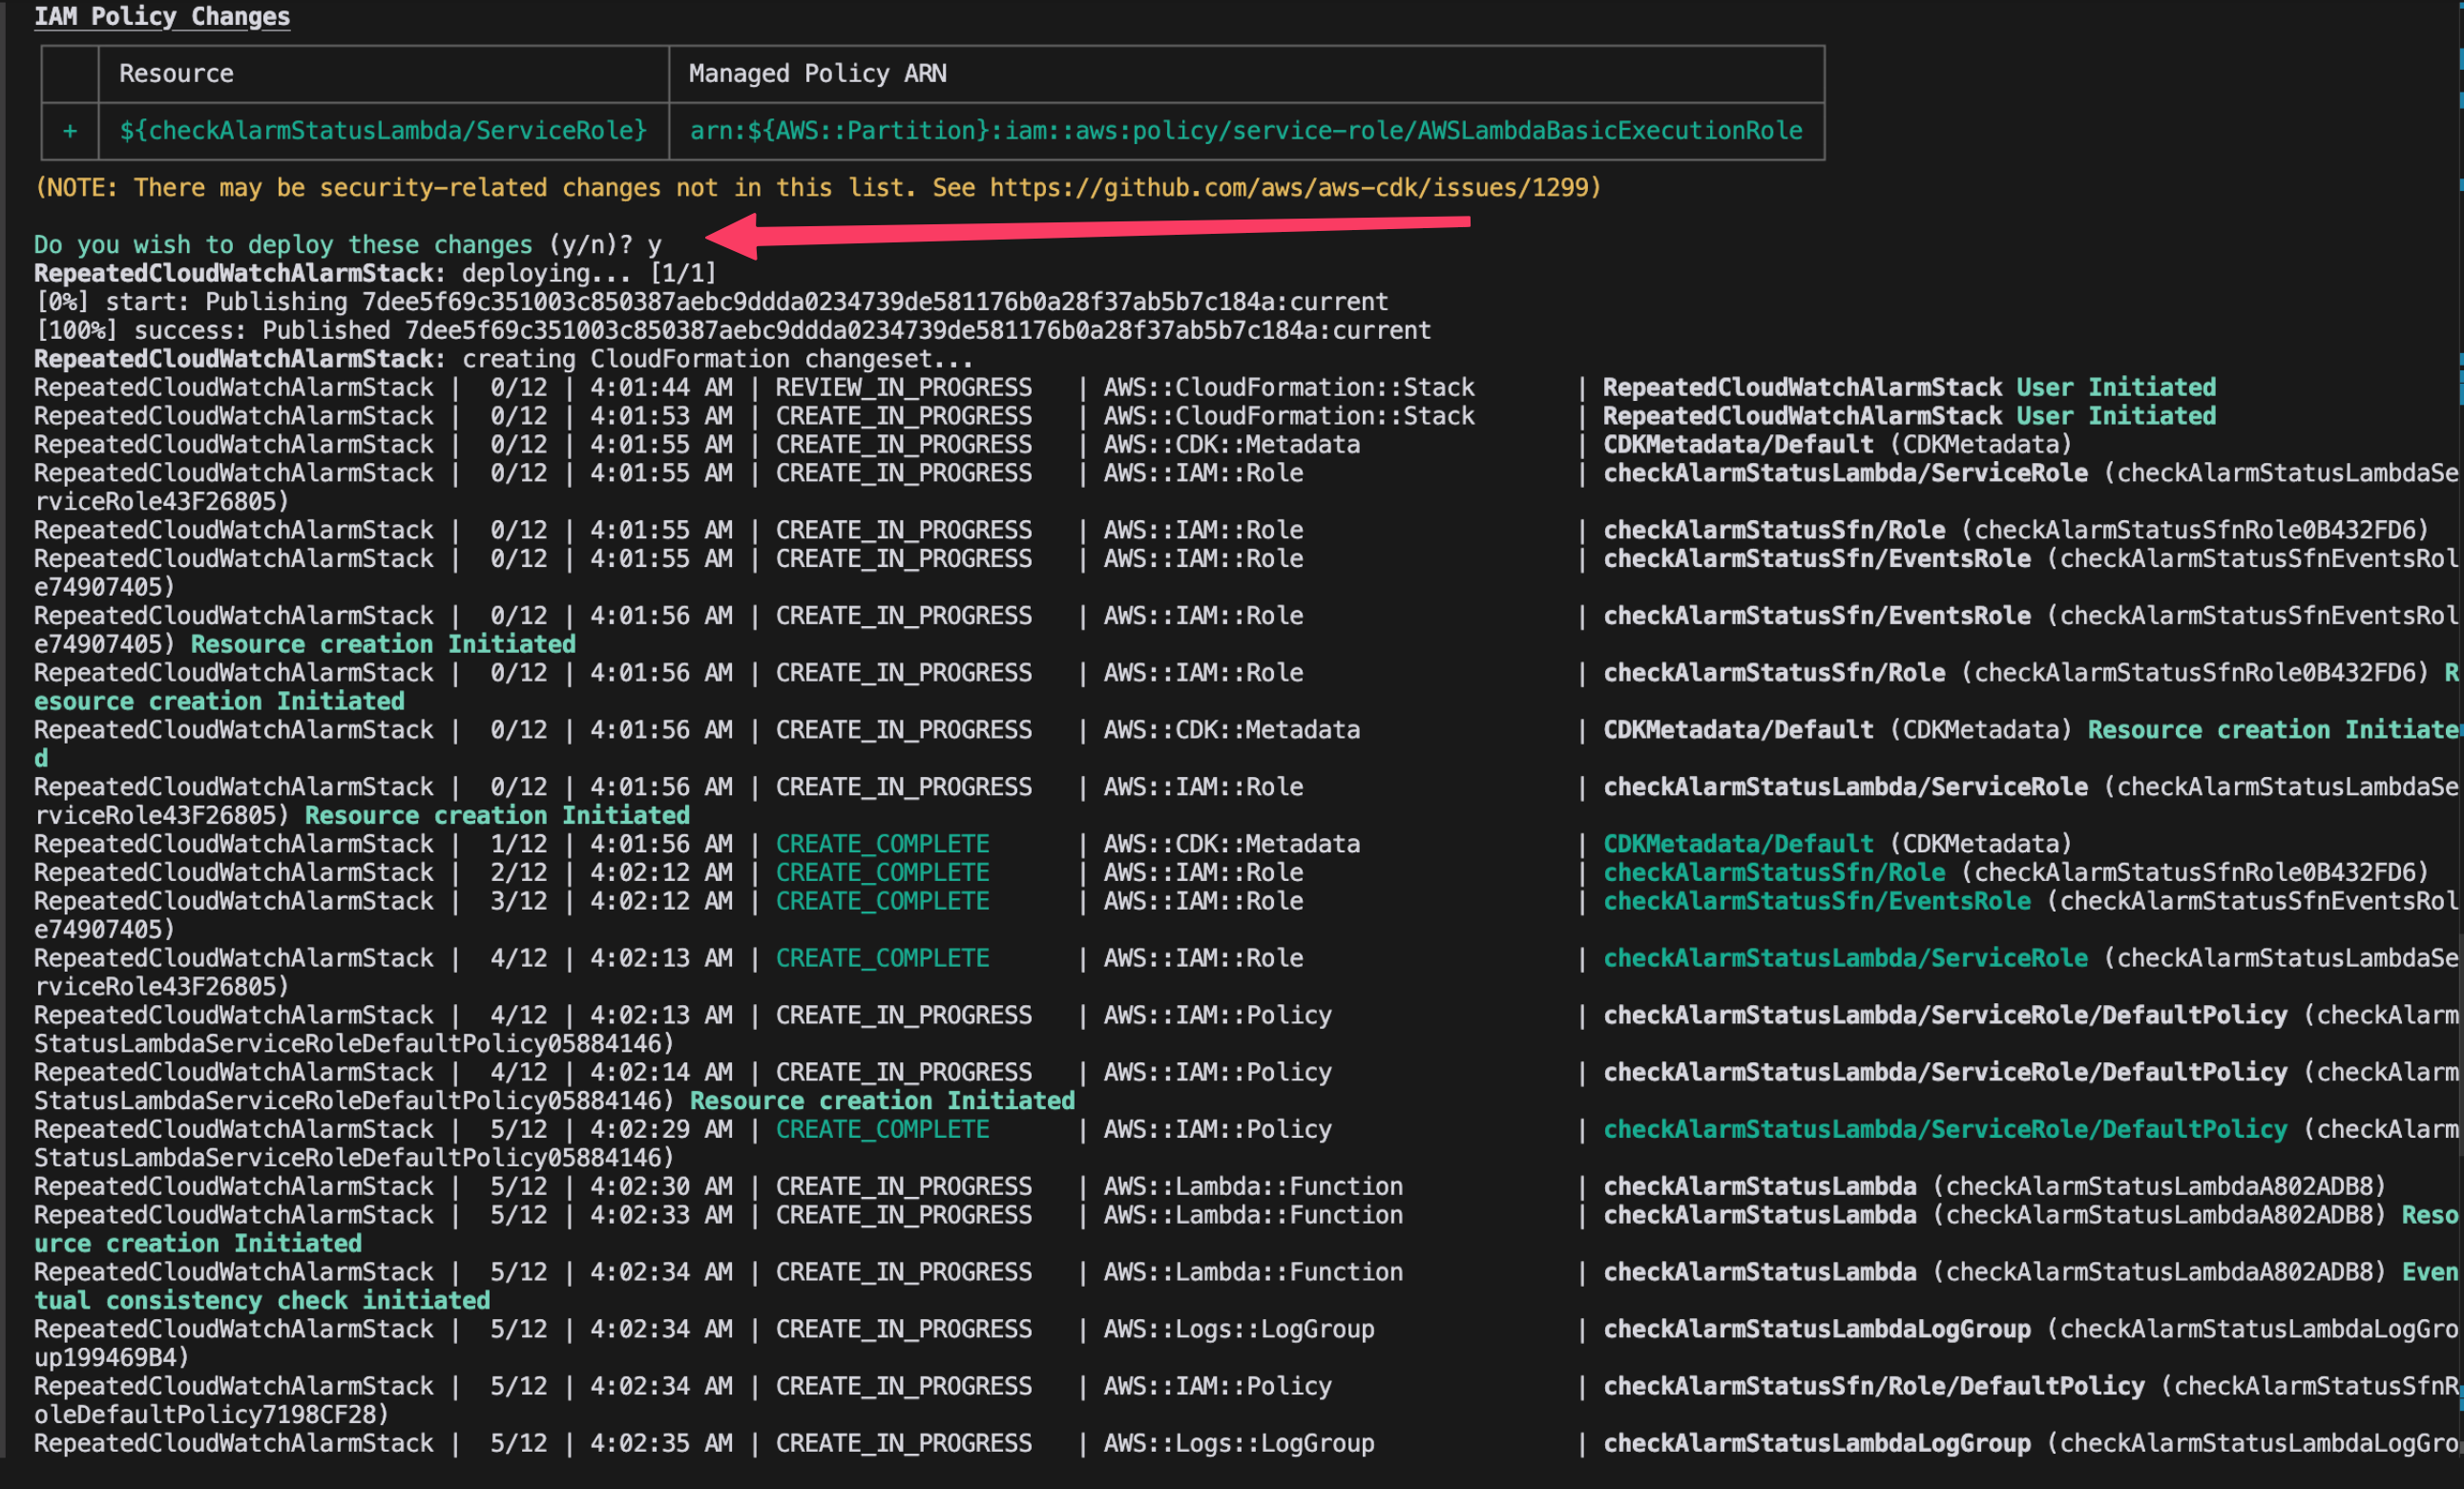
Deploy the entire solution to your AWS account, including the Step Function, Lambda, EventBridge rule, and IAM roles.
cdk deploy \
  --parameters RepeatedNotificationPeriod=300 \
  --parameters TagForRepeatedNotification=RepeatedAlarm:true \
  --parameters RequireResourceGroup=false
Explanation of parameters:
RepeatedNotificationPeriod: Interval in seconds between notifications (e.g., 300 = 5 minutes)TagForRepeatedNotification: Tag key and value to identify alarms that should send repeated notificationsRequireResourceGroup: Whether to create a CloudWatch resource group (optional)
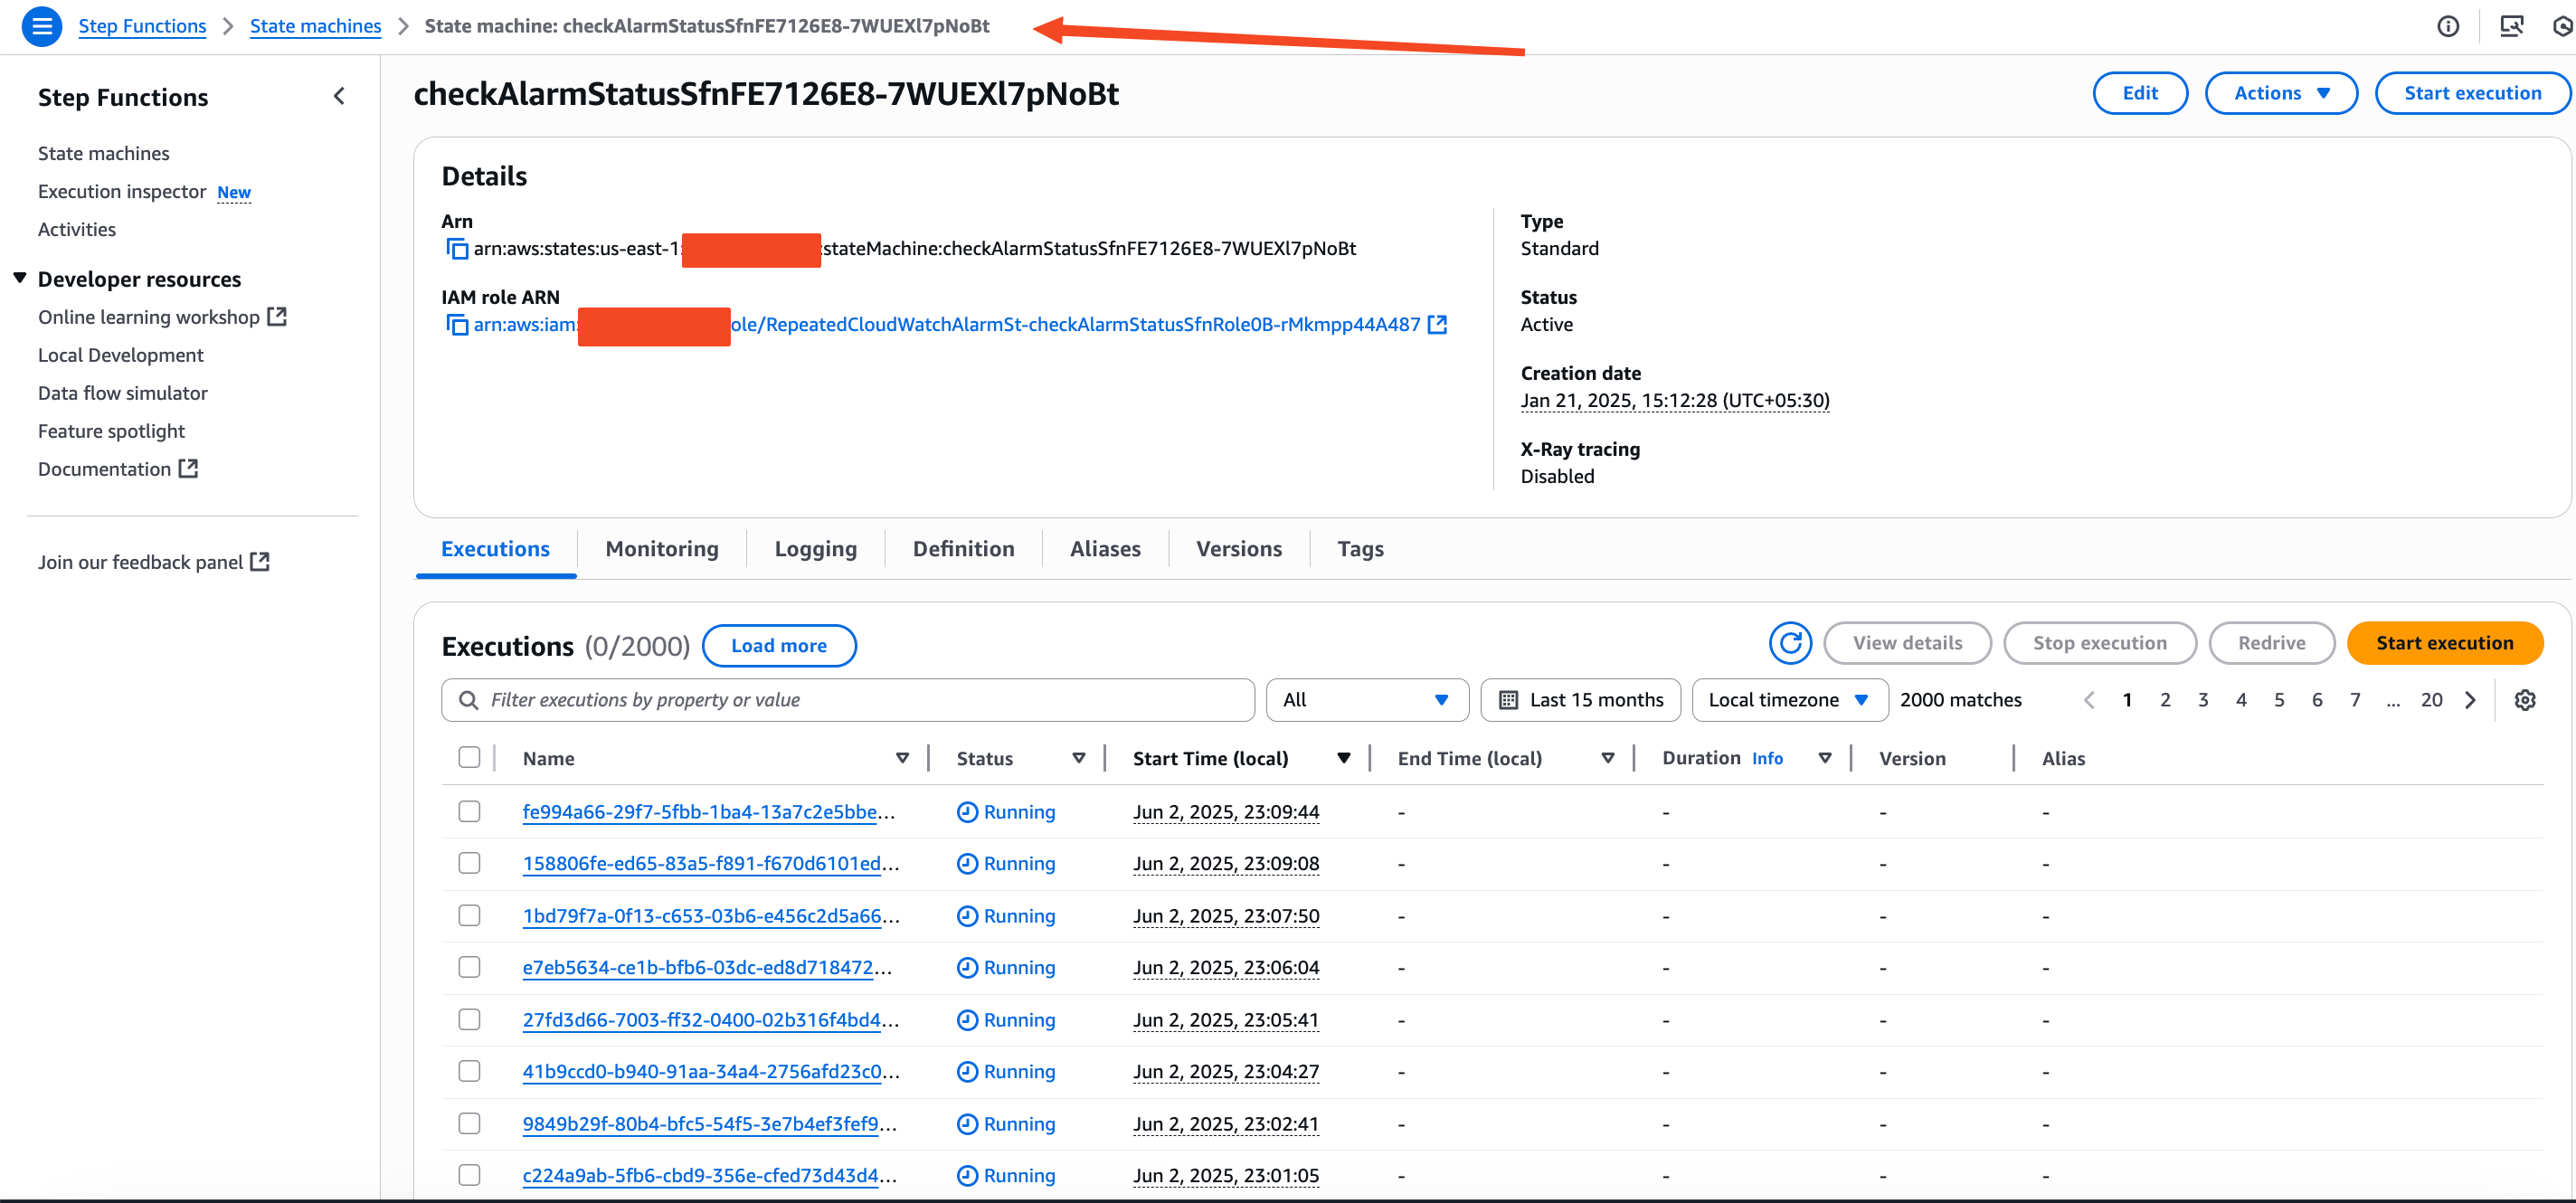
After deployment, you can verify the setup by visiting the AWS Console. Navigate to Step Functions to inspect the state machine and its workflow.
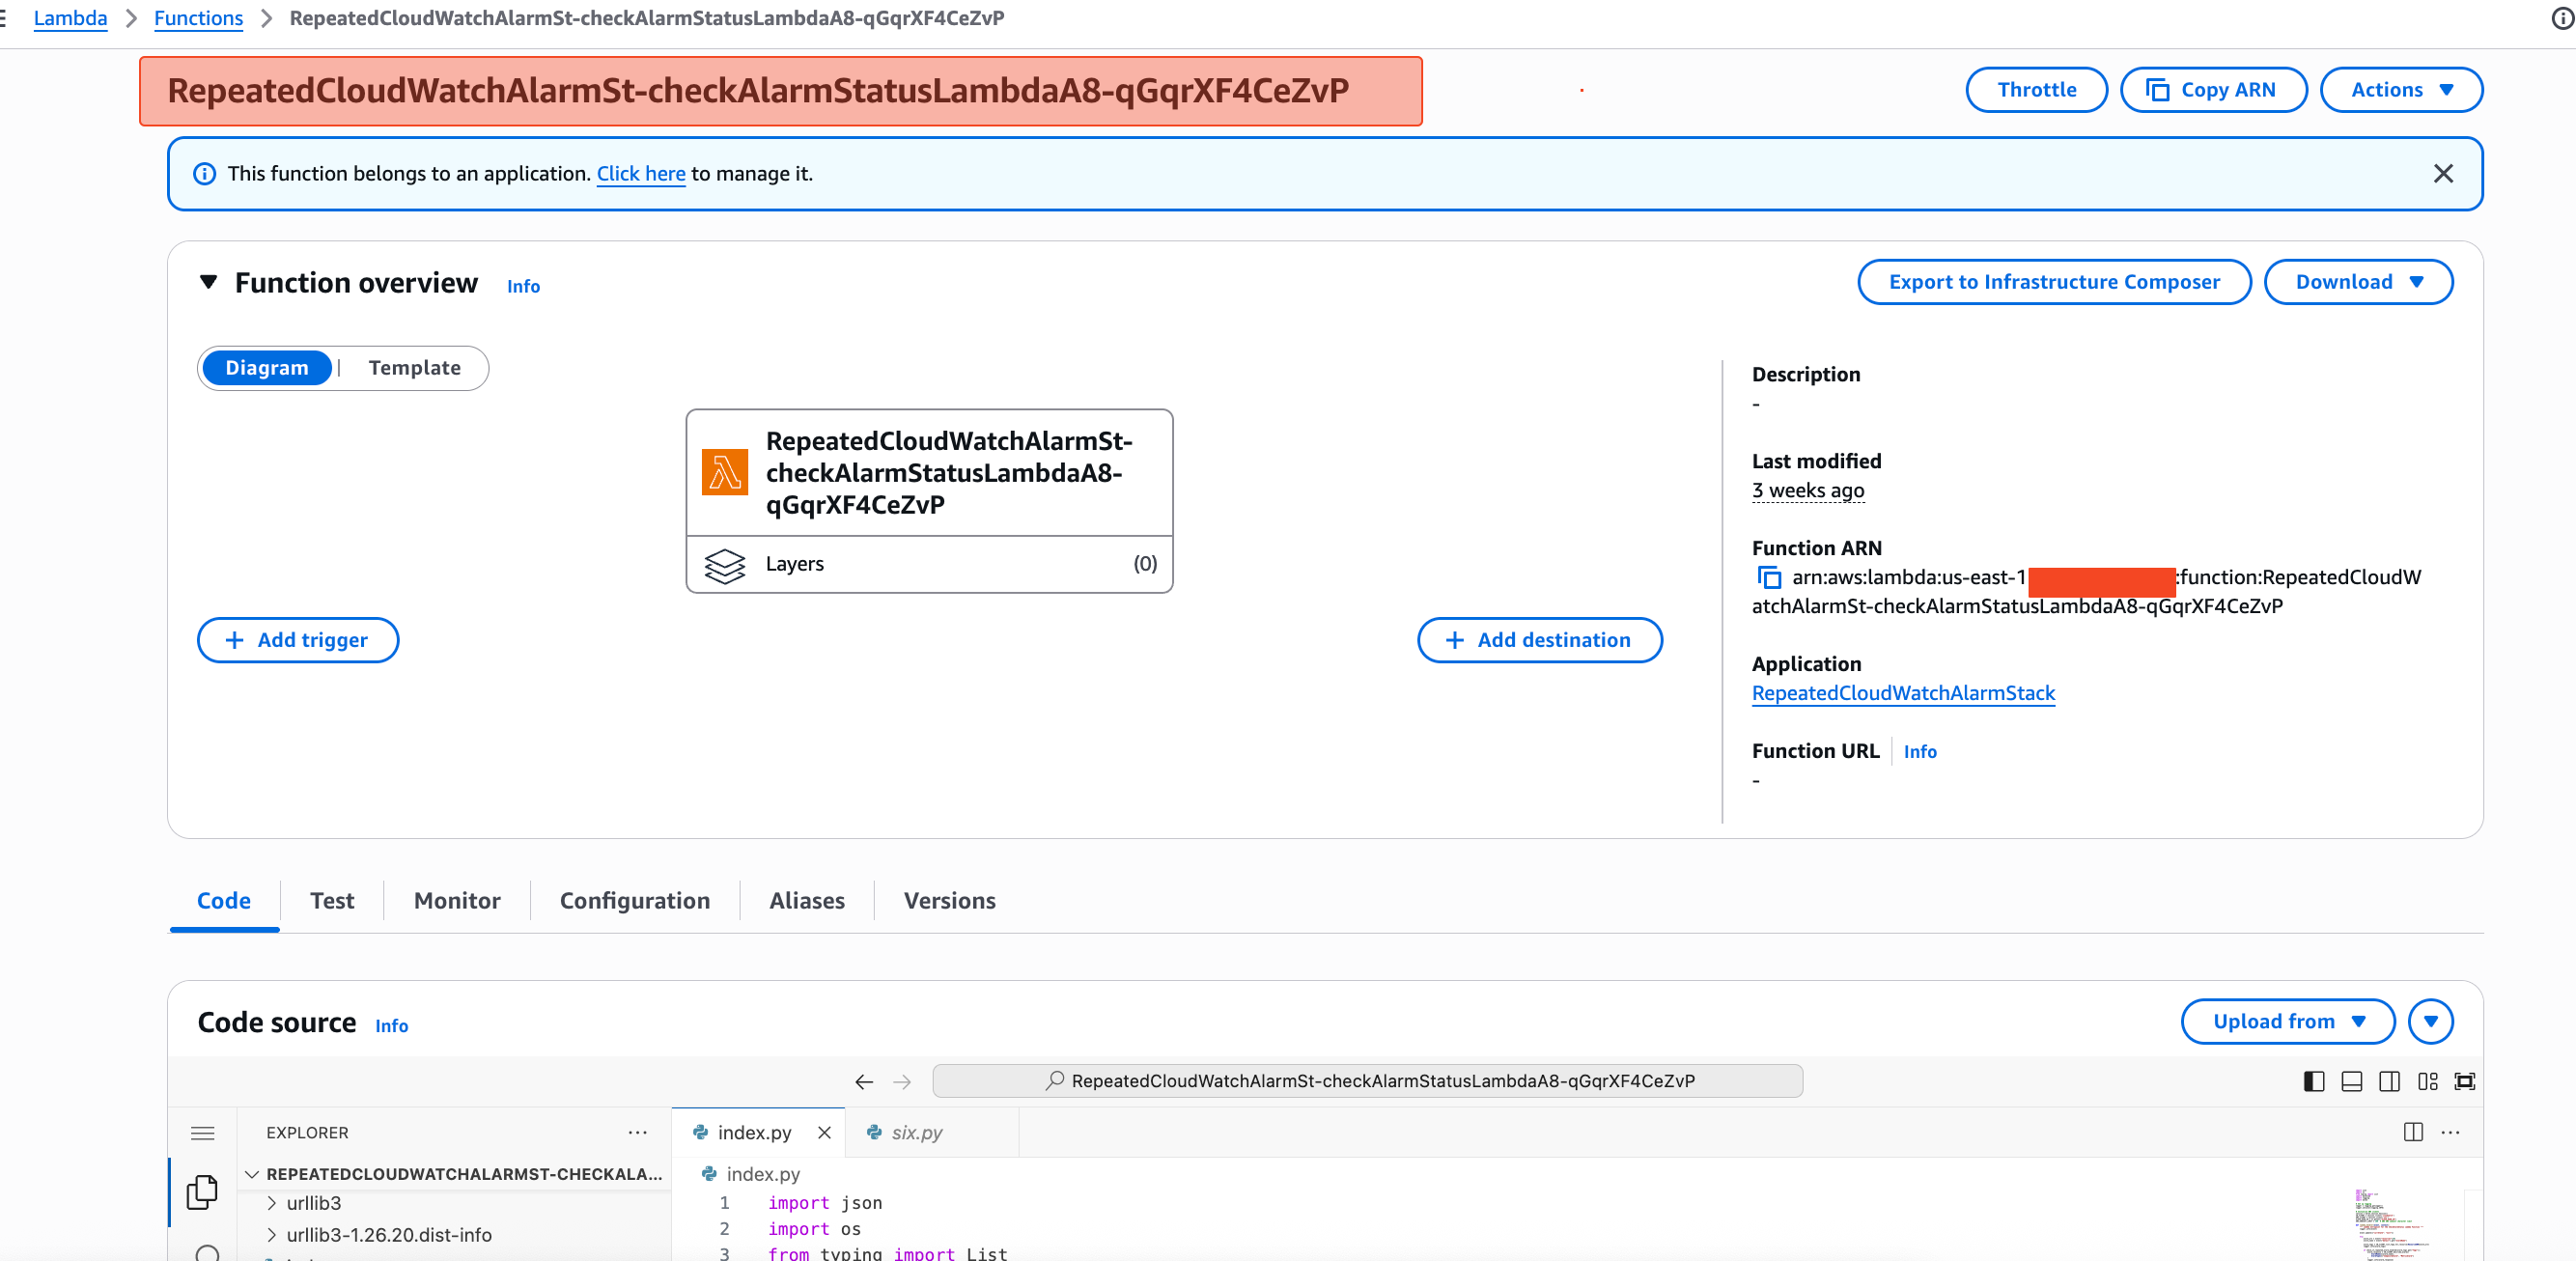
You can also open the deployed Lambda function to review or modify its environment variables and logic.
This is especially useful if you want to extend the functionality, such as sending alerts to a different SNS topic, filtering alarms by additional tags, or integrating with third-party tools.
This gives you the flexibility to customize how repeated notifications behave. For example, you might want to send alerts to a different SNS topic, include additional alarm metadata in messages, or integrate it with your incident management system.After verifying the deployment, we’ll revisit this Lambda function later to make specific custom changes.
Step 6: Tag the Alarms You Want to Monitor
Only alarms that have the specified tag will be checked by the system. Apply the tag using the following command:
aws cloudwatch tag-resource \
  --resource-arn arn:aws:cloudwatch:<region>:<account_id>:alarm:<alarm_name> \
  --tags Key=RepeatedAlarm,Value=true
Replace the placeholders with your values:
<region>: Your AWS region (e.g.,us-east-1)<account_id>: Your AWS account ID<alarm_name>: The name of your CloudWatch Alarm
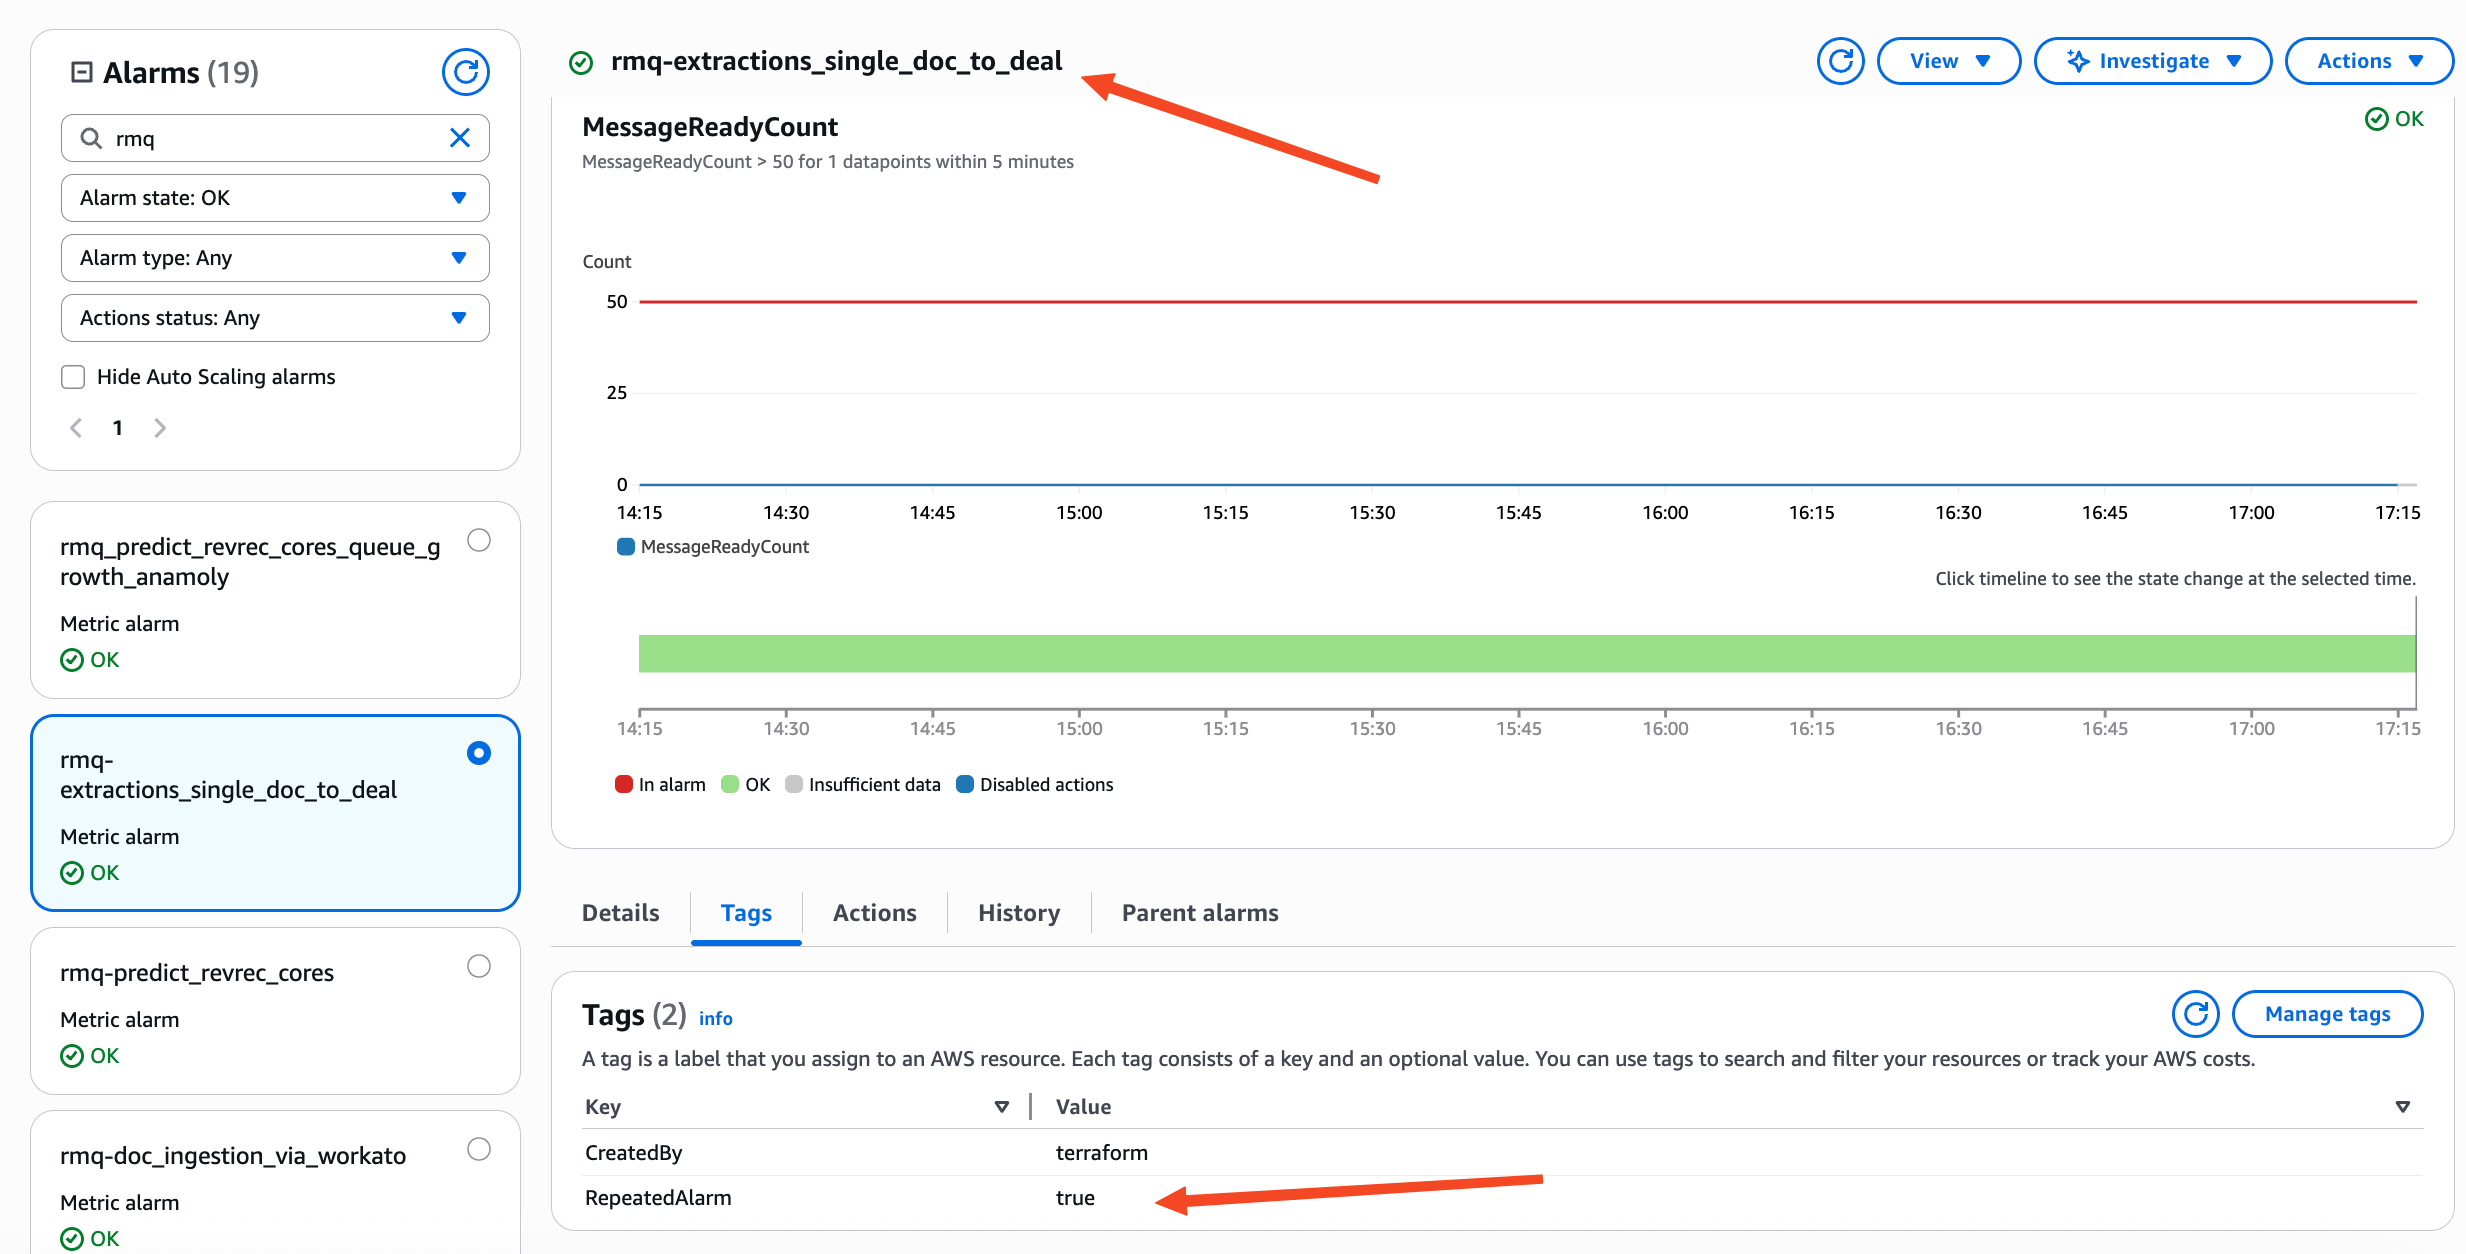
Step 7: Confirm Tagging (Optional)
Verify that the tag was applied successfully:
aws cloudwatch list-tags-for-resource \
  --resource-arn arn:aws:cloudwatch:<region>:<account_id>:alarm:<alarm_name>
You should see output similar to:
{
  "Tags": [
    {
      "Key": "RepeatedAlarm",
      "Value": "true"
    }
  ]
}
Step 8: Trigger and Observe Repeated Notifications
Generate a test alarm that enters the ALARM state and remains active. You should receive:
- One initial notification (standard CloudWatch behavior)
- Follow-up notifications based on your configured interval (e.g., every 300 seconds)
Step 9: Monitor Logs (Optional)
To confirm the Lambda function is running and sending notifications, go to the CloudWatch Logs console and locate the following log group:
/aws/lambda/RepeatedCloudWatchAlarm
Each invocation will show whether the alarm was still in ALARM and whether a message was sent.
Modifying the Lambda Function for Custom Behavior
After the solution is deployed, you can navigate to the AWS Lambda console and locate the generated function (usually named something like RepeatedCloudWatchAlarmSt-checkAlarmStatusLambda...). From there, you can directly update the logic to suit your requirements.
For example, here's a summary of the enhancements made in the Lambda function:
- Slack Mentions: Added
SLACK_USER_IDas an environment variable to mention specific Slack users or groups in alert messages. - Current Metric Value: Integrated
get_metric_statisticsusingboto3to fetch the current metric value and include it in the message. - Custom Message Format: Structured a clean JSON-formatted custom message, with context-specific fields like Queue name, Broker name, Threshold, and Current Value.
- Custom SNS Topic Support: Used environment variables
SEND_TO_CUSTOM_SNSandCUSTOM_SNS_TOPIC_ARNto conditionally send messages to an alternative topic.
Code Snippet Example (Custom Notification Block)
if os.getenv("SEND_TO_CUSTOM_SNS", "false").lower() == "true":
    SNS_CLIENT.publish(
        TopicArn=os.getenv("CUSTOM_SNS_TOPIC_ARN"),
        Subject=f"Custom Notification: {alarm_name}",
        Message=json.dumps({
            "AlarmName": alarm_name,
            "Region": session.region_name,
            "Metric": metric_name,
            "Queue": queue_name,
            "Broker": broker_name,
            "CurrentValue": current_value_str,
            "Threshold": alarm_details.get("Threshold"),
            "ActionRequired": f"<!subteam^{SLACK_USER_ID}> Check immediately."
        })
    )
This custom logic allows you to fine-tune alert delivery, include dynamic context in your messages, and integrate easily with messaging platforms like Slack.
This section provides a complete walkthrough of how to deploy the solution using the AWS Cloud Development Kit (CDK). You’ll clone the project, build it, deploy it, apply tags to alarms, and verify that repeated notifications are working.
Here is the complete code:
import json
import os
from typing import List
import datetime
import logging
import boto3
# Set up logging
logger = logging.getLogger()
logger.setLevel(logging.INFO)
# Initialize AWS clients
session = boto3.session.Session()
CW_CLIENT = session.client('cloudwatch')
SNS_CLIENT = session.client('sns')
SLACK_USER_ID = os.getenv("SLACK_USER_ID")
SNS_SUBJECT_LIMIT = 200  # AWS SNS subject character limit
def lambda_handler(event, context):
    """ Lambda entrypoint for the CheckAlarmStatus Lambda Function """
    logger.info(event)
    event.update({"currState": "null"})
    try:
        alarm_arn = event["resources"][0]
        alarm_name = event["detail"].get("alarmName")
        alarm_tags = CW_CLIENT.list_tags_for_resource(ResourceARN=alarm_arn)
        logger.info(alarm_tags)
        if check_if_repeated_alarm_enabled(alarm_tags.get("Tags")):
            alarm_response = CW_CLIENT.describe_alarms(
                AlarmNames=[alarm_name],
                AlarmTypes=["CompositeAlarm", "MetricAlarm"]
            )
            logger.info(alarm_response)
            if len(alarm_response.get("MetricAlarms")) > 0:
                alarm_details = alarm_response.get("MetricAlarms")[0]
            elif len(alarm_response.get("CompositeAlarms")) > 0:
                alarm_details = alarm_response.get("CompositeAlarms")[0]
            else:
                raise Exception("No alarms found.")
            alarm_details = json.loads(json.dumps(alarm_details, default=datetime_converter))
            if alarm_details.get("StateValue") == "ALARM":
                if os.getenv("SEND_TO_CUSTOM_SNS", "false").lower() == "true":
                    send_to_custom_sns(alarm_name, alarm_details)
                else:
                    associated_alarm_actions = alarm_details.get("AlarmActions")
                    for action in associated_alarm_actions:
                        if action.startswith(os.getenv("ARN_PREFIX") + "sns"):
                            notification_subject = create_notification_subject(alarm_name)
                            SNS_CLIENT.publish(
                                TopicArn=action,
                                Subject=notification_subject,
                                Message=json.dumps(alarm_details)
                            )
                            logger.info("Publish to %s" % action)
            event["currState"] = alarm_details.get("StateValue")
    except Exception as e:
        logger.error(f"Error: {repr(e)}")
        raise
    return event
def send_to_custom_sns(alarm_name, alarm_details):
    """Send a custom notification to a custom SNS topic"""
    custom_topic_arn = os.getenv("CUSTOM_SNS_TOPIC_ARN")
    if not custom_topic_arn:
        logger.error("CUSTOM_SNS_TOPIC_ARN is not set.")
        raise ValueError("CUSTOM_SNS_TOPIC_ARN environment variable is missing.")
    namespace = alarm_details.get("Namespace")
    metric_name = alarm_details.get("MetricName")
    dimensions = alarm_details.get("Dimensions")
    # Extract specific dimensions
    queue_name = get_dimension_value(dimensions, "Queue")
    broker_name = get_dimension_value(dimensions, "Broker")
    # Fetch current metric value
    current_value = get_current_metric_value(namespace, metric_name, dimensions)
    current_value_str = str(current_value) if current_value is not None else "N/A"
    # Construct custom message
    custom_message = json.dumps({
        "AlarmName": alarm_name,
        "AlarmDescription": f"\ud83d\udea8 Alert! {alarm_name} has been in ALARM state for 30+ minutes.",
        "NewStateReason": f"Metric Name: {metric_name}\n"
                          f"Queue: {queue_name}\n"
                          f"Broker: {broker_name}\n"
                          f"Threshold: {alarm_details.get('Threshold')}\n"
                          f"Current Value: {current_value_str}\n"
                          f"Action Required: <!subteam^{SLACK_USER_ID}>",
        "Region": session.region_name,
        "NewStateValue": "ALARM",
        "OldStateValue": "OK"
    })
    SNS_CLIENT.publish(
        TopicArn=custom_topic_arn,
        Subject=f"Custom Notification: {alarm_name}",
        Message=custom_message
    )
    logger.info("Custom notification sent to %s" % custom_topic_arn)
def create_notification_subject(alarm_name):
    notification_subject = f"ALARM: \"{alarm_name}\" remains in ALARM state in {session.region_name}"
    if len(notification_subject) >= SNS_SUBJECT_LIMIT:
        number_of_char_to_remove = len(notification_subject) - SNS_SUBJECT_LIMIT + 4
        notification_subject = f"ALARM: \"{alarm_name[:-number_of_char_to_remove]}...\" remains in ALARM state in {session.region_name}"
    return notification_subject
def datetime_converter(field):
    if isinstance(field, datetime.datetime):
        return field.__str__()
def check_if_repeated_alarm_enabled(tags: List[dict], expected_tag="TagForRepeatedNotification"):
    tag_to_check = os.getenv(expected_tag).split(":")
    key = tag_to_check[0]
    value = tag_to_check[1]
    for tag in tags:
        if tag.get("Key") == key and tag.get("Value") == value:
            return True
    return False
def get_current_metric_value(namespace, metric_name, dimensions):
    try:
        now = datetime.datetime.utcnow()
        start_time = now - datetime.timedelta(minutes=10)
        response = CW_CLIENT.get_metric_statistics(
            Namespace=namespace,
            MetricName=metric_name,
            Dimensions=dimensions,
            StartTime=start_time,
            EndTime=now,
            Period=300,  # 5 min
            Statistics=["Average"]
        )
        datapoints = response.get("Datapoints", [])
        if datapoints:
            latest_datapoint = sorted(datapoints, key=lambda x: x['Timestamp'])[-1]
            return round(latest_datapoint["Average"], 2)
        else:
            logger.warning("No datapoints available for metric.")
            return None
    except Exception as e:
        logger.error(f"Failed to get current metric value: {repr(e)}")
        return None
def get_dimension_value(dimensions, key):
    for d in dimensions:
        if d["Name"] == key:
            return d["Value"]
    return "N/A"
This custom logic allows you to fine-tune alert delivery, include dynamic context in your messages, and integrate easily with messaging platforms like Slack.
Cost Overview
Setting up repeated notifications for CloudWatch alarms using Step Functions and Lambda is low-cost for small-scale use, but costs can increase based on the number of alarms and notification frequency.
Estimated Cost Breakdown (Per Alarm)
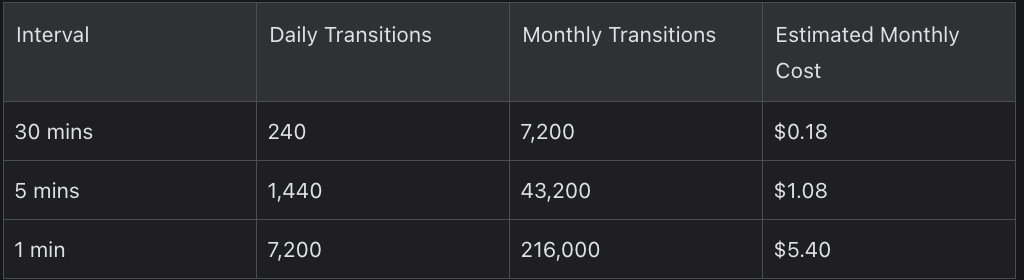
This assumes each notification loop involves 5 Step Function transitions.
Service-Based Pricing Summary
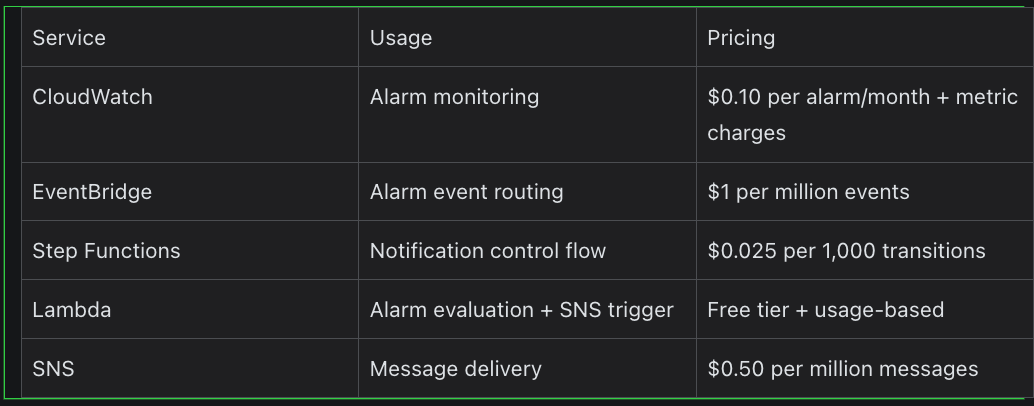
Costs are typically minimal for small setups, but teams with hundreds of alarms should monitor usage.
Conclusion
With this setup, you've created a solution that sends repeated notifications for alarms that remain in the ALARM state, helping avoid missed alerts during ongoing issues.
This approach gives you flexibility through tagging, CDK-based deployment, and the option to customize notification content and behavior.
If you're building or scaling observability, monitoring, or cloud infrastructure, our team at KubeNine can help. We offer hands-on support across AWS, Kubernetes, alerting workflows, and DevOps pipelines. Reach out to us at contact@kubenine.com.
Recent Posts