
On this page
Secure Kubernetes Apps with OAuth2-Proxy and NGINX Ingress

Introduction
Imagine this—you've built an amazing application, but there's one problem: it doesn’t support authentication out of the box. Now you need to secure it without rewriting code or building a custom auth system. That’s where OAuth2-Proxy can help. It’s a straightforward way to set up authentication using OAuth2 providers like Azure, Google, or GitHub, making it easy to lock down access to your app quickly and securely. At KubeNine we have found it most helpful for adding an auth layer in front of Streamlit applications.
OAuth2-proxy also integrates with Kubernetes and works with existing ingress controllers, making it ideal for quickly securing applications without modifying their code. For example, this setup is perfect for protecting internal dashboards and admin panels, ensuring that only authorized users can access sensitive data without altering the application code.
In this blog, you'll learn how to easily secure your applications with OAuth2-Proxy and NGINX ingress. We'll cover the architecture, step-by-step installation, and how to make it work seamlessly in Kubernetes.
How OAuth2-Proxy Works with NGINX Ingress
The diagram below illustrates the authentication flow between the client, NGINX Ingress, OAuth2-Proxy, the Redis store, and the authentication provider. The process shows how session cookies are used to validate future requests and maintain access to the application.
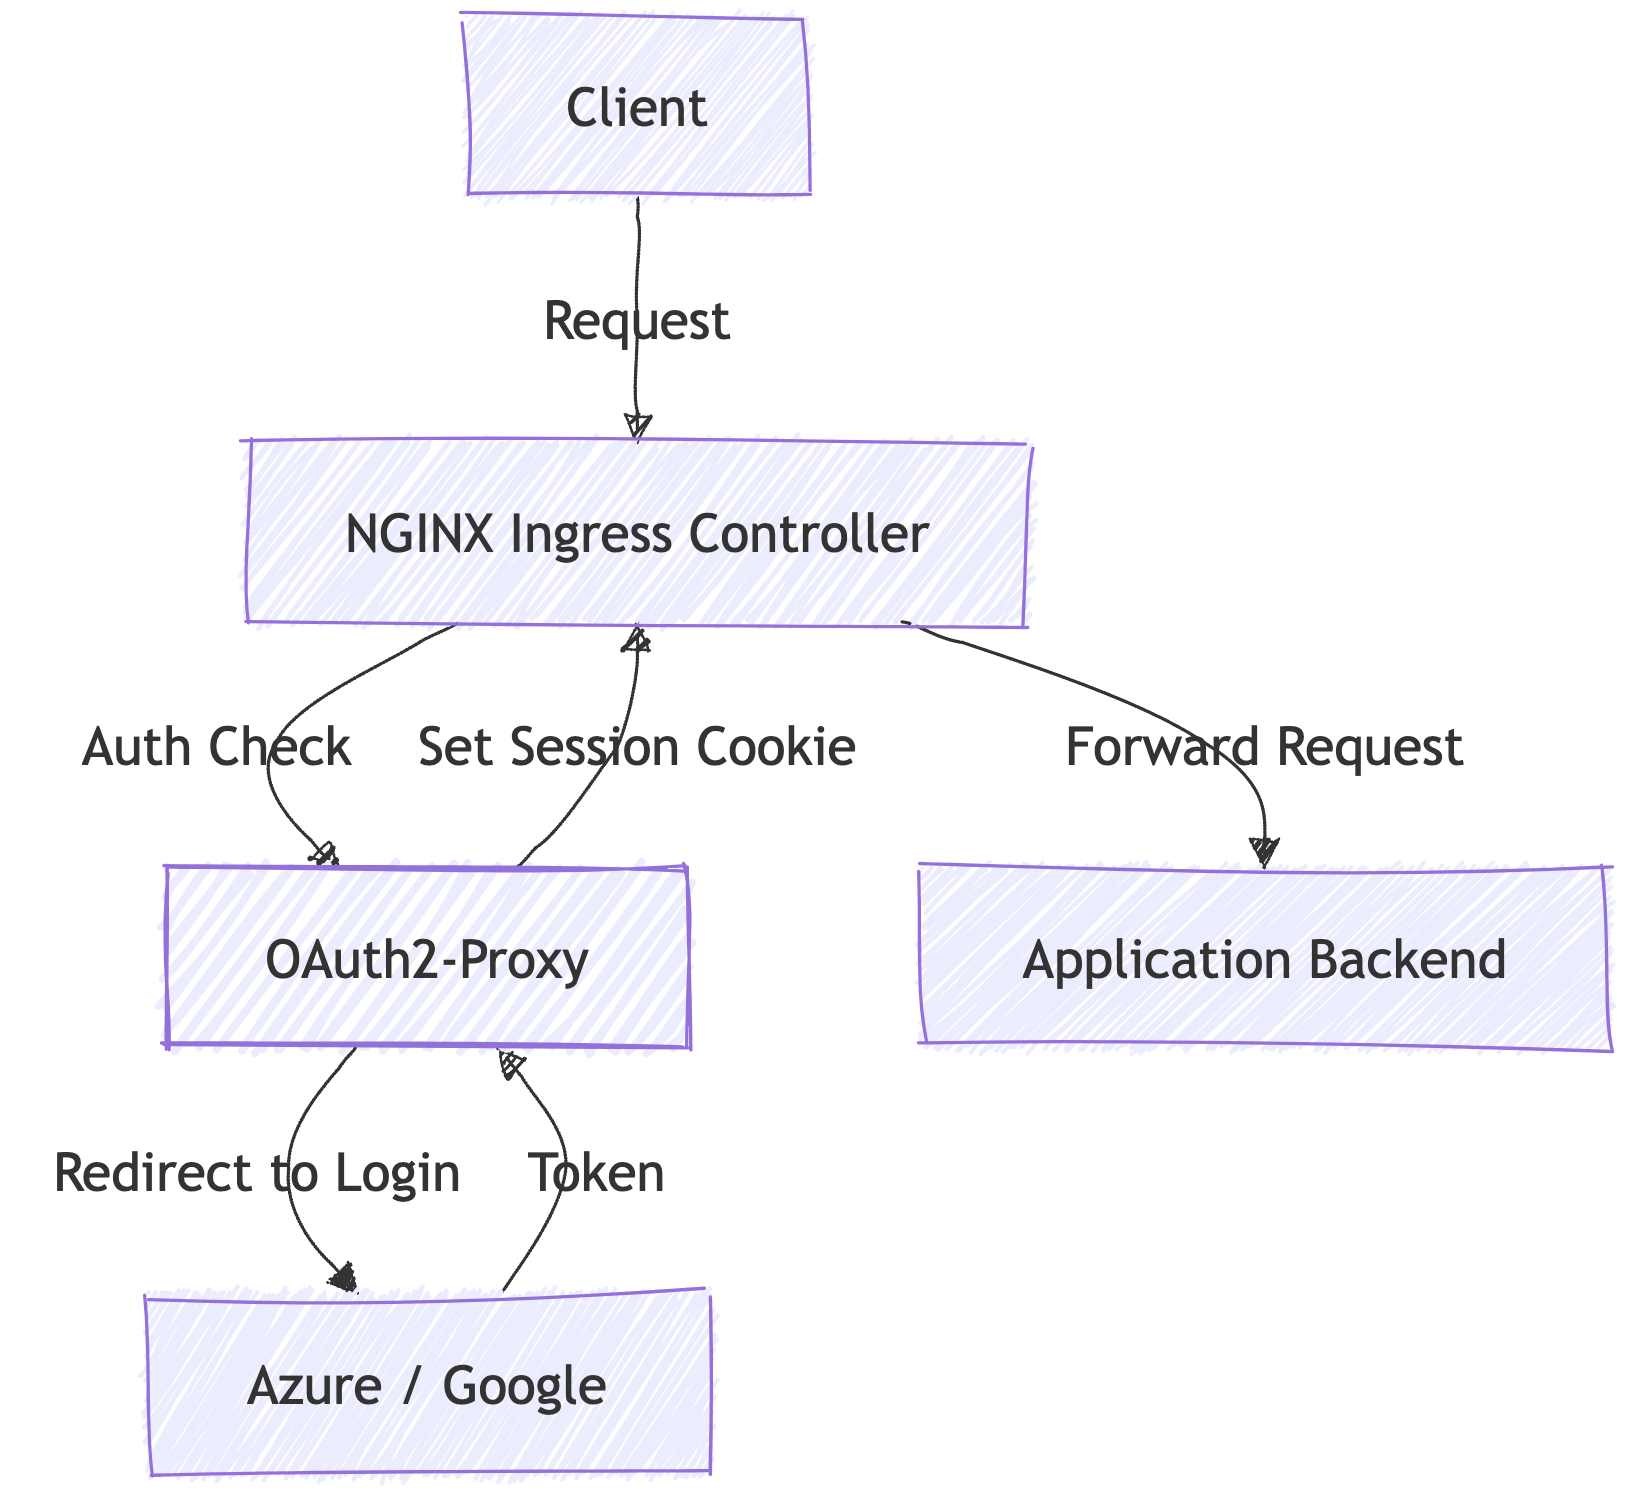
When setting up OAuth2-Proxy with NGINX Ingress, the authentication flow follows these steps:
- Initial Request:
A client sends a request to access your application, for example,https://app.kubenine.com. - Ingress Interception:
NGINX Ingress intercepts the incoming request and forwards the request, along with cookies, to OAuth2-Proxy for authentication. - Cookie Verification:
- OAuth2-Proxy checks the cookies against the Redis store.
- If the cookie is valid, OAuth2-Proxy confirms with NGINX, allowing the client to proceed and access the application.
- If the cookie is invalid or missing, OAuth2-Proxy redirects the user to the authentication provider (e.g., Azure or Google).
- Authentication and Token Storage:
- After authentication, tokens are stored in Redis.
- A session cookie is set at the
/callbackendpoint, which applies to the.kubenine.comdomain and its subdomains.
- Subsequent Requests:
- For all future requests, NGINX forwards the session cookie to OAuth2-Proxy for validation.
- If the cookie is valid, the user continues accessing the application without interruptions.
This flow effectively restricts access to authorized users while leaving the application code untouched.
Implementing OAuth2-Proxy with Microsoft Azure Authentication
There are multiple methods to implement authentication using OAuth2-Proxy. It supports a wide range of providers such as Google, GitHub, and Okta. However, for this example, we will focus on using Microsoft Azure for authentication.
We’ve already covered the architecture; now, let’s look into the implementation details to see how this can be achieved.
Installation Steps
- Add OAuth2-Proxy Helm Repository
To get started, add the official OAuth2-Proxy Helm repository and update it:
helm repo add oauth2-proxy https://oauth2-proxy.github.io/manifests
helm repo update- Deploy OAuth2-Proxy Using Helmfile
The following Helmfile configuration sets up OAuth2-Proxy with Microsoft Azure as the authentication provider. It also uses Redis for session storage to handle authenticated sessions efficiently.
repositories:
  # Define the repository for OAuth2-Proxy Helm chart
  - name: oauth2-proxy
    url: https://oauth2-proxy.github.io/manifests

releases:
  - name: oauth2-proxy  # Name of the release
    chart: oauth2-proxy/oauth2-proxy  # Chart to deploy
    namespace: default  # Namespace for deployment
    values:
      - fullnameOverride: oauth2-proxy  # Override the full name of the release
      - ingress:
          enabled: true  # Enable ingress for external access
          className: nginx  # Use NGINX as ingress controller
          path: /oauth2  # Path where OAuth2-Proxy will be accessible
          annotations:
            cert-manager.io/cluster-issuer: letsencrypt-http  # Enable TLS using Cert-Manager
          hosts:
            - oauth2-proxy.kubenine.com  # Host for OAuth2-Proxy
          tls:
            - hosts:
                - oauth2-proxy.kubenine.com
              secretName: oauth2-proxy-tls  # Secret for TLS certificates
      - config:
          clientSecret: secret  # Client secret for OAuth2 provider
          configFile: |
            email_domains = [ "*" ]  # Allow all email domains
            cookie_secure = "false"  # Use insecure cookies (set to true in production)
            cookie_domains = [ ".kubenine.com" ]  # Cookie domain for subdomain access
            whitelist_domains = [ ".kubenine.com" ]  # Whitelist domains
            provider = "azure"  # Authentication provider
            upstreams = [ "file:///dev/null" ]  # Disable upstream backend
            scope = "openid email profile offline_access"  # OAuth2 scopes
      - extraArgs:
          # Additional arguments for OAuth2-Proxy
          - --provider=azure
          - --client-id=<client-id>  # Client ID for Azure
          - --client-secret=<client-secret>  # Client secret for Azure
          - --azure-tenant=<tenant-id>  # Azure tenant ID
          - --oidc-issuer-url=https://login.microsoftonline.com/<tenant-id>/v2.0  # OIDC URL
          - --redirect-url=https://oauth2-proxy.kubenine.com/oauth2/callback  # Redirect URL after authentication
          - --upstream=file:///dev/null
      - redis:
          enabled: true  # Enable Redis for session storage
          architecture: standalone  # Single-node Redis setup
      - sessionStorage:
          type: redis  # Use Redis as session storage
      - global:
          redis:
            password: redispassword  # Redis password
3. Apply the Configuration
Use the helmfile command to apply the configuration and deploy OAuth2-Proxy:
helmfile apply 4. Configure NGINX Ingress
Next, add the following annotations to your NGINX Ingress configuration to enable OAuth2-Proxy for authentication:
annotations:
  # we tell nginx to use oauth2-proxy for authenticating every request
  nginx.ingress.kubernetes.io/auth-url: "http://oauth2-proxy.default.svc.cluster.local/oauth2/auth"
  # if the authentication fails - nginx redirects user auth-signin endpoint
  nginx.ingress.kubernetes.io/auth-signin: "https://oauth2-proxy.kubenine.com/oauth2/start?rd=$scheme%3A%2F%2F$host$escaped_request_uri"
  nginx.ingress.kubernetes.io/auth-response-headers: "X-Forwarded-User"
Testing the Setup
- Access your application via its URL, for example,
https://app.kubenine.com. - You should be redirected to the Microsoft Azure login page.
- Authenticate with your credentials.
- Verify session storage in Redis and ensure that cookies are functioning as expected.
FAQs
What is OAuth2-Proxy in Kubernetes?
OAuth2-Proxy is an authentication layer that protects Kubernetes applications using OAuth providers like Google, GitHub, or Azure AD before users can access services.
Why should I use OAuth2-Proxy with NGINX Ingress?
OAuth2-Proxy works with NGINX Ingress to add secure authentication and Single Sign-On (SSO) to Kubernetes applications without modifying application code.
Can I secure Kubernetes apps without changing application code?
Yes. OAuth2-Proxy and NGINX Ingress allow you to protect internal dashboards, admin panels, and web applications externally without changing the application itself.
How does NGINX Ingress authentication work in Kubernetes?
NGINX Ingress uses authentication annotations such as auth-url and auth-signin to redirect unauthenticated users to OAuth2-Proxy for login verification.
Why is Redis used with OAuth2-Proxy?
Redis is commonly used with OAuth2-Proxy to store user sessions securely and improve authentication performance across multiple Kubernetes pods.
Conclusion
This setup provides a straightforward way to secure your applications with OAuth2 authentication using OAuth2-Proxy and NGINX Ingress. By implementing this solution, you can lock down access to internal tools and legacy applications without needing to modify their code.
At KubeNine, we use OAuth2-Proxy to secure both internal tools and customer-facing applications. Its versatility makes it an excellent choice for ensuring secure access with minimal configuration. If you’d like help setting this up or have questions about securing your applications, feel free to reach out—we’d be happy to assist!