
On this page
Your Kubernetes API Is Public — Here’s How to Make It Private
Secure your Kubernetes API by removing public exposure. Learn how to use Cloudflare Zero Trust and WARP to enable private, identity-based access with a step-by-step guide.
The Core Problem
You spin up a cluster, grab the kubeconfig, and kubectl just works from wherever you are — coffee shop, hotel WiFi, your couch. Convenient? Absolutely. Safe? Not really.
it just works" experience usually means your Kubernetes API server is sitting on the public internet and once something is publicly reachable, you're playing a game you can't fully win.
The risks
- Anyone on the internet can reach your API endpoint (even if they can't authenticate, they can probe, fingerprint, and wait for the next CVE)
- A kubeconfig accidentally committed to a repo or pasted in a Slack DM becomes immediately exploitable
- Rotating access means regenerating certs, redistributing kubeconfigs.
And no, SSO and client certs don't fully solve this. They're authentication layers on top of an endpoint that's still publicly exposed. Authentication is not the same as inaccessibility.
The hyperscalers figured this out. Most others didn't.
If you're on EKS, GKE, or AKS, you've probably seen the "private cluster" or "private endpoint" toggle. AWS lets you disable the public endpoint entirely and route API traffic through a VPC endpoint. GKE has private clusters with authorized networks. AKS offers private clusters with a private link to the API server. Flip the switch, connect through a bastion or VPN, and your control plane disappears from the internet.
But step outside the big three and the story changes fast. Most managed Kubernetes offerings from smaller cloud providers give you a public API endpoint and that's it. There's no private endpoint option, no VPC peering for the control plane, no managed bastion. You either accept the public endpoint or you don't use their managed Kubernetes.That's a real gap.
The good news: you can close that gap yourself, without changing providers and without disrupting how your team uses kubectl. Cloudflare Zero Trust, WARP, and Cloudflare Tunnel let you put your API server behind a private network that only authenticated devices can reach — even when the underlying cluster only offers a public endpoint.
The Solution (What We're Building)
We combine Cloudflare Zero Trust + WARP + Kubernetes tunnel to create:
A fully private Kubernetes API
Accessible only via WARP-enrolled devices
Completely unreachable from public internet
Architecture

Private Kubernetes API access enforced through Zero Trust — no public exposure.
PART 1 — Cloudflare Zero Trust Setup
(From your uploaded guide — structured and simplified)
Step 1 — Create Zero Trust Account
- Go to dash.cloudflare.com
- Open Zero Trust dashboard
- Note your Team Name (important for WARP login)
Step 2 — Configure Identity Provider
Use one of:
- Azure AD (recommended for teams)
- GitHub
- One-time PIN
This controls who can access your network
Step 3 — Enable Device Networking (Critical)
Navigate:
Zero Trust → Team & Resources → Devices → Management
Enable:
- Assign unique IP → gives devices IP like 100.96.x.x
- Peer-to-peer connectivity → allows device communication
Step 4 — Fix Split Tunnel (VERY IMPORTANT)
Go to:
Devices → Device Profiles → Default → Split Tunnels
Delete this entry:
100.64.0.0/10
Why?
Because your WARP IPs (100.96.x.x) are inside this range.
If not removed:
- Traffic bypasses Cloudflare
- Your whole setup breaks
Step 5 — Device Enrollment Policy
Restrict access to only your team:
Devices → Management → Device Enrollment
Example:
- allow: dev1@company.com
- block: everyone else
🔹 Step 6 — Install WARP on Devices
On every developer machine:
brew install --cask cloudflare-warp
Login:
WARP → Preferences → Login with Zero Trust
Enter team name → authenticate
✔ Device now becomes part of your private network
Step 7 — Lock WARP (Security Hardening)
Enable:
- Lock WARP switch
- Auto-connect
- Admin override
Prevents devs from bypassing security
Step 8 — Add DNS Firewall (Security Layer)
Go to:
Zero Trust → Traffic Policies → DNS
Create policies:
Block threats:
- Malware
- Phishing
- Botnets
- Cryptomining
Block risky domains:
- Newly registered domains
- Suspicious domains
Stops attacks before connection happens
Step 9 — Network Access Policy
Example:
Allow only devs to reach internal resources:
Allow:
  user email IN [dev team]
  destination IP = 100.96.x.x
Block everyone else.
PART 2 — Connect Kubernetes via Cloudflare Tunnel
(This is where your Kubernetes blog integrates)
Step 10 — Create Tunnel
Go to:
Zero Trust → Networks → Tunnels → Create

Type: cloudflared
Copy the tunnel token
Step 11 — Deploy cloudflared in Kubernetes
Create namespace
kubectl create namespace cloudflare-tunnel
Create secret
kubectl create secret generic tunnel-token \
  --from-literal=token=<TOKEN> \
  -n cloudflare-tunnel
ConfigMap (enable WARP routing)
warp-routing:
  enabled: true
👉 This is what allows WARP devices to reach your cluster
Deployment
replicas: 2
image: cloudflare/cloudflared:latest
Verify
kubectl get pods -n cloudflare-tunnel
✔ Pods must be Running
Step 12 — Add Network Routes
Go to:
Zero Trust → Networks → Routes
Add:
10.43.0.0/16 → tunnel   (service CIDR)
192.168.0.0/16 → tunnel (pod CIDR)
Step 13 — Update Split Tunnel Again
Remove:
10.0.0.0/8
192.168.0.0/16
Ensures Kubernetes traffic goes through Cloudflare
PART 3 — Private Kubernetes API Access
Step 14 — Get Internal API IP
kubectl get svc kubernetes -n default
Example:
10.43.0.1
Step 15 — Update kubeconfig
server: https://10.43.0.1:443
✔ No other changes required
Step 16 — Test Access
With WARP ON:
kubectl get nodes
Works
With WARP OFF:
no route to host
Blocked
Final Security Model
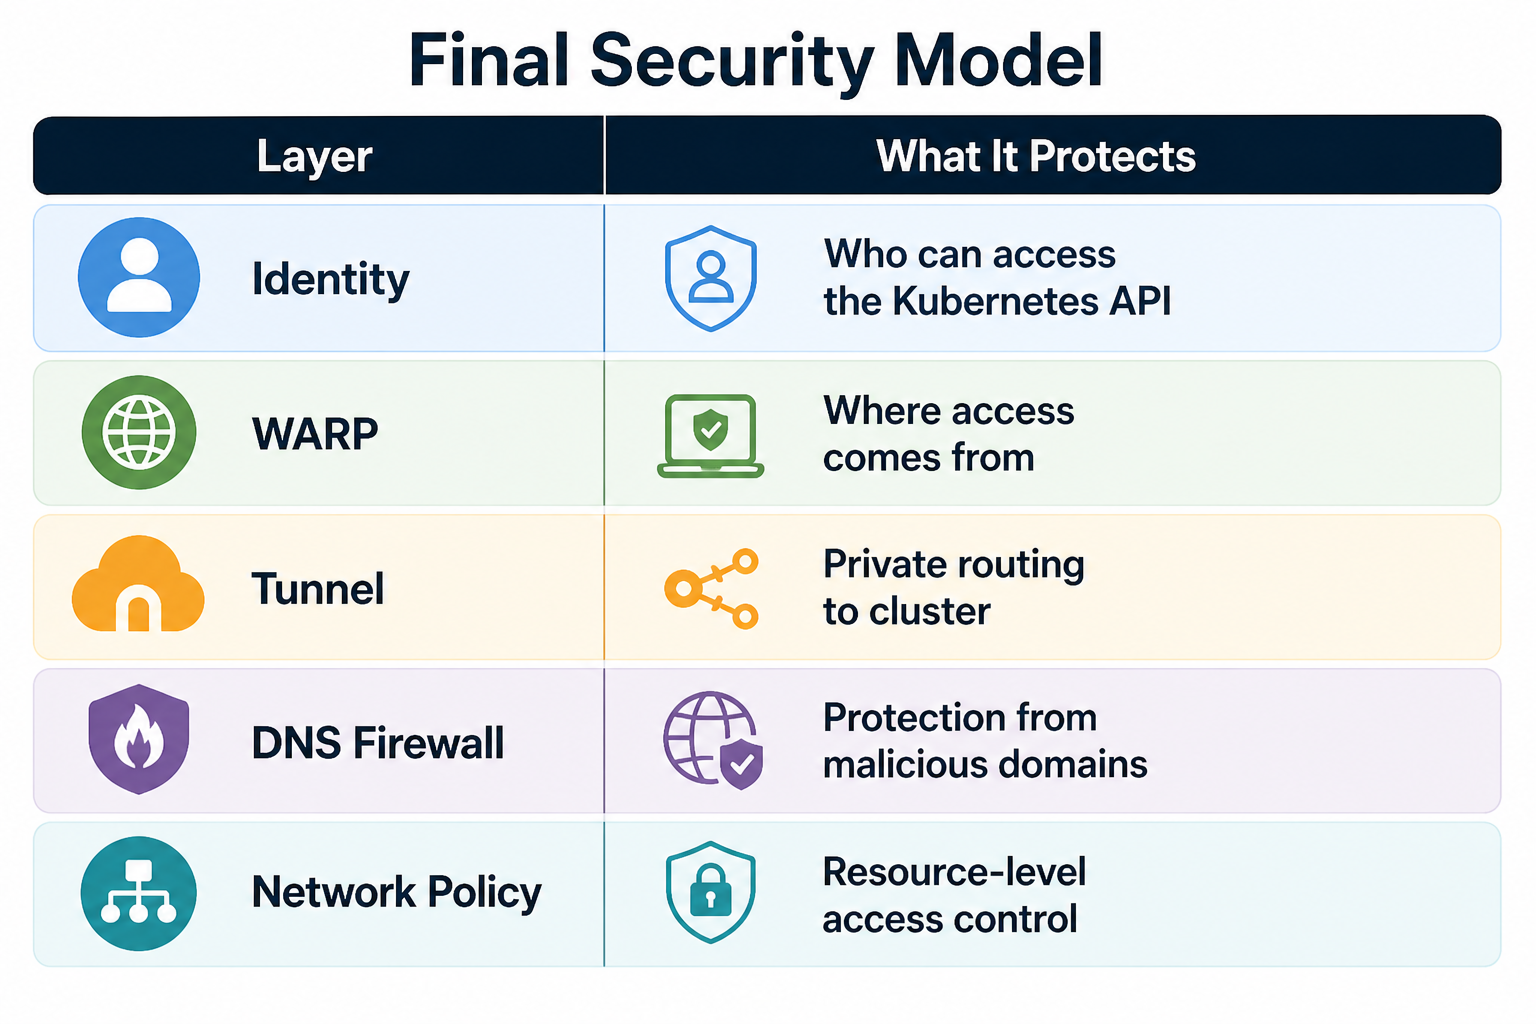
What You Achieve
- No public Kubernetes API
- Access only via enrolled devices
- Instant revoke via Cloudflare
- Full audit logs
- No firewall complexity
FAQ
1. How can I access a Kubernetes API privately?
You can access a private Kubernetes API by using Cloudflare Zero Trust, WARP, and a Cloudflare Tunnel. This setup ensures only authenticated users and enrolled devices can securely connect without exposing the API to the public internet.
2. Why is exposing the Kubernetes API publicly a security risk?
A public Kubernetes API endpoint can be scanned, targeted by bots, and exploited if credentials are leaked. Even with authentication enabled, it increases your attack surface. Private access significantly improves Kubernetes security.
3. What is Cloudflare Zero Trust for Kubernetes?
Cloudflare Zero Trust for Kubernetes is a security approach that combines identity verification, device authentication, and network-level policies. It ensures that only authorized users and trusted devices can access the Kubernetes API.
4. Is Cloudflare WARP required for private Kubernetes API access?
Yes. Cloudflare WARP connects your device to a secure private network and assigns a trusted IP. Without WARP enabled, your device cannot access the private Kubernetes API, ensuring restricted and secure access.
5. What are the benefits of using a private Kubernetes API?
Using a private Kubernetes API improves security, reduces internet exposure, prevents unauthorized access, limits attack surfaces, and helps DevOps teams enforce Zero Trust access controls.
Conclusion
If your Kubernetes API is still public, you’re increasing your attack surface unnecessarily. Moving to a private, Zero Trust-based setup is one of the simplest and most effective security improvements you can make today.
Kubernetes security should not rely only on credentials.
It should enforce identity + network together.
This setup does exactly that — cleanly, securely, and production-ready.
READ MORE
Want to strengthen your overall cloud security posture? These guides will help.
Route 53 DNS Firewall: Block Malware Across Your VPC
Protect your AWS environment by blocking malicious domains, phishing, and bot traffic at the DNS level.
https://www.kubeblogs.com/route-53-dns-firewall-aws-egress-security/
Fix 504 Errors in GKE Load Balancer (BackendConfig Guide)
Learn how we resolved 30-second timeout issues in GKE using BackendConfig and proper load balancer tuning.
https://www.kubeblogs.com/fixing-504-errors-in-gke-load-balancer-how-backendconfig-solved-our-30-second-timeout-problem/
How We Use Airflow to Optimize Our DevOps Workflow
Discover how we automated workflows, improved efficiency, and reduced manual overhead using Apache Airflow.
https://www.kubeblogs.com/how-we-use-airflow-to-optimize-our-devops-workflow/