Table of Contents
Introduction
Role-Based Access Control (RBAC) is essential for securing applications. FastAPI is a very popular Python framework and in this blog we simplify the whole setup for you.
Implementing RBAC from scratch requires managing user roles, permissions, and access tokens, which adds complexity to your application code.
Keycloak centralizes authentication and authorization. It handles user management, role assignment, and token generation, allowing your application to focus on business logic.
In this guide, we'll cover JWT token validation, permission checking, resource-based access control, and admin role bypass patterns. The implementation uses FastAPI's dependency injection to keep authorization logic separate from business logic.
Step-by-Step Implementation
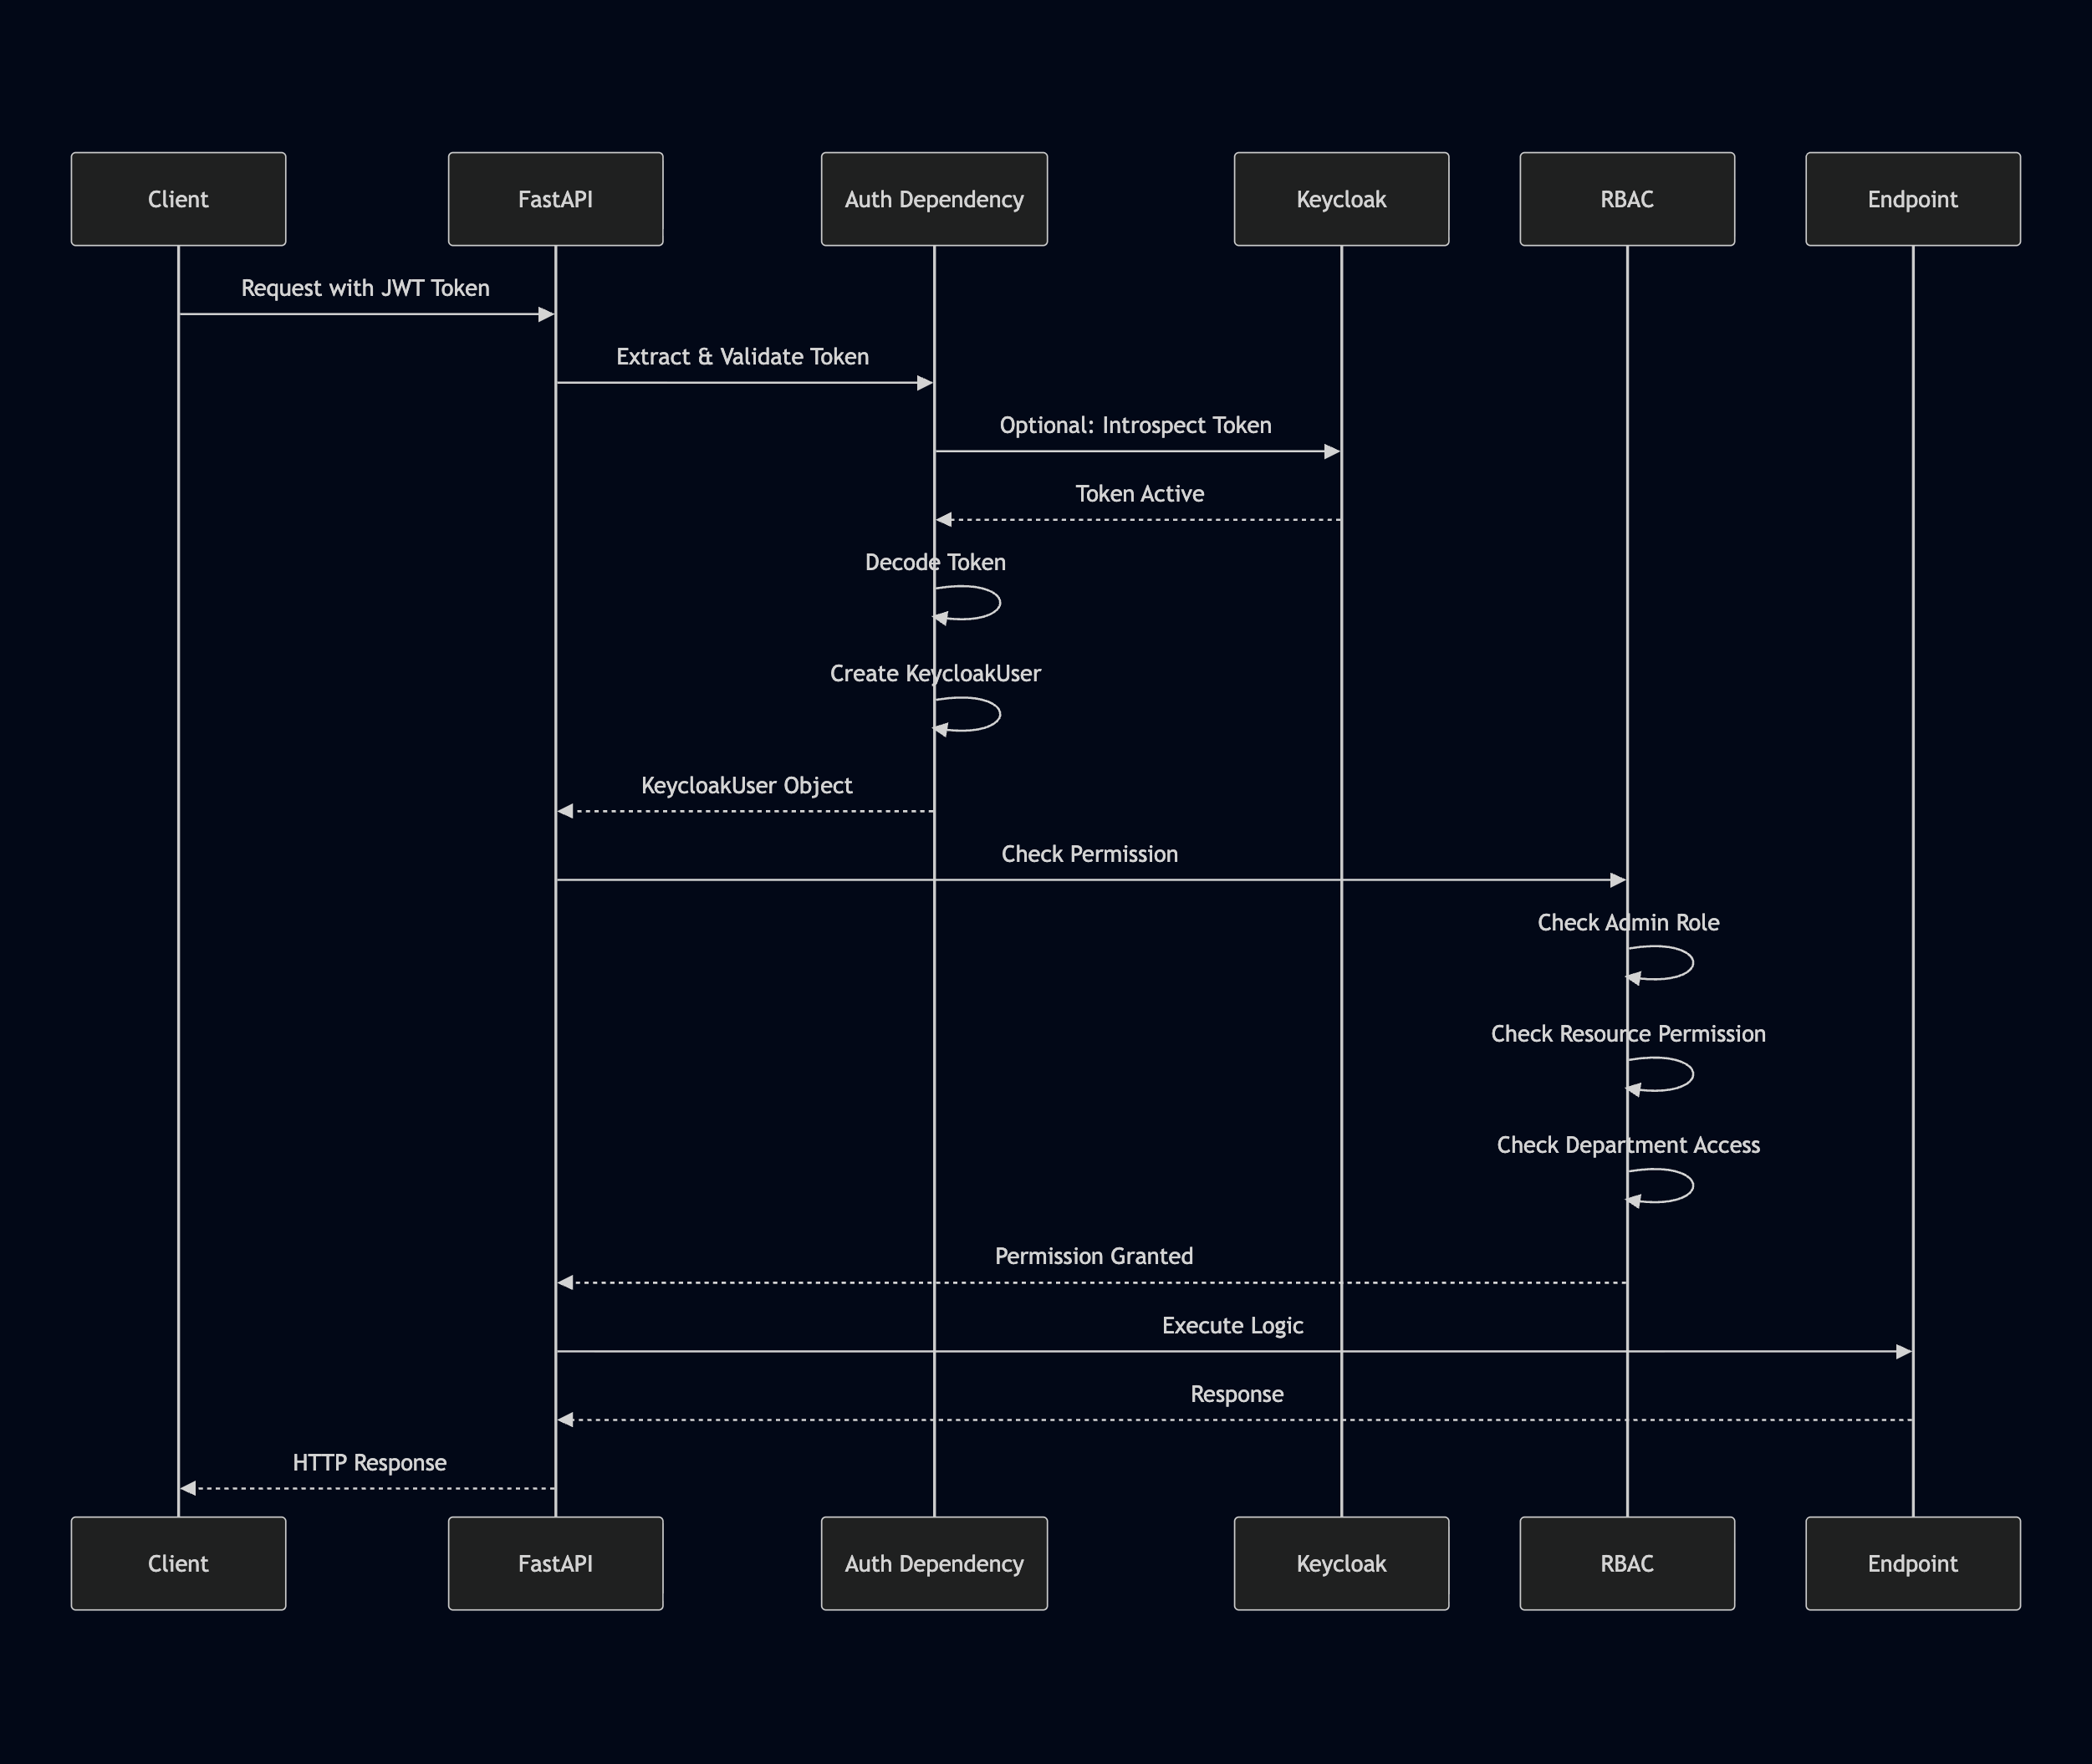
Architecture Overview
The RBAC system follows a layered architecture where authentication and authorization are handled through FastAPI dependencies:
Step 1: Keycloak Server Configuration
Before integrating with your FastAPI application, configure Keycloak with the necessary realms, clients, roles, and user attributes.
Create a Realm
- Log into Keycloak Admin Console
- Click "Create Realm" in the top-left dropdown
- Enter a realm name (e.g., "myapp")
- Configure realm settings:
- User-managed access: Enable if you need fine-grained permissions
- Email as username: Enable if users should use email for login
- User registration: Enable if you want self-registration
Create a Client
- Navigate to Clients in the left sidebar
- Click Create client
- Configure client settings:
- Client ID: Set a unique identifier (e.g., "myapp-backend")
- Client protocol: Select "openid-connect"
- Access Type: Choose "confidential" for server-side applications
- Standard Flow Enabled: Enable for authorization code flow
- Direct Access Grants Enabled: Enable if you need password-based authentication
- Valid Redirect URIs: Add your application URLs (e.g.,
<http://localhost:8000/api/v1/auth/callback)> - Web Origins: Add allowed origins for CORS (e.g.,
<http://localhost:3000)>
- Save the client configuration
Configure Client Credentials
- Go to the Credentials tab of your client
- Copy the Client Secret - you'll need this for token introspection
- Store the client secret securely in your application's environment variables
Set Up Roles
Create roles that your application will check for permissions:
Realm Roles (applies across all clients in the realm):
- Navigate to Realm roles in the left sidebar
- Click Create role
- Create roles like:
admin- Superuser role that bypasses all permission checksuser- Standard user role
Client Roles (specific to your client):
- Go to your client → Roles tab
- Click Create role
- Create resource-specific roles following your permission pattern:
reports:generatedata:readdata:writeusers:manage
Configure User Attributes
To support department-based access control, configure custom user attributes:
- Navigate to Realm settings → User profile
- Add a custom attribute (e.g.,
department) - Configure the attribute:
- Name:
department - Display name: Department
- User editable: Set based on your requirements
- Required: Set based on your requirements
- Name:
Alternatively, you can add attributes directly to users without modifying the user profile schema.
Configure Token Claims
To include custom attributes in JWT tokens:
- Go to your client → Client scopes tab
- Click Add mapper → By configuration → User Attribute
- Configure the mapper:
- Name: Department Mapper
- User Attribute:
department - Token Claim Name:
department - Claim JSON Type: String
- Add to ID token: Enable
- Add to access token: Enable
- Add to userinfo: Enable
- Repeat for any other custom attributes you need in tokens
Assign Roles to Users
- Navigate to Users in the left sidebar
- Select a user or create a new one
- Go to the Role Mappings tab
- Assign realm roles or client roles:
- Click Assign role for realm roles
- Select your client and assign client roles
- For department-based access, set the user's
departmentattribute in the Attributes tab
Configure Token Settings
- Go to Realm settings → Tokens
- Configure token lifetimes:
- Access Token Lifespan: Set appropriate expiration (default: 5 minutes)
- SSO Session Idle: Time before session expires
- SSO Session Max: Maximum session duration
- For production, consider shorter token lifespans and enable refresh tokens
Enable Token Introspection (Optional)
If you want to verify token status in real-time:
- Go to your client → Settings
- Ensure Service Accounts Enabled is enabled
- Go to Service Account Roles tab and assign necessary roles
- The client secret from the Credentials tab is used for introspection
Step 2: Application Configuration
Configure Keycloak connection settings in your FastAPI application using environment variables. Store these in a Pydantic Settings class with fields for server URL, realm, client ID, admin role, and authentication toggle:
class Settings(BaseSettings):
    keycloak_server_url: str = "https://auth.example.com"
    keycloak_realm: str = "myapp"
    keycloak_client_id: str = "myapp-backend"
    keycloak_client_secret: str = ""  # From client credentials
    keycloak_issuer_url: str = "https://auth.example.com/realms/myapp"
    keycloak_verify_signature: bool = True
    keycloak_admin_role: str = "admin"
    enable_keycloak_auth: bool = True
The enable_keycloak_auth flag allows you to disable authentication in development environments.
Step 3: Keycloak User Model
Create a Pydantic model to represent user information from JWT tokens. The model extracts roles from both realm-level and client-level access claims:
class KeycloakUser(BaseModel):
    sub: str
    email: str
    realm_access: dict | None = None
    resource_access: dict | None = None
    department: str | None = None

    def get_roles(self) -> list[str]:
        # Aggregates roles from realm_access, resource_access, and custom attributes
        pass

    def has_role(self, role: str) -> bool:
        return role in self.get_roles()
The get_roles() method aggregates roles from multiple sources and automatically generates resource-based roles from user attributes, supporting multi-tenant applications.
Step 4: Authentication Dependency
Create a FastAPI dependency that authenticates users by extracting JWT tokens from Authorization headers or cookies, decoding them, and optionally verifying token status with Keycloak's introspection endpoint:
async def get_current_user(request: Request) -> KeycloakUser:
    token = extract_keycloak_token(request)
    user = decode_keycloak_token(token, settings.keycloak_issuer_url)
    # Optional: Verify token is still active with Keycloak
    return user
Token introspection verifies that tokens are still active in Keycloak, catching revoked sessions immediately even if tokens haven't expired.
Step 5: Permission Checking
Implement permission checking with admin bypass. Admin users can access all resources without explicit permissions:
def has_permission(user: KeycloakUser, permission: str) -> bool:
    if user.has_role(settings.keycloak_admin_role):
        return True
    return permission in user.get_roles()
Step 6: Endpoint Protection
Protect endpoints using FastAPI dependencies. The dependency combines authentication and authorization:
@router.post("/api/reports")
async def generate_report(
    user: KeycloakUser = Depends(
        require_permission("reports:generate")
    ),
) -> dict:
    validate_resource_access(user, request.department)
    # Endpoint logic
For admin-only endpoints, use a separate dependency that checks for the admin role.
Permission Structure
The RBAC system uses a hierarchical permission structure:
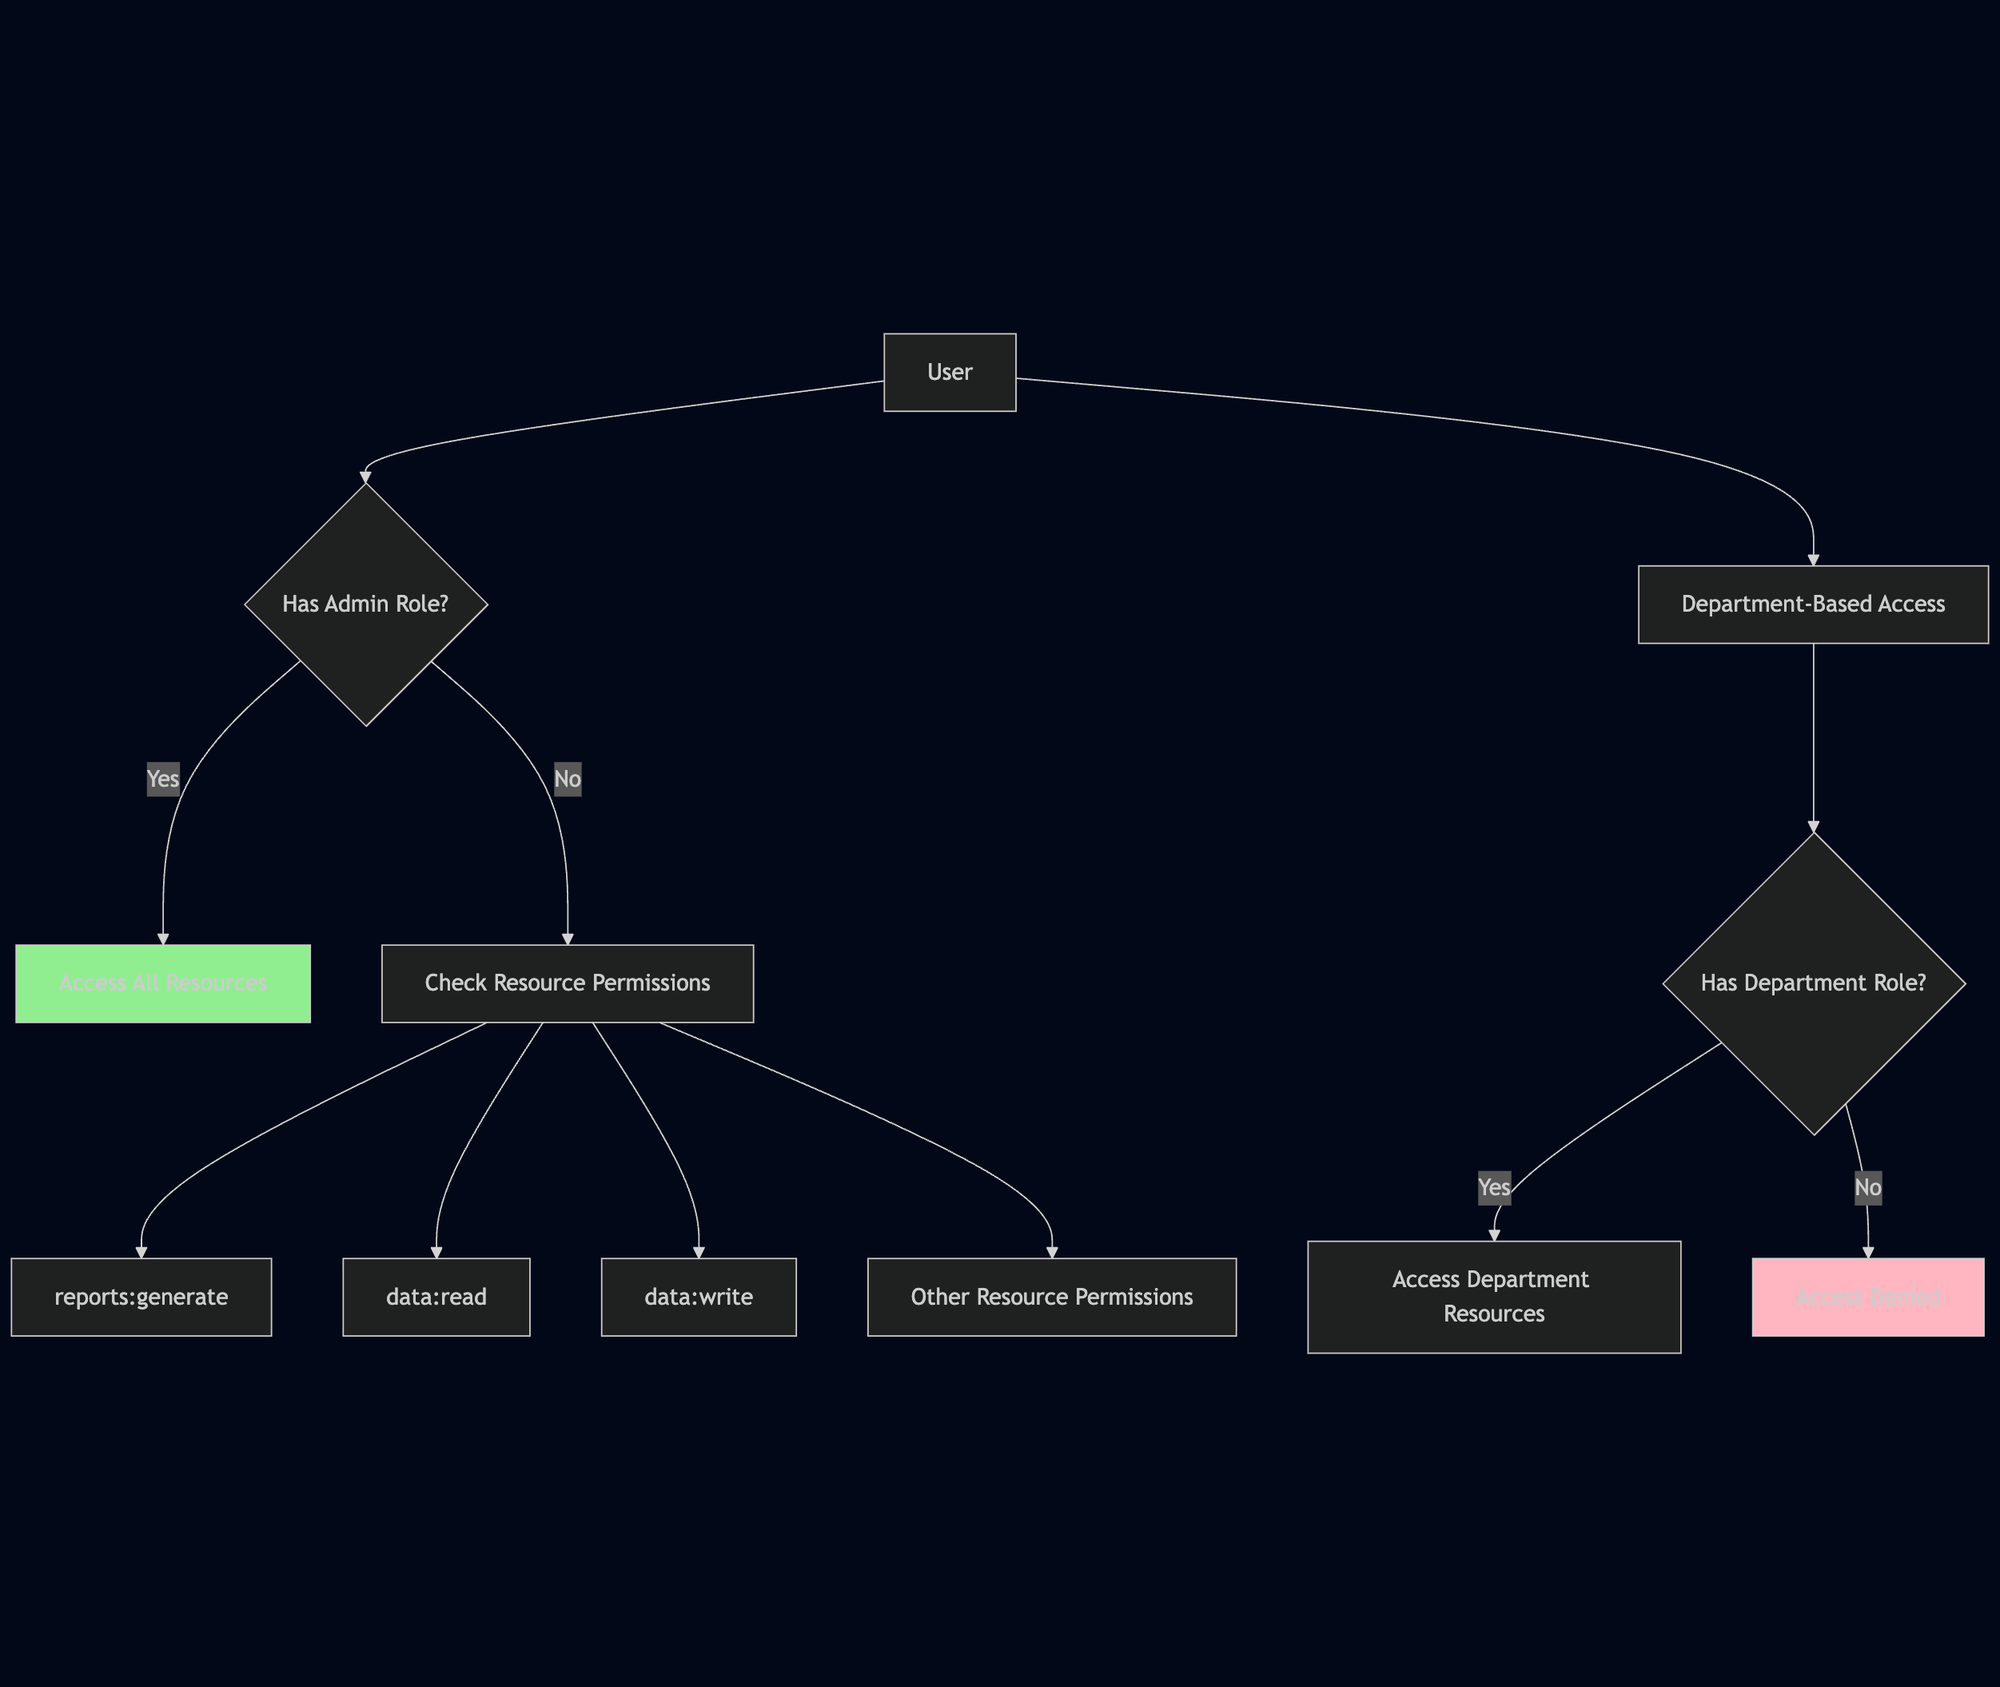
Admin users bypass all permission checks. Regular users must have explicit resource permissions and department roles to access resources.
Permissions follow a hierarchical naming pattern like resource:action. Examples include reports:generate, data:read, data:write, and users:manage. The system maps resource names to permissions using a helper function that standardizes permission naming across the application.
Department roles are automatically generated from user attributes in the KeycloakUser.get_roles() method. The system checks for both department:{department_name} and {department_name} formats for backward compatibility. Users can only access resources within their assigned departments, unless they have the admin role which bypasses all department checks.
Token Introspection
For enhanced security, verify tokens with Keycloak's introspection endpoint. This ensures revoked sessions are immediately invalidated, even if tokens haven't expired. The introspection endpoint checks token status in real-time. If introspection fails due to network issues, the system falls back to expiration checking to avoid blocking all requests.
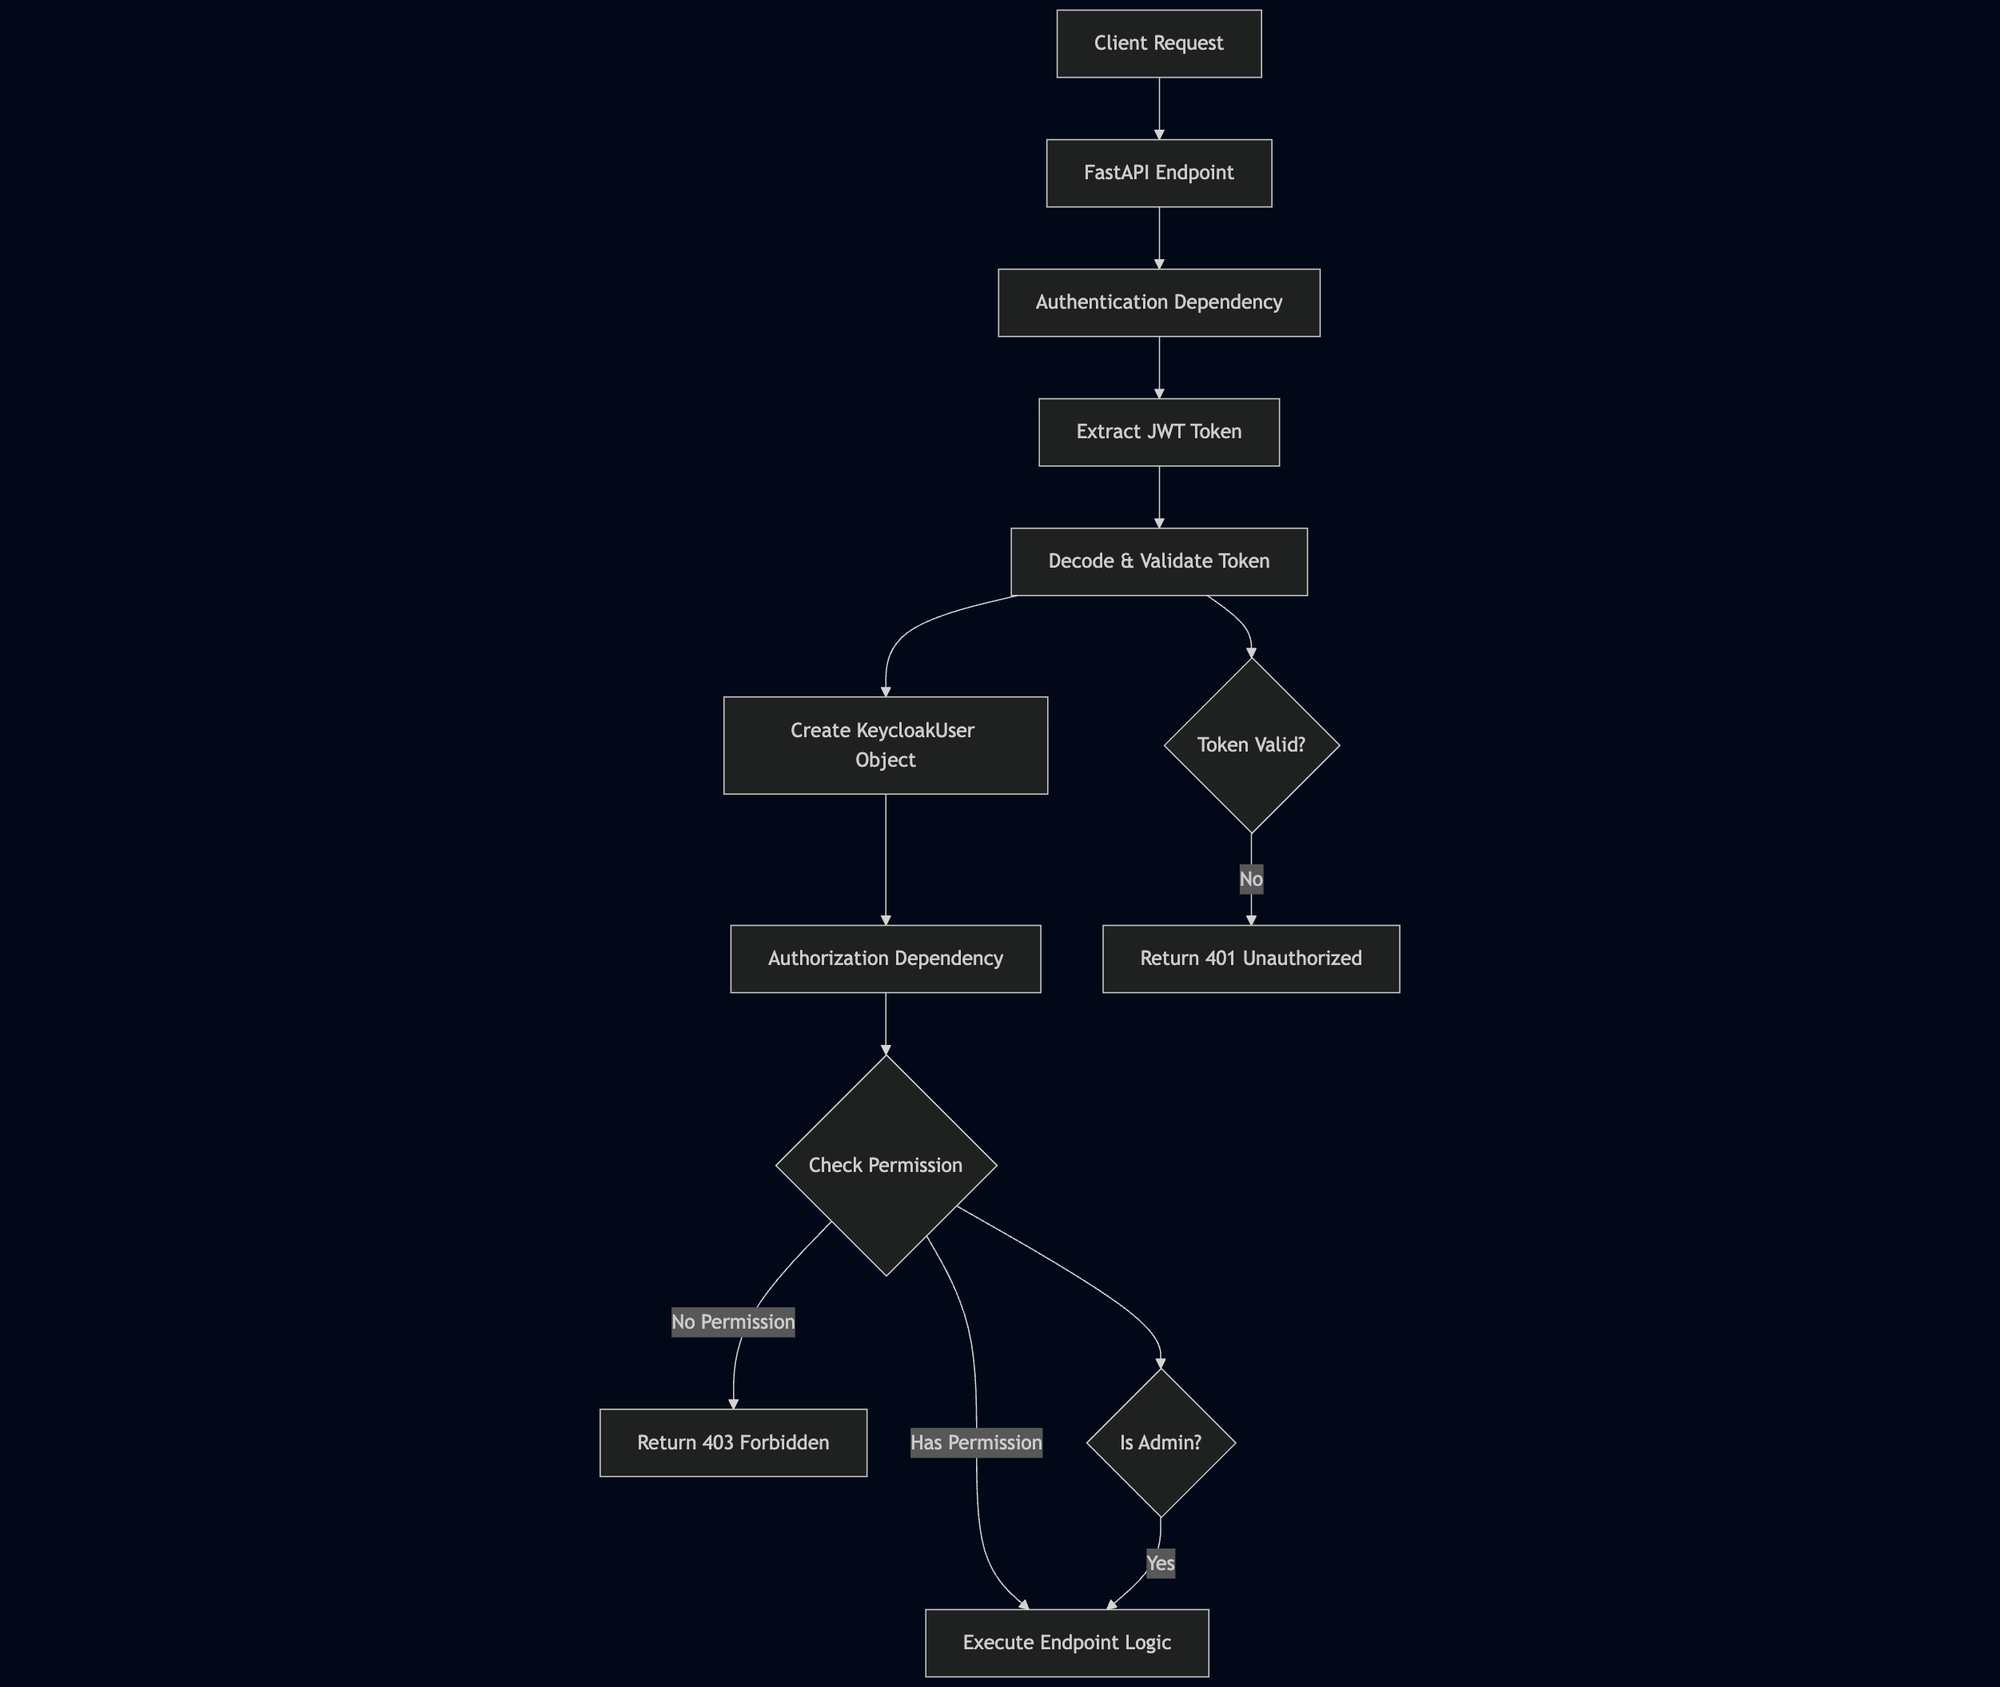
Request Flow
The complete request flow from client to endpoint execution:
Conclusion
Implementing RBAC with Keycloak in FastAPI provides a simplified authorization system that separates authentication concerns from business logic.
Key takeaways from this implementation:
- Centralized authentication through Keycloak reduces application complexity
- FastAPI dependencies enable declarative permission enforcement
- Admin role bypass simplifies superuser access patterns
- Resource-based RBAC supports multi-tenant architectures
- Token introspection provides real-time revocation checking
The system handles authentication, permission checking, and resource-based access control while maintaining code clarity. FastAPI's dependency system makes it easy to add authorization to new endpoints without duplicating logic.
Recent Posts