Table of Contents
Introduction
Managing Kubernetes secrets across multiple namespaces is a common pain point for DevOps teams. Manually creating and maintaining identical secrets in every namespace not only increases operational overhead but also introduces security risks through inconsistent configurations. Kubernetes Reflector solves this challenge by automatically replicating secrets across namespaces, ensuring consistency and reducing manual intervention.
This guide will walk you through implementing Kubernetes Reflector in your cluster, demonstrating how to automate secret management and improve your overall Kubernetes security posture.
What is Kubernetes Reflector?
Kubernetes Reflector is a custom controller that automatically reflects (replicates) Kubernetes resources, particularly secrets, across different namespaces. It watches for specific annotations on resources and automatically creates copies in target namespaces, eliminating the need for manual secret creation and maintenance.
Key Benefits:
- Automated Secret Replication: Eliminates manual secret creation across namespaces
- Consistency Management: Ensures all namespaces have identical secret configurations
- Operational Efficiency: Reduces DevOps team workload and potential human errors
- Security Enhancement: Centralizes secret management and reduces configuration drift
Architecture Overview
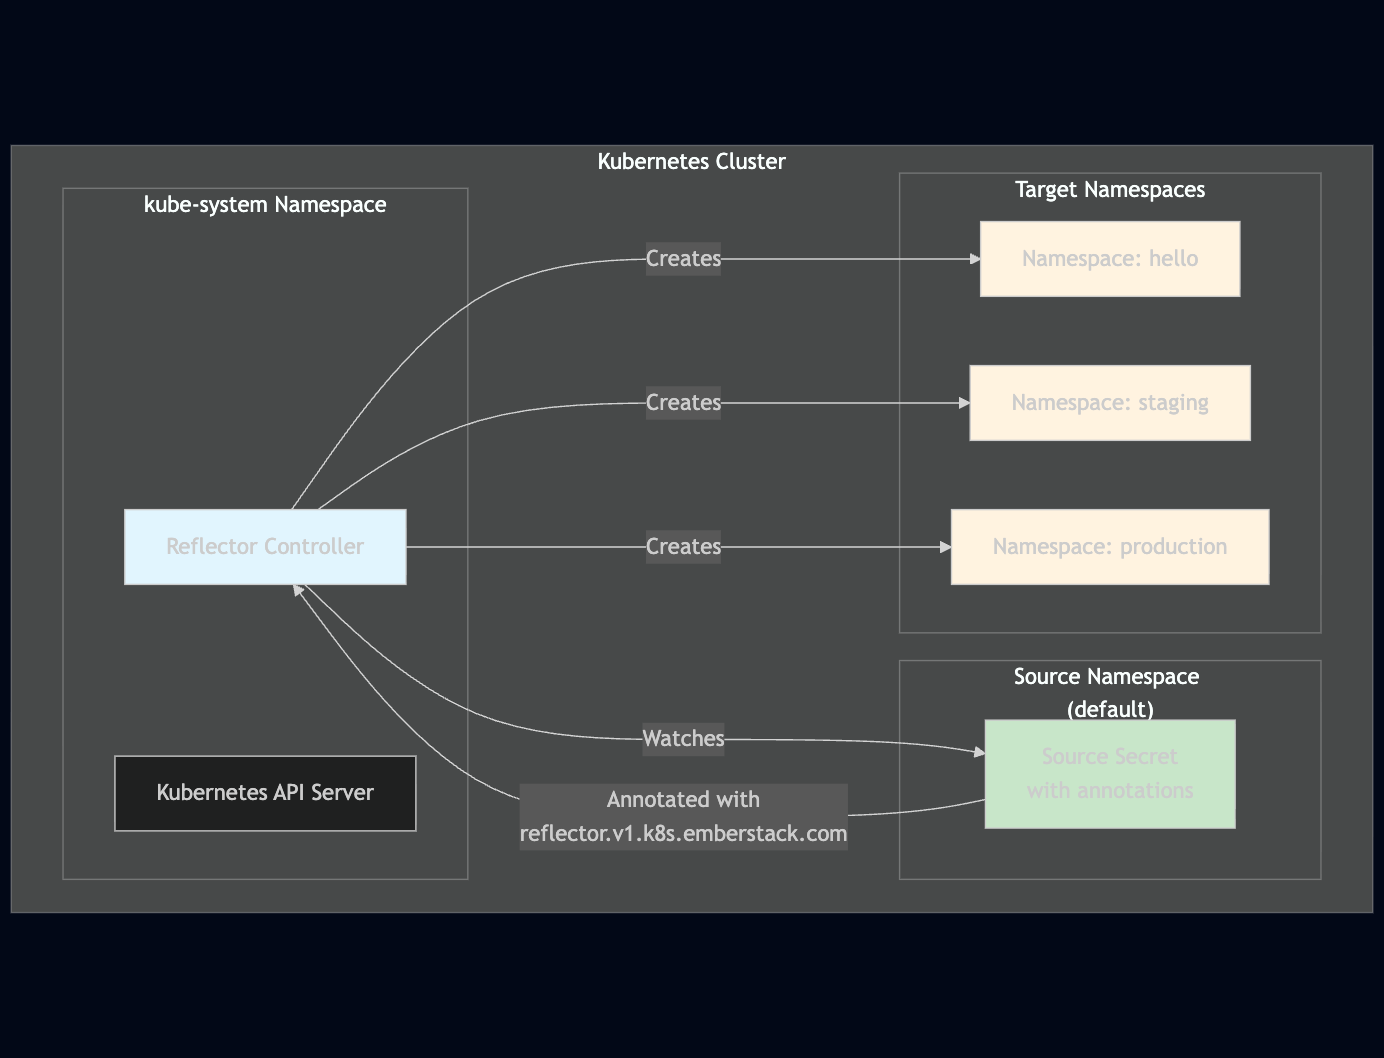
Step-by-Step Implementation
Prerequisites
- A running Kubernetes cluster with kubectl configured
- Cluster admin permissions for installing the Reflector controller
- Existing namespaces where you want to replicate secrets
Step 1: Install Kubernetes Reflector
Install the Reflector controller using kubectl:
kubectl apply -f https://github.com/emberstack/kubernetes-reflector/releases/download/v1.0.0/reflector.yamlVerify the installation by checking the kube-system namespace:
kubectl get pods -n kube-system | grep reflector
kubectl get deployments -n kube-system | grep reflector
Installation Flow
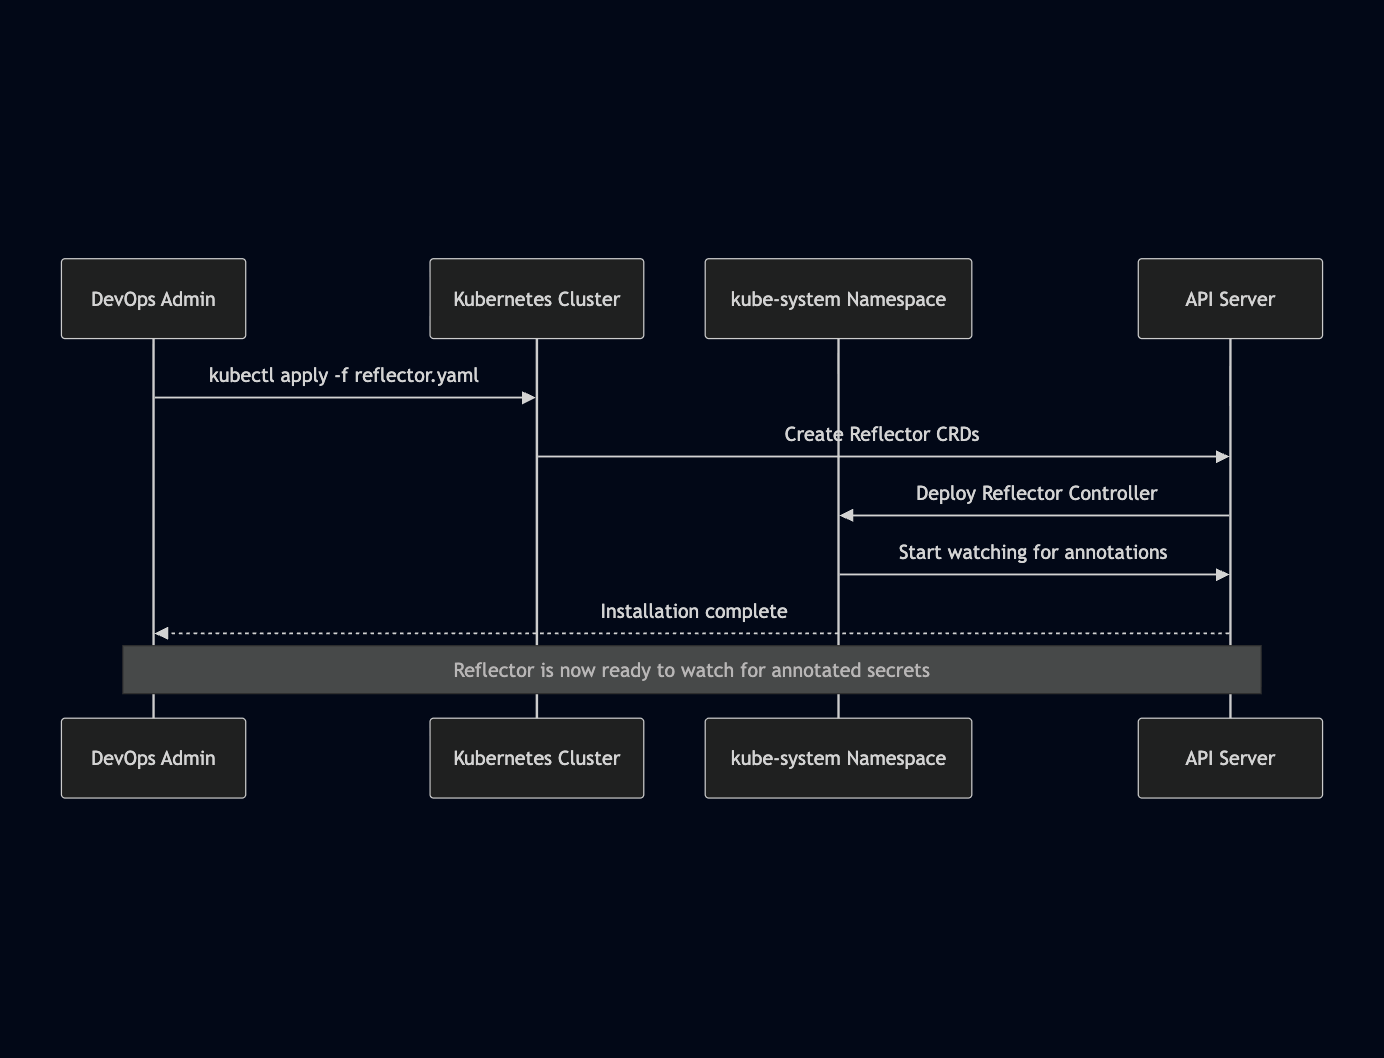
Step 2: Create a Source Secret
Create a secret in your source namespace (e.g., default):
apiVersion: v1
kind: Secret
metadata:
  name: docker-registry-secret
  namespace: default
  annotations:
    reflector.v1.k8s.emberstack.com/reflection-allowed: "true"
    reflector.v1.k8s.emberstack.com/reflection-auto-enabled: "true"
type: kubernetes.io/dockerconfigjson
data:
  .dockerconfigjson: <base64-encoded-docker-config>
Step 3: Verify Secret Replication
Check that the secret has been replicated to target namespaces:
# Check source namespace
kubectl get secrets -n default

# Check target namespace (e.g., hello namespace)
kubectl get secrets -n hello
Advanced Configuration Options
Selective Namespace Targeting
To replicate secrets only to specific namespaces, use the reflection-allowed-namespaces annotation:
apiVersion: v1
kind: Secret
metadata:
  name: docker-registry-secret
  namespace: default
  annotations:
    reflector.v1.k8s.emberstack.com/reflection-allowed: "true"
    reflector.v1.k8s.emberstack.com/reflection-auto-enabled: "true"
    reflector.v1.k8s.emberstack.com/reflection-allowed-namespaces: "namespace1,namespace2,namespace3"
type: kubernetes.io/dockerconfigjson
data:
  .dockerconfigjson: <base64-encoded-docker-config>
Excluding Specific Namespaces
To exclude certain namespaces from replication:
apiVersion: v1
kind: Secret
metadata:
  name: docker-registry-secret
  namespace: default
  annotations:
    reflector.v1.k8s.emberstack.com/reflection-allowed: "true"
    reflector.v1.k8s.emberstack.com/reflection-auto-enabled: "true"
    reflector.v1.k8s.emberstack.com/reflection-allowed-namespaces: "namespace1,namespace2"
    reflector.v1.k8s.emberstack.com/reflection-auto-namespaces: "namespace1,namespace2"
type: kubernetes.io/dockerconfigjson
data:
  .dockerconfigjson: <base64-encoded-docker-config>
Security and Compliance Considerations
Access Control
- Ensure only authorized users can create secrets with reflection annotations
- Implement RBAC policies to restrict secret creation permissions
- Use namespace isolation to prevent unauthorized access to reflected secrets
Audit and Monitoring
- Enable Kubernetes audit logging for secret operations
- Monitor Reflector controller logs for any replication failures
- Implement alerts for failed secret replication attempts
Compliance Requirements
- Document all reflected secrets and their target namespaces
- Establish procedures for secret rotation and updates
- Ensure reflected secrets meet your organization's security standards
Best Practices and Recommendations
1. Naming Conventions
Use consistent naming conventions for reflected secrets to avoid conflicts:
metadata:
  name: "reflected-{original-secret-name}-{target-namespace}"
2. Resource Limits
Monitor Reflector controller resource usage and set appropriate limits:
resources:
  limits:
    memory: "256Mi"
    cpu: "250m"
  requests:
    memory: "128Mi"
    cpu: "100m"
3. Backup and Recovery
- Implement regular backups of Reflector configurations
- Test secret replication in non-production environments
- Document rollback procedures for failed deployments
4. Performance Optimization
- Limit the number of namespaces per secret to avoid performance issues
- Use selective reflection annotations to minimize unnecessary replication
- Monitor cluster performance during large-scale secret replication
Conclusion
Kubernetes Reflector provides an elegant solution to the complex challenge of managing secrets across multiple namespaces. By automating secret replication, organizations can significantly reduce operational overhead, improve security consistency, and enhance their overall Kubernetes management capabilities.
The implementation process is straightforward, requiring minimal configuration while providing powerful customization options for enterprise environments. As your Kubernetes infrastructure scales, Reflector will become an invaluable tool for maintaining operational efficiency and security standards.
We’ve also published a detailed video walkthrough for this topic—watch it here:


