
On this page
How to Securely Expose Your Applications Using Cloudflare Tunnel (Step-by-Step Guide)

Introduction
You've built a media server, a monitoring dashboard, or a personal application running on your home network. Now you want to access it from anywhere, but opening ports on your router feels risky, and managing SSL certificates is a hassle. What if you could expose your applications to the internet with enterprise-grade security, automatic TLS/SSL, DDoS protection, and bot mitigation—all without opening a single inbound port or paying a cent?
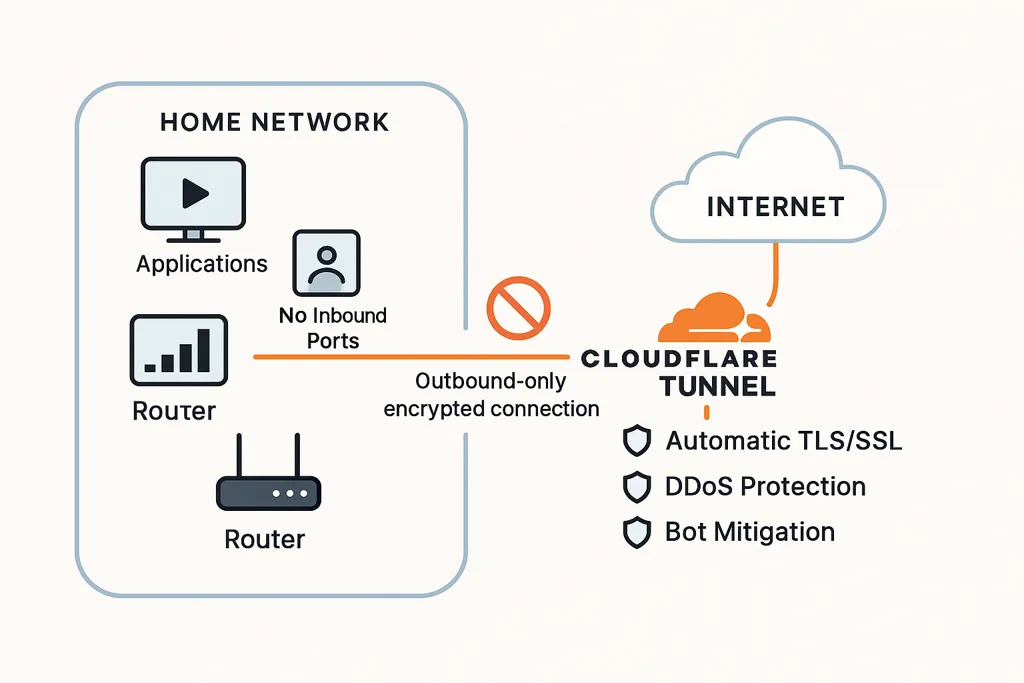
Cloudflare Tunnel makes this possible. Unlike traditional reverse proxy solutions that require opening firewall ports and managing certificates, Cloudflare Tunnel creates an outbound-only encrypted connection from your infrastructure to Cloudflare's global edge network. Your applications remain completely hidden from direct internet access while Cloudflare handles all the security, performance, and reliability concerns at the edge.
This approach eliminates the most common security vulnerabilities: exposed ports, certificate management overhead, and direct attack surfaces. Organizations using Cloudflare Tunnel can achieve zero-trust network architecture where applications are never directly accessible, yet remain fully functional for authorized users worldwide.
How Cloudflare Tunnel Works

Zero Inbound Ports: The cloudflared daemon initiates outbound connections to Cloudflare's edge network. Your firewall can block all inbound traffic while still allowing full application access.
Automatic TLS/SSL: Cloudflare automatically provisions and renews SSL certificates for all domains. No Let's Encrypt automation, no renewal scripts, no certificate expiration incidents.
Built-in Security: The free tier includes DDoS protection, bot detection, and automatic security headers—all at no cost. Advanced WAF features may require configuration or plan upgrades.
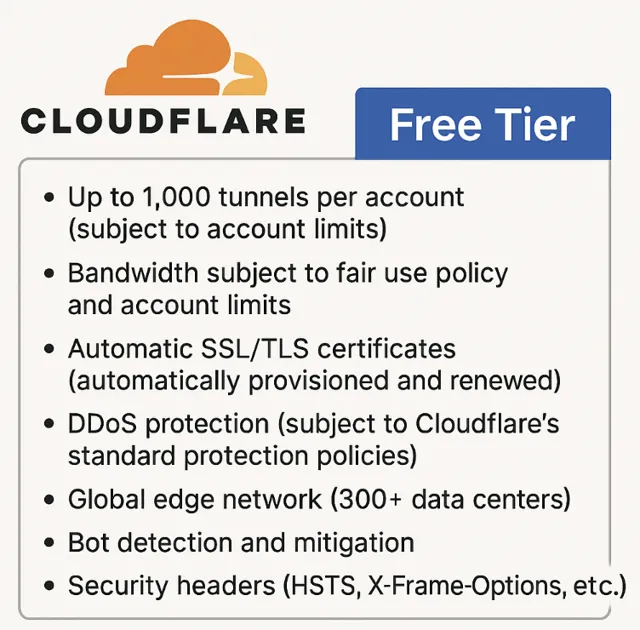
- Up to 1,000 tunnels per account (subject to account limits)
- Bandwidth subject to fair use policy and account limits
- Automatic SSL/TLS certificates (automatically provisioned and renewed)
- DDoS protection (subject to Cloudflare's standard protection policies)
- Global edge network (300+ data centers)
- Bot detection and mitigation
- Security headers (HSTS, X-Frame-Options, etc.)
Setup Process
Step-by-Step Deployment Flow
1. Initial Setup
Install and authenticate with Cloudflare:
# Install cloudflared
curl -L --output cloudflared.deb https://github.com/cloudflare/cloudflared/releases/latest/download/cloudflared-linux-amd64.deb
sudo dpkg -i cloudflared.deb

# Authenticate (opens browser)
cloudflared tunnel login

# Create tunnel
cloudflared tunnel create homelab-tunnel
# Output: Created tunnel with id 92e9e906-7554-4b35-bf7d-39a76d05f1cb
2. Kubernetes Configuration
Create the secret and ConfigMap:
# Create namespace
kubectl create namespace cloudflare

# Create secret from credentials
kubectl create secret generic cloudflared-cert \
  --from-file=credentials.json=~/.cloudflared/92e9e906-7554-4b35-bf7d-39a76d05f1cb.json \
  -n cloudflare
ConfigMap structure:
apiVersion: v1
kind: ConfigMap
metadata:
  name: cloudflared-config
  namespace: cloudflare
data:
  config.yaml: |
    tunnel: 92e9e906-7554-4b35-bf7d-39a76d05f1cb
    credentials-file: /etc/cloudflared/creds/credentials.json
    ingress:
      - hostname: jellyfin.example.com
        service: http://jellyfin.jellyfin:8096
      - hostname: grafana.example.com
        service: http://prometheus-stack-grafana.monitoring:80
      - service: http_status:404
3. Deploy Cloudflare Tunnel
Create and apply the complete deployment YAML:
apiVersion: apps/v1
kind: Deployment
/////////////
/////////////
    spec:
      containers:
      - name: cloudflared
        image: cloudflare/cloudflared:2024.2.0
        args:
        - tunnel
        - --config
        - /etc/cloudflared/config/config.yaml
        - run
        resources:
          requests:
            memory: "64Mi"
            cpu: "100m"
          limits:
            memory: "128Mi"
            cpu: "200m"
        securityContext:
          capabilities:
            add:
            - NET_ADMIN
        volumeMounts:
        - name: config
          mountPath: /etc/cloudflared/config
          readOnly: true
        - name: creds
          mountPath: /etc/cloudflared/creds
          readOnly: true
      volumes:
      - name: config
        configMap:
          name: cloudflared-config
      - name: creds
        secret:
          secretName: cloudflared-cert
Apply the deployment:
kubectl apply -f cloudflared-deployment.yaml
kubectl get pods -n cloudflare
4. Deployment Architecture

Key Configuration Points:
- Services use
ClusterIPtype (not LoadBalancer or NodePort) - Hostname-based routing in tunnel config
- Catch-all
http_status:404rule prevents accidental exposure - Single cloudflared pod can route to multiple services
4. DNS Configuration
Option 1: Individual CNAME Records
In Cloudflare Dashboard, add a CNAME for each subdomain:
jellyfin→92e9e906-7554-4b35-bf7d-39a76d05f1cb.cfargotunnel.comgrafana→92e9e906-7554-4b35-bf7d-39a76d05f1cb.cfargotunnel.com- Enable proxy (orange cloud icon) for each
Option 2: Wildcard CNAME (Recommended)
Use a single wildcard record to handle all subdomains:
- Type:
CNAME - Name:
*(wildcard) - Target:
92e9e906-7554-4b35-bf7d-39a76d05f1cb.cfargotunnel.com - Proxy: Enabled (orange cloud)
With wildcard DNS, you only need to update the ConfigMap when adding new services—no DNS changes required. The tunnel configuration handles routing based on hostname matching.
SSL/TLS Settings:
- Encryption mode: "Full"
- Enable "Always Use HTTPS"
- Enable "Automatic HTTPS Rewrites"
5. Resource Requirements
The cloudflared pod is lightweight and can handle routing to dozens of services across multiple namespaces with minimal resource consumption.
Deployment Options Beyond Kubernetes
While Kubernetes is a popular deployment platform, Cloudflare Tunnel works with any infrastructure:
Docker Deployment: Run cloudflared as a Docker container alongside your applications. Mount the config file and credentials, and it works identically to Kubernetes.
Bare Metal / Systemd: Install cloudflared directly on a server and run it as a systemd service. Perfect for traditional server deployments or VMs.
Cloud VMs: Deploy cloudflared on any cloud provider's virtual machine. The outbound-only connection works regardless of your infrastructure provider.
The configuration format remains the same across all platforms—only the deployment method changes. This flexibility makes Cloudflare Tunnel suitable for any environment, from home labs to enterprise data centers.
Performance Benefits
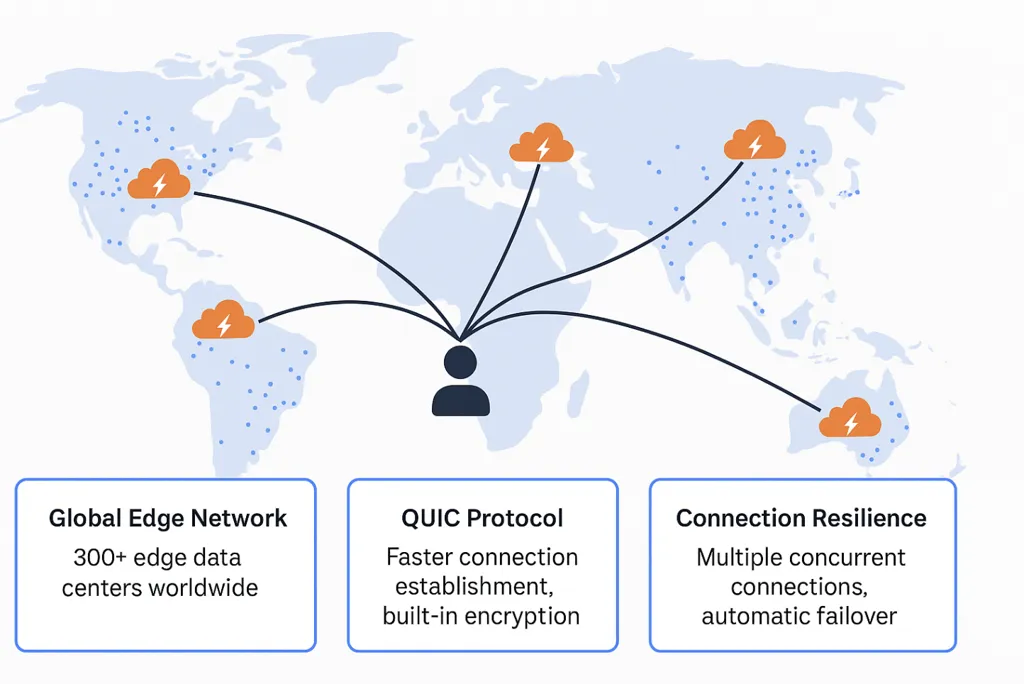
Global Edge Network: Cloudflare operates 300+ data centers worldwide. Users connect to the nearest edge location, reducing latency significantly.
QUIC Protocol: Provides faster connection establishment, improved performance on unreliable networks, and built-in encryption.
Connection Resilience: Multiple concurrent connections (typically 4) to different edge locations ensure automatic failover with zero downtime.
Cost Comparison
Cloudflare Tunnel eliminates infrastructure costs while providing superior security posture. Traditional solutions require VPN infrastructure, certificate management, or cloud load balancers—all of which add cost and operational overhead.
Best Practices
Credential Security: Never commit credentials to version control. Always store tunnel credentials as Kubernetes Secrets.
Network Isolation: Use ClusterIP service types for all applications exposed through the tunnel. This ensures services are only accessible within the cluster and through the tunnel.
Monitoring: Monitor the cloudflared pod health and set up alerts for tunnel failures. Check logs regularly to ensure connections are active.
Access Control: While Cloudflare Tunnel provides network security, applications should still implement proper authentication. For sensitive services, consider Cloudflare Access for additional authentication layers.
Conclusion
Cloudflare Tunnel represents a paradigm shift in how we expose applications to the internet. By eliminating inbound ports, automating certificate management, and providing enterprise-grade security features at no cost, it solves the fundamental security and operational challenges of traditional reverse proxy setups.
The free tier provides everything most organizations need: up to 1,000 tunnels per account, automatic SSL/TLS, DDoS protection, and global edge network access. Whether deploying on Kubernetes, Docker, bare metal, or cloud VMs, Cloudflare Tunnel provides the same security and performance benefits. With wildcard DNS configuration, adding new services requires only a ConfigMap update—no DNS changes needed.
About KubeNine Consulting: We specialize in Kubernetes, Docker, GitHub Actions, Django, and Observability solutions. Visit kubenine.com to learn how we help organizations optimize their cloud infrastructure and reduce operational costs.