
On this page
Why HTTPS Matters and How to Enable It Using Certbot

Introduction
Securing your website is no longer optional, it’s a fundamental requirement. If your site is still operating over HTTP, it’s time to make the switch to HTTPS. This not only ensures data transmitted between your users and server is encrypted and secure, but also strengthens user trust, enhances brand credibility, and improves your site’s visibility in search engines.
Implementing HTTPS is straightforward with Certbot, it is a widely trusted tool that integrates with Let’s Encrypt to provide free SSL/TLS certificates. Certbot automates the entire process from certificate issuance to web server configuration, making it easy to protect your site with modern encryption standards in just a few minutes.
What is HTTPS
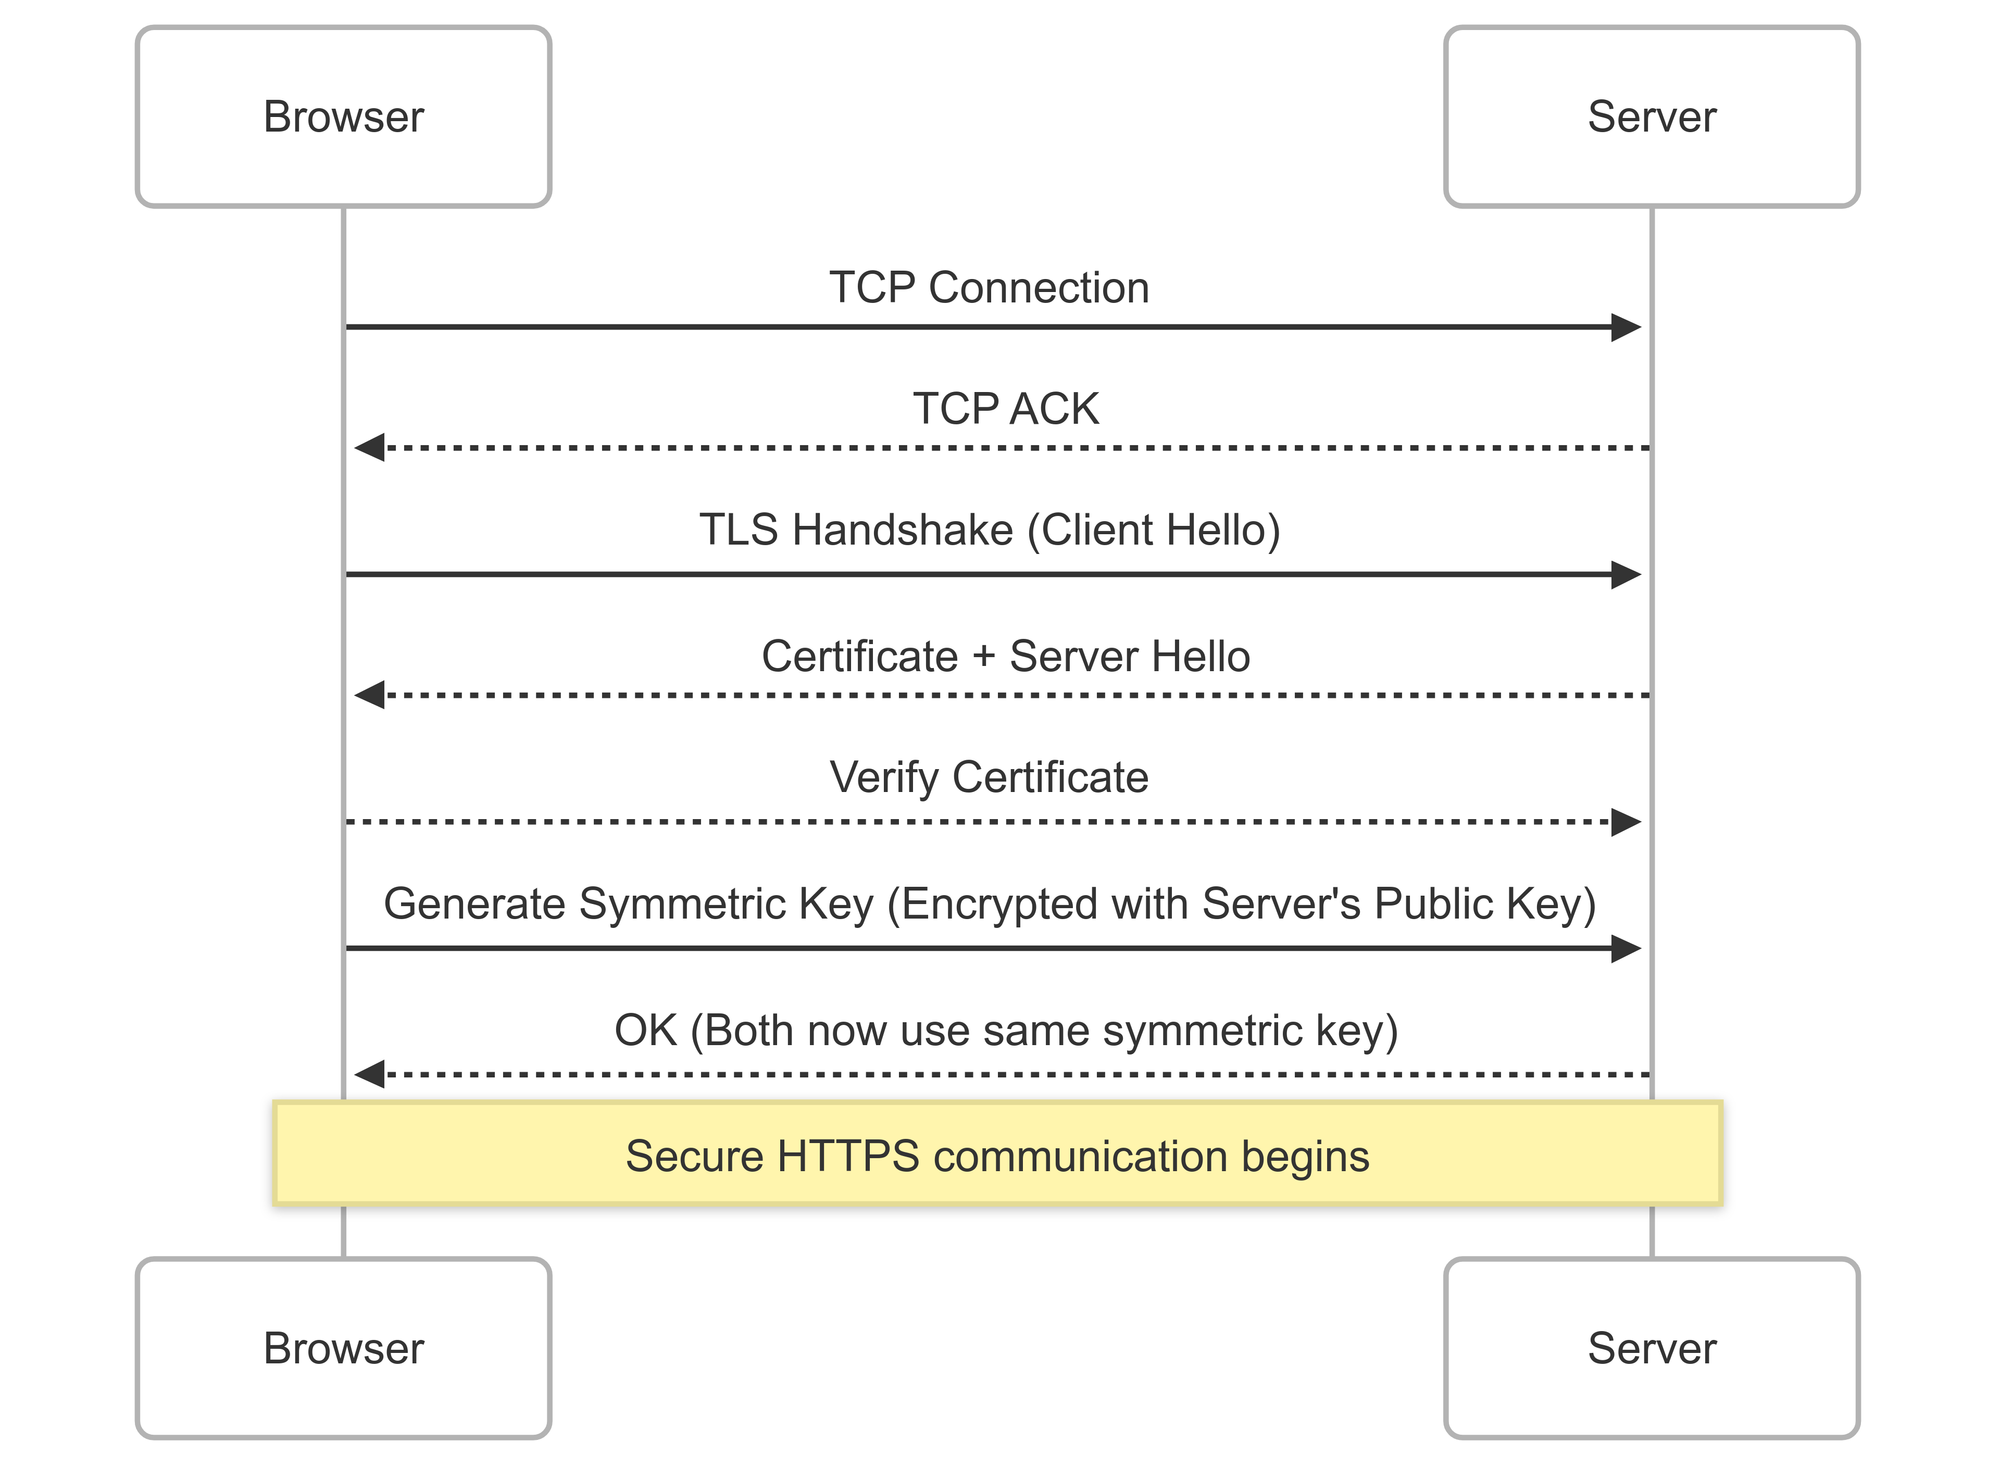
HTTPS stands for Hypertext Transfer Protocol Secure. In simple terms it is the encrypted version of HTTP. The big difference is:
- HTTP sends all your data unencrypted (anyone could intercept it).
- HTTPS encrypts the data using TLS (Transport Layer Security), so nobody can easily see or modify it while it's traveling between your device and the website.
- HTTPS provides Authentication your website’s identity
- HTTPS Improves SEO rankings and user trust
Secure Connection Flow:
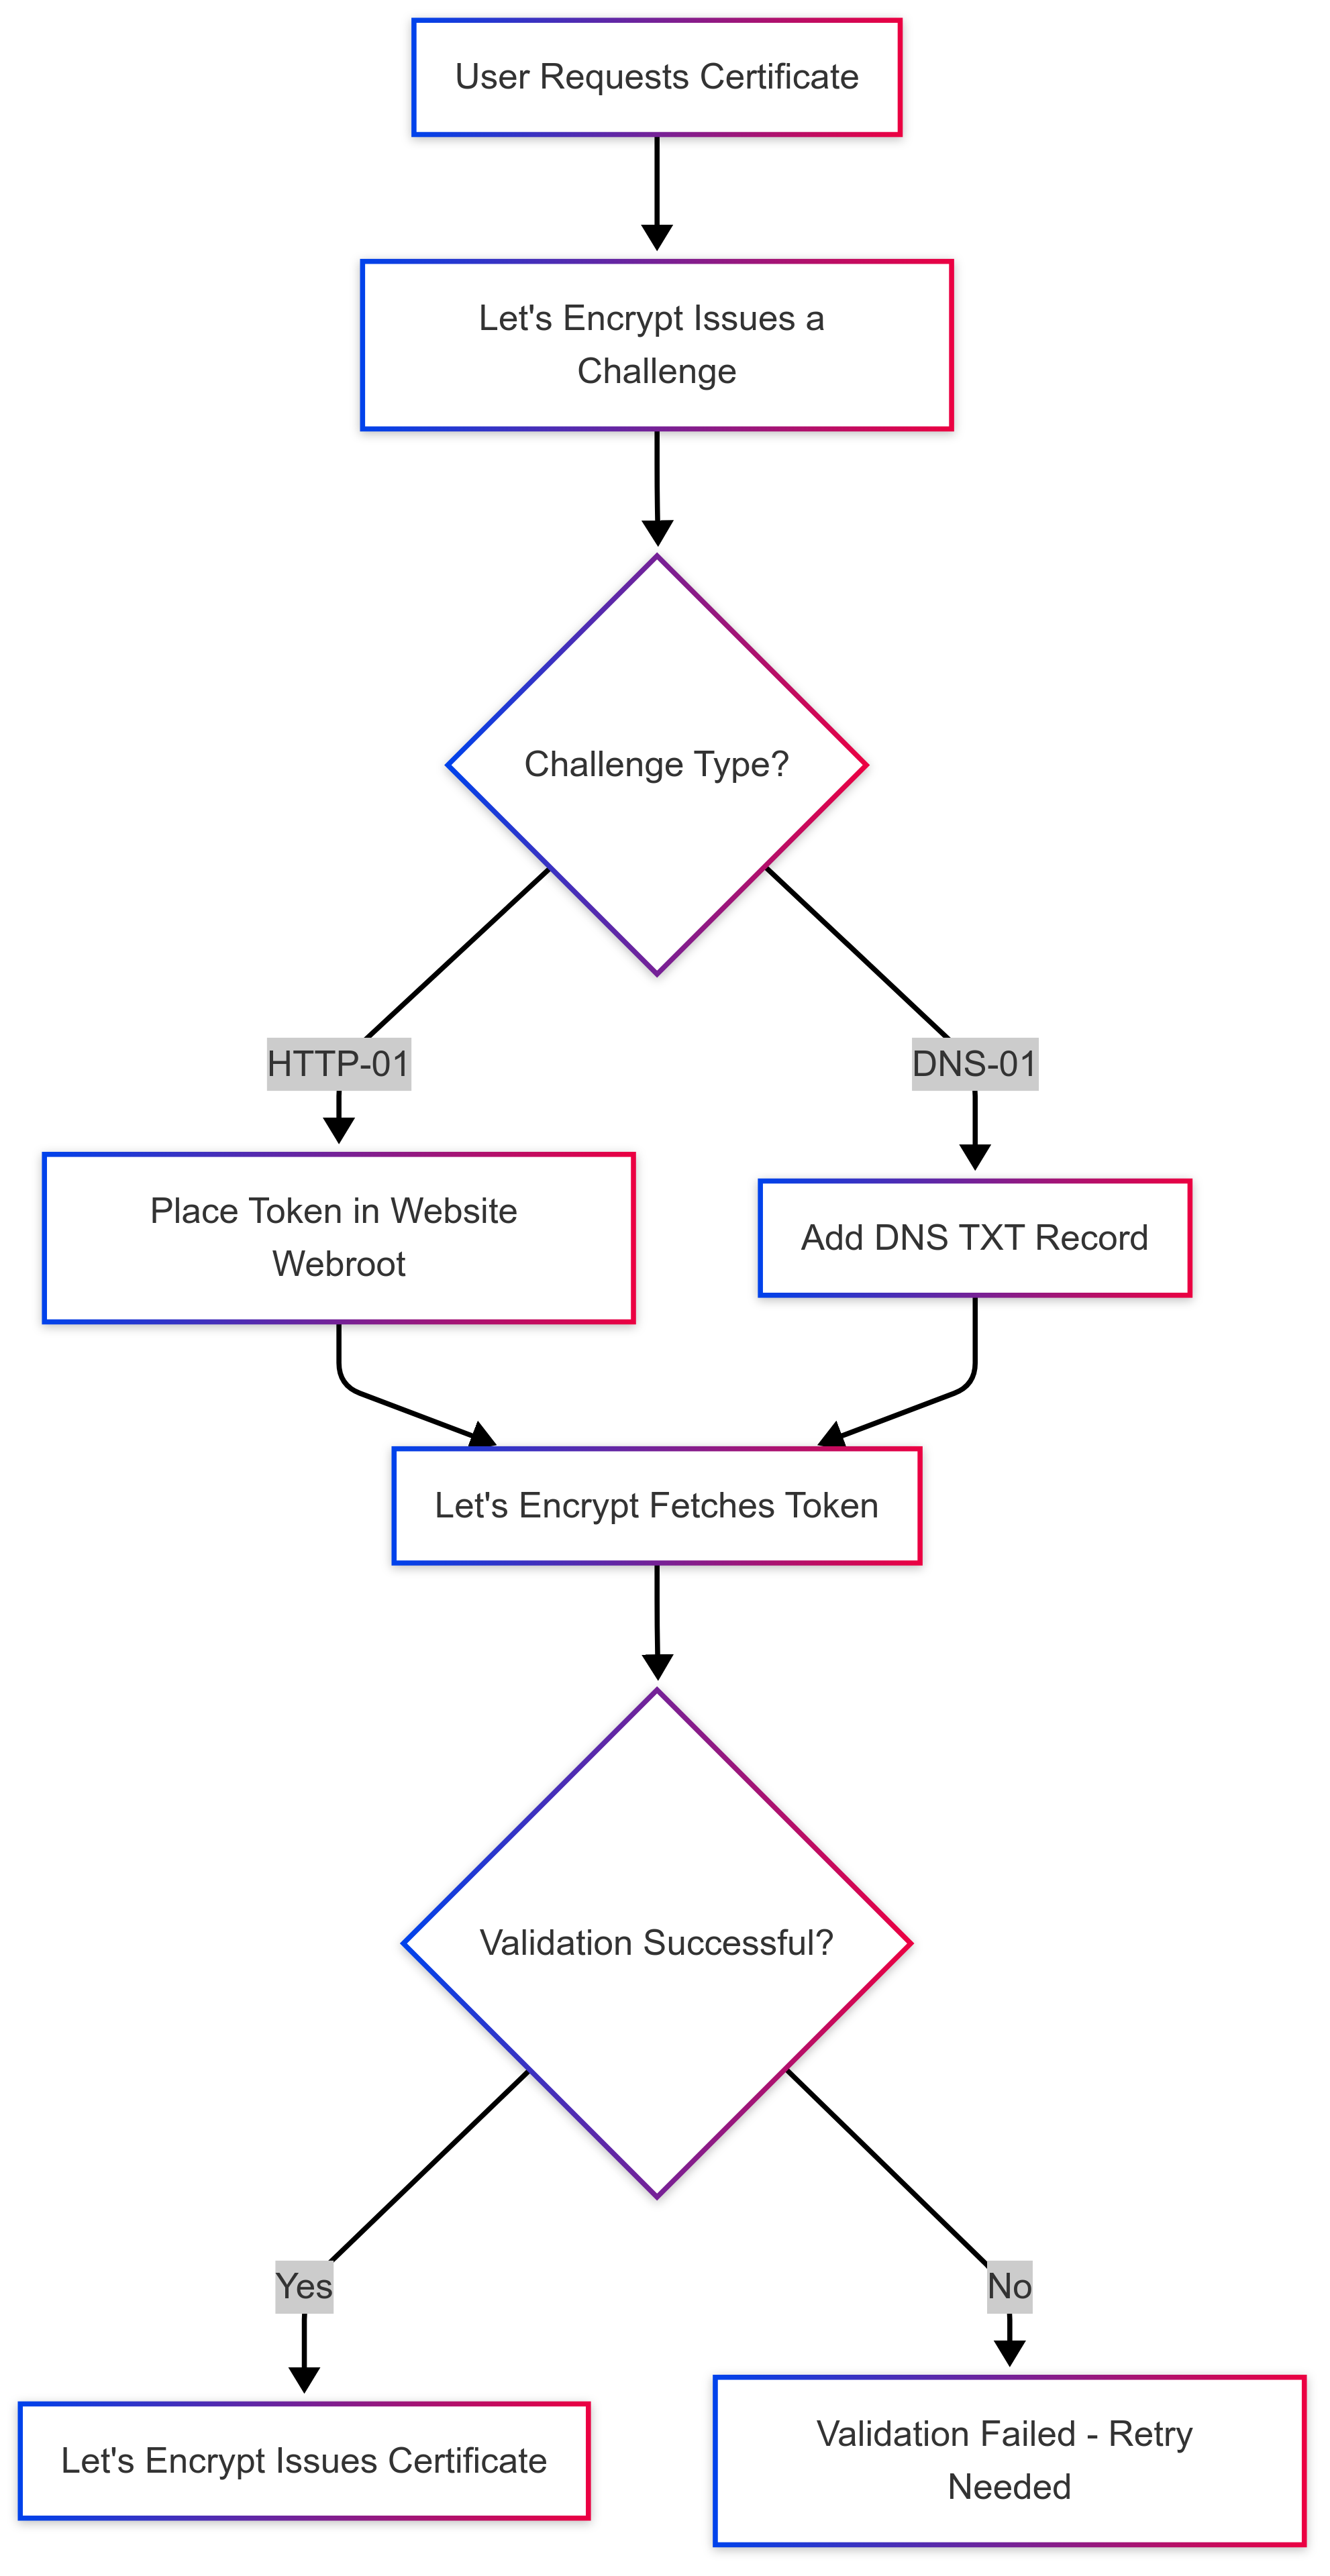
How Domain Validation Works
To issue a certificate, Let’s Encrypt must verify that you control the domain. Here’s how it works:
Request a Certificate
You (the website owner) run a tool like Certbot to request an SSL certificate.
Challenge Issued
Let’s Encrypt sends a challenge — a small test — asking you to prove you control the domain.
Respond to the Challenge
You respond by:
- HTTP-01 challenge: Placing a special token (file) at a specific URL on your website.
or - DNS-01 challenge: Adding a special DNS record to your domain's settings.
Let’s Encrypt Checks
Let’s Encrypt tries to fetch the token:
- If it finds the right response, it knows you control the domain.
- If not, validation fails.
Certificate Issued
Once verified, Let’s Encrypt issues the SSL/TLS certificate, and your site can serve traffic securely over HTTPS.
NGINX Before Certbot:
server {
    listen 80;
    server_name example.com;
    location / {
        root /var/www/html;
    }
}
Certbot’s Temporary Change:
location /.well-known/acme-challenge/ {
    root /var/lib/letsencrypt/;
    default_type "text/plain";
}
After Certbot Success:
server {
    listen 443 ssl;
    server_name example.com;
    ssl_certificate /etc/letsencrypt/live/example.com/fullchain.pem;
    ssl_certificate_key /etc/letsencrypt/live/example.com/privkey.pem;
    location / {
        root /var/www/html;
    }
}
How to Install and Run Certbot for Nginx
Setting up SSL on your server is quite easy, thanks to Certbot. Here’s how you can install Certbot and secure your Nginx server with a free SSL certificate from Let's Encrypt.
# Update Your Server
sudo apt update

# Install Certbot and NGINX plugin
sudo apt install certbot python3-certbot-nginx

# Make sure your domain points to the server
dig example.com

# Run Certbot
sudo certbot --nginx -d example.com
Certbot will now:
- Ask you for your email (for renewal notifications).
- Prompt you to agree to the terms of service.
- Let you choose which domains you want to secure.
- Update your Nginx configuration automatically to serve HTTPS.
Auto-Renewal Setup
Let's Encrypt certificates are valid for 90 days. Certbot can renew them automatically. You can test the renewal process with:
sudo certbot renew --dry-run If this test is successful, you're all set! Certbot will keep your certificates up to date automatically.
Troubleshooting Tips
- Ensure domain DNS records are correct
- Open ports 80 (HTTP) and 443 (HTTPS)
- If not using NGINX, use Certbot’s
--standalonemode
Frequently Asked Questions
1. What is Certbot and how does it work?
Certbot is a tool that automates the process of obtaining and installing SSL/TLS certificates from Let’s Encrypt, making it easy to enable HTTPS on your server.
2. Why should I enable HTTPS on my website?
HTTPS encrypts data between users and your server, improves security, builds trust, and can boost your search engine rankings.
3. Does Certbot automatically renew SSL certificates?
Yes, Certbot can automatically renew certificates before they expire (typically every 90 days), ensuring continuous HTTPS security.
4. What ports are required for Certbot to work?
Ports 80 (HTTP) and 443 (HTTPS) must be open for domain validation and secure communication.
Conclusion
So there you have it! An HTTPS secured website with just a few simple commands. Using Certbot and Let’s Encrypt makes it easy to keep your site secure and your visitors confident.
Read More from KubeBlogs
Docker Storage Full? Move It to an External Volume (Step-by-Step Guide)
https://www.kubeblogs.com/docker-storage-on-an-external-volume/
Run Streamlit Reliably in Production using Supervisor
https://www.kubeblogs.com/run-streamlit-reliably-in-production-using-supervisor/
Fix GCP 403 Permission Errors in Compute Engine VMs
https://www.kubeblogs.com/gcp-permissions-and-scopes-for-compute-engine-vms/
If you ever need a hand with SSL setups, cloud infrastructure audits, DevOps best practices, or just making sure everything runs smoothly behind the scenes, KubeNine is always ready to help.