
On this page
Implement Role-Based Access Control (RBAC) in FastAPI Using Keycloak
Learn how to implement RBAC in FastAPI using Keycloak. Secure APIs with JWT validation, role-based permissions, and clean authorization.

Introduction
Your FastAPI API works perfectly.Authentication is implemented. JWT tokens are valid.But here’s the real question:
Can a normal user access your admin endpoints?
If yes, your application is not secure.
This is a common mistake in many FastAPI applications—developers implement authentication but skip proper authorization. As a result, all authenticated users may end up having the same level of access.
Role-Based Access Control (RBAC) solves this problem by ensuring users can only access resources based on their assigned roles.
In this guide, we’ll implement RBAC in FastAPI using Keycloak, covering JWT validation, permission checks, resource-based access control, and admin bypass patterns.
The Real Problem
FastAPI makes it easy to authenticate users, but it does not enforce role-based authorization out of the box.
In many implementations:
- JWT tokens are validated
- Users are authenticated
- But roles are never checked
This creates a serious security gap where any authenticated user can access sensitive endpoints.
Authentication answers who the user is
Authorization controls what the user can do
Without proper RBAC, your API is only partially secure.
Step-by-Step Implementation
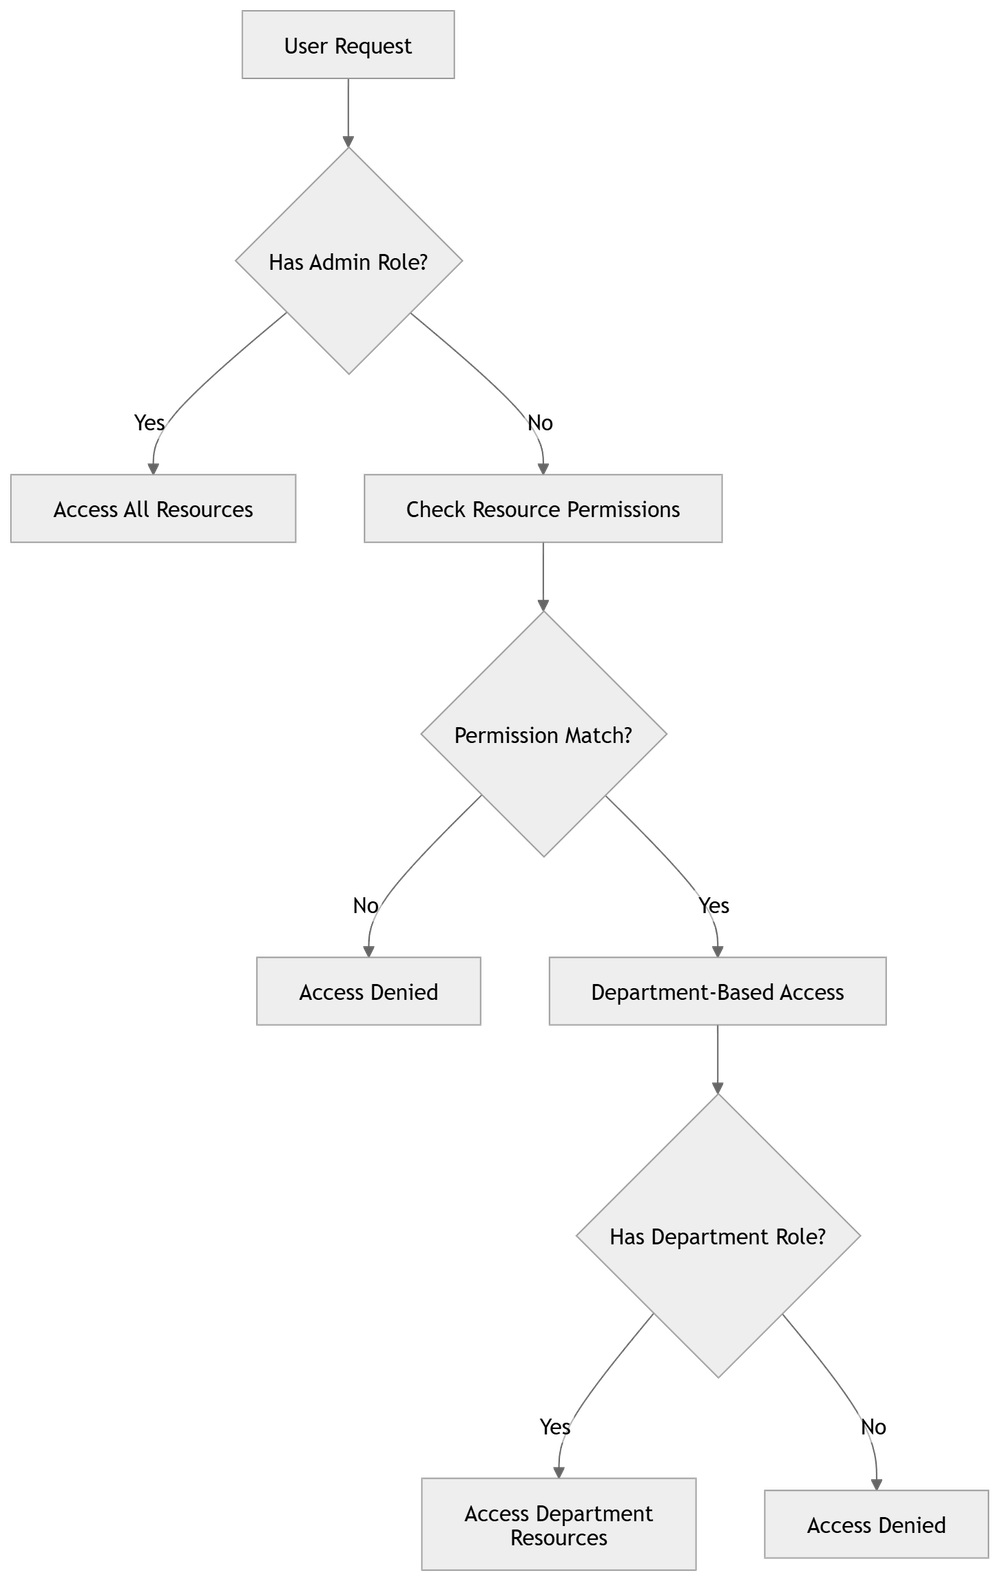
Architecture Overview
Before implementing RBAC, it's important to understand how authentication and authorization flow through the system.

Step 1: Keycloak Server Configuration
Before integrating with FastAPI, configure Keycloak with the required components: realms, clients, roles, and user attributes.
Create a Realm
- Log into Keycloak Admin Console
- Click Create Realm
- Enter a name (e.g.,
myapp)
Optional settings like user registration, email login, and fine-grained access can be enabled based on your use case.
Create a Client
- Navigate to Clients → Create client
- Configure:
- Client ID:
myapp-backend - Protocol:
openid-connect - Access Type:
confidential - Enable Standard Flow
- Enable Direct Access Grants
- Client ID:
Also configure redirect URIs and web origins.
Configure Client Credentials
- Go to the Credentials tab
- Copy the Client Secret
Store it securely using environment variables.
Set Up Roles
Define roles that your application will use.
Realm Roles
admin→ full accessuser→ standard access
Client Roles
reports:generatedata:readdata:writeusers:manage
Using a resource:action format keeps permissions consistent.
Configure User Attributes
For advanced access control, add attributes like department. This is useful for implementing scoped or multi-tenant access.
Configure Token Claims
Map user attributes into JWT tokens using mappers so they are available during authorization.
Assign Roles to Users
- Go to Users → Role Mappings
- Assign roles (realm or client)
- Add attributes if needed
Configure Token Settings
- Go to Realm Settings → Tokens
Adjust token lifespan and session limits. Shorter lifetimes are recommended for production.
Enable Token Introspection (Optional)
Token introspection allows real-time validation of tokens, ensuring revoked sessions are immediately invalid.
Once the application is configured, the next step is to structure how user data is handled inside FastAPI.
Step 2: Application Configuration
Configure Keycloak settings in your FastAPI application using environment variables. This keeps configuration secure and environment-specific.
```python
class Settings(BaseSettings):
    keycloak_server_url: str = "https://auth.example.com"
    keycloak_realm: str = "myapp"
    keycloak_client_id: str = "myapp-backend"
    keycloak_client_secret: str = ""  # From client credentials
    keycloak_issuer_url: str = "https://auth.example.com/realms/myapp"
    keycloak_verify_signature: bool = True
    keycloak_admin_role: str = "admin"
    enable_keycloak_auth: bool = True
```
The enable_keycloak_auth flag can be used to disable authentication in development environments.
Step 3: Keycloak User Model
Create a model to represent user data from JWT tokens. It extracts roles from both realm and client access.
```python
class KeycloakUser(BaseModel):
    sub: str
    email: str
    realm_access: dict | None = None
    resource_access: dict | None = None
    department: str | None = None

    def get_roles(self) -> list[str]:
        pass

    def has_role(self, role: str) -> bool:
        return role in self.get_roles()
```
The get_roles() method aggregates roles from multiple sources and supports attribute-based access.
Step 4: Authentication Dependency
Create a FastAPI dependency to authenticate users by extracting and validating JWT tokens.
```python
async def get_current_user(request: Request) -> KeycloakUser:
    token = extract_keycloak_token(request)
    user = decode_keycloak_token(token, settings.keycloak_issuer_url)
    return user
```
Token introspection can be used to verify that tokens are still active, even if they have not expired.
Step 5: Permission Checking
Implement permission checks with an admin bypass pattern.
```python
def has_permission(user: KeycloakUser, permission: str) -> bool:
    if user.has_role(settings.keycloak_admin_role):
        return True
    return permission in user.get_roles()
```
Admin users get full access, while regular users must have explicit permissions.
Step 6: Endpoint Protection
Protect endpoints using FastAPI dependencies that combine authentication and authorization.
```python
@router.post("/api/reports")
async def generate_report(
    user: KeycloakUser = Depends(
        require_permission("reports:generate")
    ),
) -> dict:
    validate_resource_access(user, request.department)
    # Endpoint logic
```
Unauthorized requests are automatically blocked, keeping endpoints secure and clean.
Common Issues
While implementing RBAC with FastAPI and Keycloak, developers often run into a few common problems:
- Roles not present in JWT token
- Using wrong role type (realm vs client roles)
- Token decoding issues
- Role name mismatch (case-sensitive)
- Missing backend role validation
Fixing these early helps avoid production issues.
Permission Structure
The RBAC system follows a structured permission model.
Insert Diagram Here (Permission Structure)
Permissions use the format:'resource:action'
This makes access control consistent and scalable.
Token Introspection
Token introspection verifies whether a token is still valid in Keycloak. This helps detect revoked sessions immediately and improves overall security.
Request Flow
The request flow includes:
- Request sent with JWT
- Token validated
- Roles extracted
- Permission checked
- Endpoint executed
Conclusion
Implementing RBAC in FastAPI using Keycloak is not just a best practice—it is essential for building secure APIs.
Authentication alone is not enough. Without proper role validation, your application remains vulnerable, even if users are correctly authenticated.
By combining Keycloak with FastAPI, you get:
- Centralized authentication and role management
- Clean and scalable authorization logic
- Secure, production-ready API endpoints
Always enforce authorization, not just authentication.
Once RBAC is properly implemented, your FastAPI application becomes significantly more secure, maintainable, and ready for real-world use.
FAQ
What is RBAC in FastAPI?
RBAC restricts API access based on user roles and permissions.
Why use Keycloak?
It centralizes authentication and authorization, reducing complexity.
What is admin bypass?
Admins can access all resources without permission checks.
What is token introspection?
It validates token status in real time.
How are permissions structured?
Using a resource:action format.
Read More on KubeBlogs
If you're exploring DevOps, Kubernetes, and cloud security, these guides will help you go deeper:
- How to Run Secure CI/CD Pipelines on Kubernetes
https://www.kubeblogs.com/self-hosted-github-actions-runner-on-kubernetes-using-helmfile/
- How to Manage Secrets Securely in Kubernetes
https://www.kubeblogs.com/simplifying-secret-management-in-kubernetes/
- How to Avoid Pushing Secrets into Docker Images
https://www.kubeblogs.com/how-to-avoid-pushing-secrets-into-docker-images-complete-security-guide/
These articles cover CI/CD security, Kubernetes best practices, and container security — essential for building secure production systems.