
On this page
Stop Breaking Your Database: Use SQLAlchemy and Alembic for Migrations
If your database migrations keep failing or breaking production, SQLAlchemy and Alembic can help you manage schema changes safely.

Introduction
Consider a scenario where you’re building a user management system for a web application. Initially, you might only need to store simple details like names and emails. But as your application expands, so does your database’s complexity.
You might want to add features such as user preferences, roles, or login histories. Each of these updates requires a change in the database structure, and handling these changes with raw SQL can be tedious and prone to errors.
This is where Object-Relational Mapping (ORM) and database migration tools come in. SQLAlchemy and Alembic are two Python libraries designed to streamline working with data and adapting your database as requirements evolve.
SQLAlchemy provides a way to interact with databases using Python code, while Alembic helps manage changes to the database structure consistently and safely.
In this blog, we’ll explore how SQLAlchemy and Alembic make data and database management simpler and more organized. Then, we’ll move into a hands-on project to see these tools in action, showing you how to set up and use SQLAlchemy and Alembic to create a flexible and maintainable database solution for your application.
Before we move on to setting up a project, let's clarify the key concepts and tools we'll be using: ORM (Object-Relational Mapping), SQLAlchemy, and Alembic.
What is ORM (Object-Relational Mapping)?
An Object-Relational Mapper (ORM) allows you to interact with a database using programming language objects instead of writing raw SQL queries. In other words, ORMs bridge the gap between database tables (relational data) and Python classes (objects), letting you manage data directly through Python code.

- Why Use an ORM?
- Abstraction: ORMs let you work with data as Python objects, so you don’t need to worry about SQL syntax.
- Clean and Readable Code: It makes code simpler and easier to maintain by reducing SQL statements.
- Cross-Compatibility: ORMs can work with different database types, making it easy to switch databases if needed.
In the Python ecosystem, two popular ORMs are SQLAlchemy and Django’s ORM. In this blog, we’re focusing on SQLAlchemy because it’s widely used for handling database interactions in Python projects.
What is SQLAlchemy?
SQLAlchemy is a powerful and flexible ORM for Python that allows you to interact with databases using Python code. It translates your Python code into SQL commands under the hood, meaning you can manage your data without writing raw SQL queries.
SQLAlchemy works well with databases like SQLite, MySQL, PostgreSQL, and Oracle, making it a popular choice for a wide range of applications.
- Benefits of SQLAlchemy:
- Pythonic Data Management: Instead of writing SQL, you can work with Python objects and methods.
- Supports Multiple Databases: SQLAlchemy is compatible with many databases, so you can switch between them if your project requirements change.
- Efficient and Organized: It makes handling complex relationships and large datasets easier by reducing repetitive code.
Example: To create a User table in SQLAlchemy, you would define it as a Python class, where each class attribute represents a column in the table:
from sqlalchemy import create_engine, Column, Integer, String
from sqlalchemy.ext.declarative import declarative_base
Base = declarative_base()
class User(Base):
    __tablename__ = 'users'
    id = Column(Integer, primary_key=True)
    name = Column(String)
    email = Column(String)
This code defines a users table with columns for id, name, and email. SQLAlchemy automatically maps this class to the database, allowing you to create, read, update, and delete records using Python objects.
What is Alembic?
As your application grows, so does your need to adjust the database schema — adding new columns, modifying existing ones, or even creating new tables. Alembic is a migration tool specifically designed to manage these schema changes over time. It works seamlessly with SQLAlchemy to track and apply changes to the database structure in a safe and consistent way.
- Why Use Alembic?
- Version Control for Your Database: Alembic keeps a record of each schema change, much like version control for code.
- Safe Schema Updates: Alembic allows you to apply or undo changes step-by-step, making it safer to experiment with schema modifications.
- Environment Consistency: Alembic ensures your database schema remains consistent across different environments, such as development, testing, and production.
Example: If you wanted to add an age column to the User table defined above, Alembic would generate a migration file containing the necessary SQL commands. This file can then be applied (or rolled back), ensuring a smooth and trackable change to the database schema.
Why Use SQLAlchemy and Alembic Together?
By combining SQLAlchemy and Alembic, you get a complete solution for managing data and schema changes in Python applications. Together, they offer several advantages:
- Simplified Data Management: SQLAlchemy’s ORM lets you handle data directly with Python objects, leading to cleaner, more maintainable code.
- Automated Schema Migrations: Alembic tracks and applies schema changes automatically, reducing the manual SQL work involved.
- Scalability: As your project grows, SQLAlchemy and Alembic can adapt to handle increasing data and schema complexity.
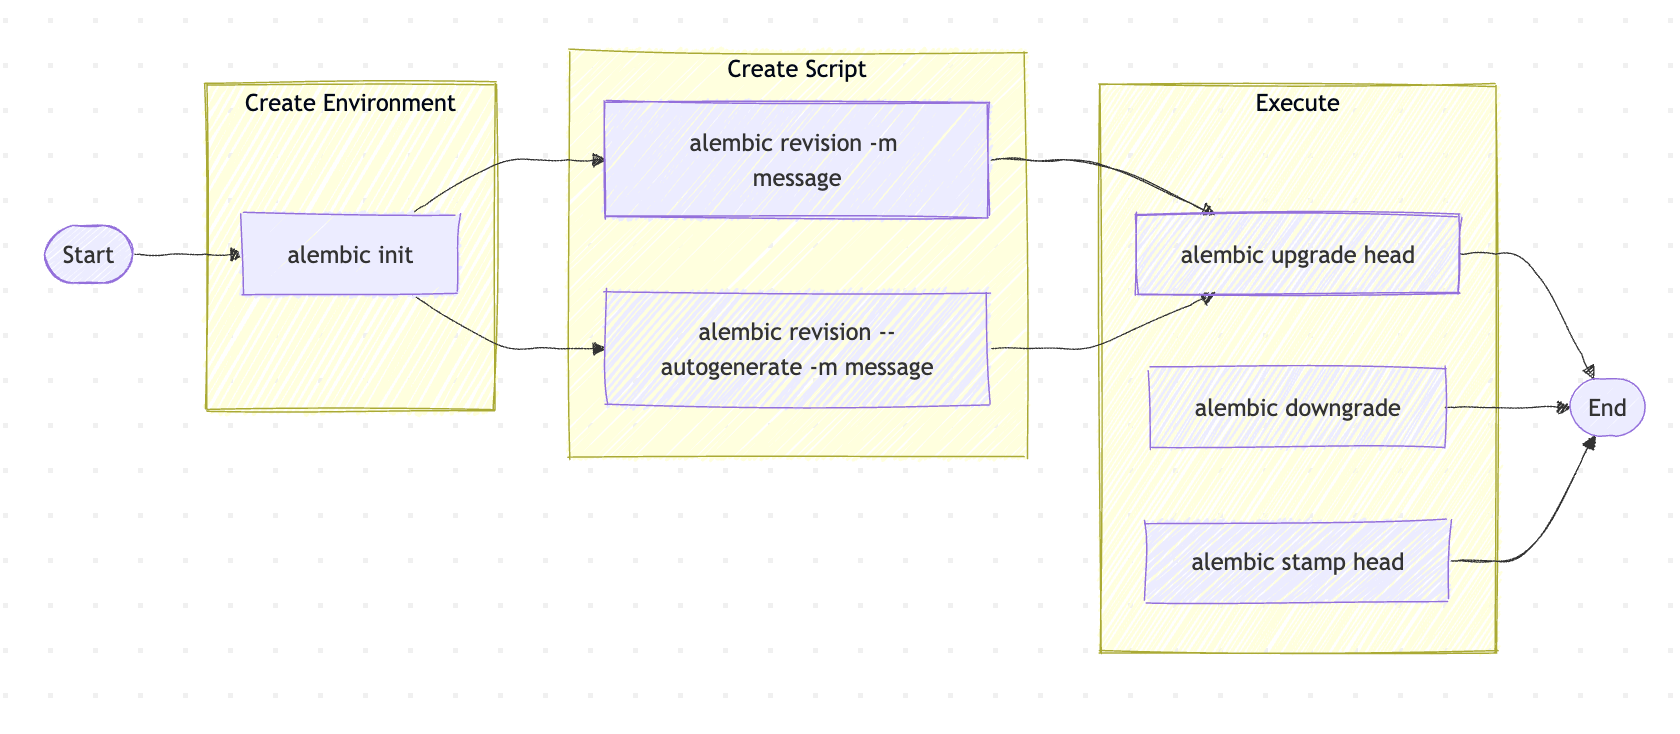
Hands-On Project - Setting Up SQLAlchemy and Alembic
This guide will walk through setting up a Python project with SQLAlchemy for database interactions and Alembic for managing schema changes. We’ll create a project that uses SQLite for simplicity and stores user data in a database table.
Step 1: Set Up the Project Environment
First, create a new directory for your project, initialize a virtual environment, and install SQLAlchemy and Alembic.
python -m venv venv
source venv/bin/activate
Next, install the required libraries:
pip install sqlalchemy alembicStep 2: Create the Project Structure
Organizing your project files from the start will make it easier to maintain. Here’s a suggested structure:
sqlalchemy_alembic_example/
│
├── alembic/             # Alembic folder for migrations
├── app.py               # Main application file
├── model.py             # Defines the database models
├── alembic.ini          # Alembic configuration
└── requirements.txt     # Stores dependencies
Step 3: Define the Database Structure with SQLAlchemy
In model.py, define your database structure. Here’s a basic User model:
# model.py
from sqlalchemy import create_engine, Column, Integer, String
from sqlalchemy.ext.declarative import declarative_base
from sqlalchemy.orm import sessionmaker

# Base class for all database models
Base = declarative_base()

# Define a simple User model
class User(Base):
    __tablename__ = 'users'
    id = Column(Integer, primary_key=True, autoincrement=True)
    name = Column(String(50), nullable=False)
    email = Column(String(100), nullable=False, unique=True)

# Database connection
DATABASE_URL = "sqlite:///./example.db"
engine = create_engine(DATABASE_URL)
SessionLocal = sessionmaker(autocommit=False, autoflush=False, bind=engine)
This code creates a User table with id, name, and email columns, which will be stored in an SQLite database.
Step 4: Initialize the Database
Create an app.py file to initialize the database and create the tables.
# app.py
from model import Base, engine

def init_db():
    Base.metadata.create_all(bind=engine)
    print("Database initialized.")

if __name__ == "__main__":
    init_db()
Running this script will create your SQLite database and the users table.
python3 app.py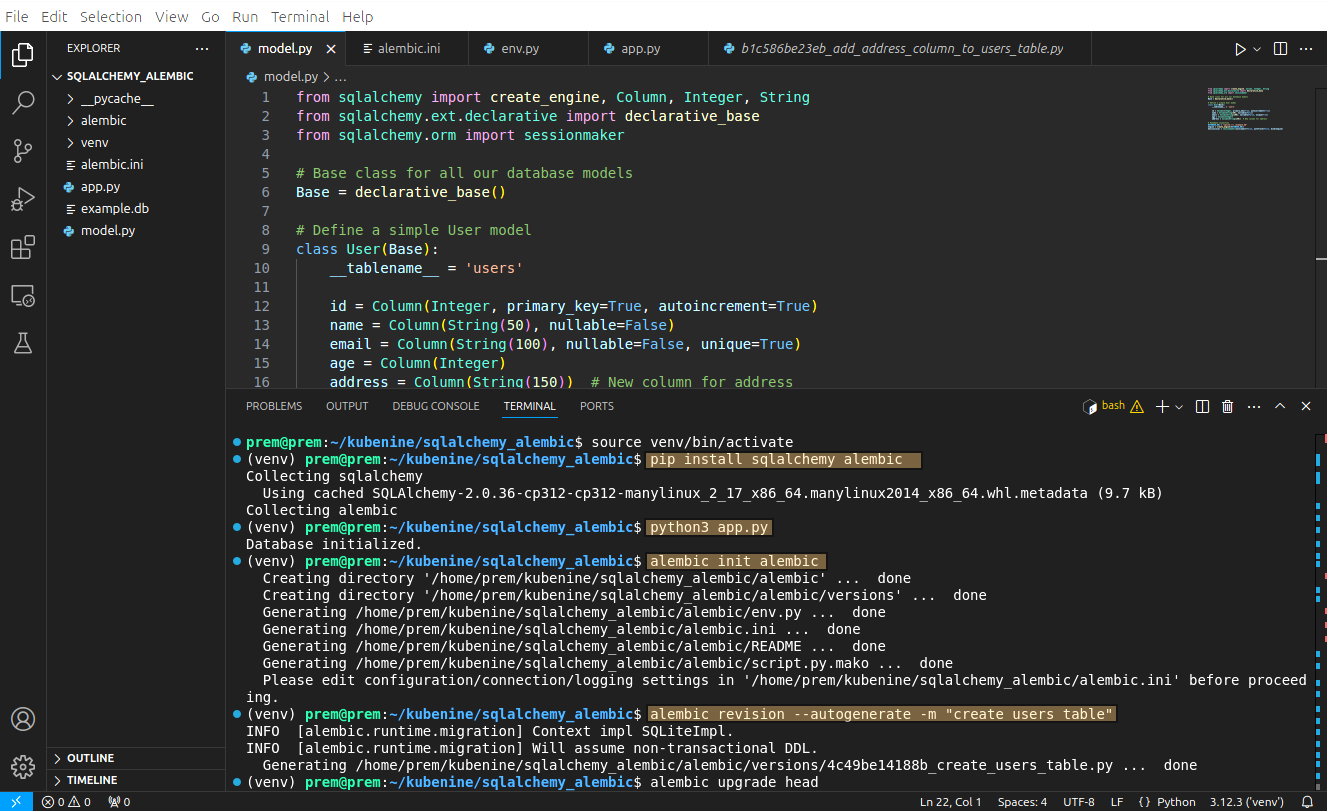
Step 5: Set Up Alembic for Database Migrations
Alembic will help us track and apply database schema changes as our project evolves. Start by initializing Alembic in your project:
alembic init alembicThis creates an alembic folder and a configuration file, alembic.ini.
Configure Alembic
In alembic.ini, set the SQLAlchemy URL to point to your SQLite database:
# alembic.ini
sqlalchemy.url = sqlite:///./example.db
Next, open alembic/env.py and set Alembic’s target metadata to your model’s metadata so it knows the database structure.
# alembic/env.py
from model import Base
target_metadata = Base.metadata
Step 6: Create Your First Migration
Let’s create a migration to track the creation of the users table.
Run the following command to generate a migration:
alembic revision --autogenerate -m "create users table"This command creates a new migration file in alembic/versions/. To apply the migration and update your database schema, run:
alembic upgrade headYour users table is now created in the SQLite database.
Step 7: Updating the Database Schema with Migrations
Let’s say you want to add an age column to the users table. Update the User model in model.py to include this new field.
class User(Base):
    __tablename__ = 'users'
    id = Column(Integer, primary_key=True, autoincrement=True)
    name = Column(String(50), nullable=False)
    email = Column(String(100), nullable=False, unique=True)
    age = Column(Integer)  # New field
Next, create a new Alembic migration:
alembic revision --autogenerate -m "add age column to users table"This will detect the new column and generate a migration to add it to the users table. Apply the migration by running:
alembic upgrade headNow, your database is updated with the new age field!
Step 8: Adding and Retrieving Data with SQLAlchemy
Finally, here’s an example of how to add and retrieve data from the users table. Update app.py to include these functions:
# app.py (continued)
from model import SessionLocal, User

def create_user(name, email, age):
    session = SessionLocal()
    user = User(name=name, email=email, age=age)
    session.add(user)
    session.commit()
    session.close()
    print(f"User {name} added.")

def get_users():
    session = SessionLocal()
    users = session.query(User).all()
    session.close()
    return users

if __name__ == "__main__":
    init_db()
    create_user("Alice", "alice@example.com", 30)
    users = get_users()
    for user in users:
        print(f"User {user.name}, Email: {user.email}, Age: {user.age}")
Running this code will add a user and print all users in the database.
Alembic Commands in Action
The following screenshots demonstrate the use of key Alembic commands that manage database migrations:
1. Alembic Upgrade Command (alembic upgrade head)

In this screenshot, the alembic upgrade head command is being executed. This command upgrades the database schema to the latest migration. The output shows the transition between versions, specifically upgrading from version 4c49be14188b to e6a077a2804d, which added an age column to the users table.
2. Alembic Downgrade Command (alembic downgrade)

The next screenshot shows the execution of alembic downgrade e6a077a2804d. This command downgrades the database schema to a previous migration. In this case, it reverts back to the state after adding the age column to the users table.
3. Alembic History Command

Here, the alembic history command is executed, which displays the entire migration history of the database. The migrations are listed in order, showing their unique identifiers and the migration message, such as add address column to users table and create users table.
- Alembic Current Command

Finally, the alembic current command shows the current state of the database. In this screenshot, the database is currently at migration e6a077a2804d, which corresponds to the addition of the age column to the users table.
(Optional)
Step 1:Now Adding a Recording System(another model) to Our Python Project with SQLAlchemy
Let’s add a second model called Record, which will represent a table named records. This table can store basic information about recordings, such as title, duration, and date created. Here’s how the updated model.py and app.py files will look with this new Record model:
Updated model.py with the Record Model
# model.py
from sqlalchemy import create_engine, Column, Integer, String, DateTime
from sqlalchemy.ext.declarative import declarative_base
from sqlalchemy.orm import sessionmaker
from datetime import datetime

# Base class for all database models
Base = declarative_base()

# Define the User model
class User(Base):
    __tablename__ = 'users'
    id = Column(Integer, primary_key=True, autoincrement=True)
    name = Column(String(50), nullable=False)
    email = Column(String(100), nullable=False, unique=True)
    age = Column(Integer)
    address = Column(String(100))

# Define the Record model
class Record(Base):
    __tablename__ = 'records'
    id = Column(Integer, primary_key=True, autoincrement=True)
    title = Column(String(100), nullable=False)
    duration = Column(Integer)  # Duration in seconds
    date_created = Column(DateTime, default=datetime.utcnow)

# Database connection
DATABASE_URL = "sqlite:///./example.db"
engine = create_engine(DATABASE_URL)
SessionLocal = sessionmaker(autocommit=False, autoflush=False, bind=engine)
This Record model represents a records table with the following columns:
id: A primary key with auto-increment.title: The title of the recording (required).duration: The duration of the recording, stored as an integer representing seconds.date_created: The date and time the record was created, automatically set to the current UTC time.
Updated app.py to Add and Retrieve Records
Now we’ll add functions in app.py to create sample Record entries and fetch all records.
# model.py
from sqlalchemy import create_engine, Column, Integer, String, DateTime
from sqlalchemy.ext.declarative import declarative_base
from sqlalchemy.orm import sessionmaker
from datetime import datetime

# Base class for all database models
Base = declarative_base()

# Define the User model
class User(Base):
    __tablename__ = 'users'
    id = Column(Integer, primary_key=True, autoincrement=True)
    name = Column(String(50), nullable=False)
    email = Column(String(100), nullable=False, unique=True)
    age = Column(Integer)
    address = Column(String(100))

# Define the Record model
class Record(Base):
    __tablename__ = 'records'
    id = Column(Integer, primary_key=True, autoincrement=True)
    title = Column(String(100), nullable=False)
    duration = Column(Integer)  # Duration in seconds
    date_created = Column(DateTime, default=datetime.utcnow)

# Database connection
DATABASE_URL = "sqlite:///./example.db"
engine = create_engine(DATABASE_URL)
SessionLocal = sessionmaker(autocommit=False, autoflush=False, bind=engine)
Explanation of Changes
RecordModel: Added aRecordmodel tomodel.pywith fields fortitle,duration, anddate_created.- Functions for Record Management: Added
add_sample_recordandget_all_recordsfunctions inapp.pyto insert and retrieve records from therecordstable. - Sample Data: Added sample data entries for both
UserandRecordmodels to demonstrate the functionality.
Step 2: Generate a Migration for the New Model
With the new Record model defined, we need to generate a migration file that Alembic will use to add this model’s table to the database. Run the following command to create a new migration:
alembic revision --autogenerate -m "Add Record model"Alembic will analyze the differences between the models defined in your code and the current database schema, then generate a migration file. You’ll find this file in the alembic/versions/ directory. It should contain SQL statements to create the records table based on the Record model you added.
Step 3: Apply the Migration
Now that you’ve generated and reviewed the migration, it’s time to apply it to the database. Run the following command to execute the migration and add the records table:
alembic upgrade headThis command will apply all migrations up to the latest one (referred to as head), ensuring your database schema is synchronized with your models.
Conclusion
Using SQLAlchemy and Alembic together provides a strong foundation for managing data and database schema changes in Python applications. SQLAlchemy’s ORM allows you to interact with data using Python objects, making code more intuitive and maintainable. Meanwhile, Alembic simplifies schema changes, allowing you to track and apply them smoothly as your project evolves.
But we know that implementing these solutions, especially in larger, cloud-based environments, can feel overwhelming. That’s where KubeNine comes in. If you’d rather focus on developing your product and leave the infrastructure to the experts, we’re here to help.
At KubeNine, we specialize not only in data management but also in DevOps, Kubernetes, AWS, and a full suite of cloud services. Our team can manage all aspects of your cloud and DevOps needs, so you can scale confidently without the stress. Let us handle the complexities so you can focus on what you do best—building great products.